Okay, not intended to be a personal question. Over on one of the Yahoogroups I frequent,
Power Team, there's been a discussion related to the groups filled-up photo albums, and what to do about it. I made the statement that most people don't care to learn the technicalities of managing the size of their image files. Somebody called me on it, so here I am, giving you a chance to learn a little more about this esoteric subject, if you're interested.
Fact is, the issue of image sizes is often counter-intuitive. We're used to "megapixels" as marketing speak, but most of us have very little idea how images are stored in our cameras (and in turn on our computers), or why a picture from one 6-megapixel camera can look much better than another 6-megapixel camera.
Okay, I don't intend to get side-tracked into a camera discussion, but if you follow and understand what I tell you here, it does apply to your camera and may help you better understand how to use its features.
I'll try to keep things simple and non-technical, and that means (for you techheads out there) that I may make some simplifications and generalizations about things. Just relax and cut me some slack. If what I say here isn't always absolutely true, most of the time it's true enough.
As I said, the number of pixels that a camera can detect doesn't always translate into a better image. Likewise, two images on your computer of the same absolute size (say 800 pixels wide, and 600 pixels tall) may have much different file sizes. In both cases, the major issue is something called
file compression.Okay, you've probably noticed in one way or another that image files take up a lot of memory (space on your camera's memory card, space on your hard disk, and so on). What you maybe don't know is that it could be much worse. Almost every image on your computer and in your camera uses some form of compression to make it smaller than it would be otherwise.
What is an image file?To understand how an image file is compressed, you need to understand first what an image file is.
I used the word
"pixel" back there and took it for granted that you'd know what I was talking about, but I'm not sure that's a safe assumption. In general terms, a pixel is a dot. Each dot has characteristics of color and brightness that are recorded in digital form (those ones and zeros you keep hearing about, which can be ignored for our purposes) on your camera or computer. Depending on the type of file and the options chosen, various amounts of information can be stored for each pixel.
The simplest kind of image just has two conditions for the pixel, on (white for instance) and off (which could represent black). But in this day and age, it's rare to see an image that doesn't have color. Some images have just a few colors available. Most photos have a LOT.
Think of it as box of crayons. If you have a box of eight crayons, you're pretty limited in how realistic a picture you can draw. If you have 256 crayons, you'd be able to draw a better picture. Well, many of the images you have on your computer have tens of thousands of crayons to chose from, and most images will use a fair percentage of those. The more crayons you've got, the more information has to be recorded to show which crayon is used to draw any given pixel.
So in basic terms, an image file is something like this.
Pixel 1 (Starting in the upper left hand corner): Pixel 1 is color 11,320 from our box of about 32,000.
Pixel 2 (the next pixel in the top row, but one to the right of pixel 1): Pixel 2 is color 11,321 from our box of about 32,000.
And so on, repeated (in our 800 x 600 example image) 800 times, until we skip down to the left of the second row, and repeat, the whole process repeating 600 times until you reach the bottom right of the picture.
So in a raw, uncompressed file, file size is pretty simple. It's the amount of space each pixel takes up multiplied by the number of pixels. Two pictures of the same size will be the same size, no matter if one is of a blank, white, wall, and the other is of a forest. That's simple, but it's wasteful of storage space, and as I said, image files are inconveniently large. Anything we can do to make them smaller is a good thing. But how do you make the file smaller, without making the image itself smaller?
Squeezing it Down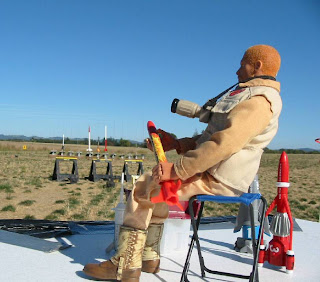
The funny thing about pictures is that, while a picture may have a lot of pixels, in many images a lot of those pixels are in patches that are exactly the same, and if they aren't the same, they're darned similar. For example, image a picture of your favorite GI Joe sitting on a table outside. Below him is grass and other "ground clutter," but behind him is a clear, blue sky.
Imagine looking at a pixel in the middle of that sky. Let's just call it's color, "blue." Maybe the next pixel to the left is the same blue, and the one beyond that just a TINY bit lighter blue, and the next beyond that back to the original blue again. In fact, you could go a fair distance in any direction from our pixel, and no be able to find a color that was much different than that original pixel.
Sure, some of them are different, but most are so close that they're difficult or impossible to tell apart with the naked eye. If you can't tell them apart, then the computer (or camera) is wasting a lot of space storing information that really doesn't serve much of any purpose. A computer (or the software built into a camera) could look at those similar colors and decide they were too close to tell apart, and set them all to one, average color.
Having turned a bunch of
almost identical colors into
really identical colors, imagine that, instead of storing "pixel 1, pixel 2, pixel 3" we could instead store "starting 100 pixels from the left and 120 pixels down there's a rectangle. It's 150 pixes tall and 500 pixels wide, and all those pixels are color 11,320 of around 32,000, AKA 'blue.'" We just defined 50,000 color pixels with one sentence. In computer terms, we just saved a butt-load of storage space.
Okay, now imagine the software takes your entire picture and divides it into a whole bunch of rectangles, and defines each one in the same way. Some of those rectangles, say a piece of blue sky, or a white-washed wall, or the big yellow side of the Mobile Support Vehicle may be pretty large, and defining them will save a ton of space.
But other rectangles will be smaller, say the skin on a cheek between the eye and the crease around somebodies mouth, or the middle part of an orange on a table, or the white in a little patch of cloud floating in that blue sky. Defining those areas will still save space, but not nearly so much. It may take just as much storage space to define an area 10 x 50 pixels as it does for one 100 x 500. Some places on the image, in a bed of gravel, or a patch of grass, or in the leaves of a tree, or in uncle jack's herringbone sports-jacket, the rectangles may get so small that it isn't worth making them at all. You'll do just as well to record the individual pixels.
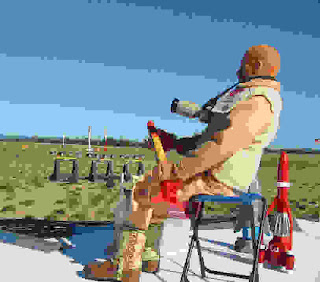
It's easier to see how this works if you look at an image that's been over-compressed to the point of looking "jaggy." Like this one. You might want to click on it for a closer look. Notice that a blue sky isn't just ONE shade of blue. There may be hundreds of shades in the original image. But maybe you can turn it into ten or twenty shades, and your eye usually won't notice. Even in our super-compressed example here, there are still four bands of different blue in the sky, but obviously you
do notice.
Notice the smaller blocky areas of the same color, the parts of his uniform, the table he's sitting on. Then look at the really "noisy" parts of the image, the grass, his his detailed boots, the rocket launch pads in the background. Of the total image size here, very little of it is that blue sky, or the white table top. Most of it is in those "dirty" areas. Life is in the details. So is file size.
Most cameras, and most photo editing programs on your computer will somewhere have options on how aggressively to compress images. More compression lowers quality, until you eventually get the "paint-by-numbers" mess you see above, but less compression means bigger file sizes. There's a happy sweet spot somewhere that you can live with. Generally, I go for less compression on the camera, but more compression when I save things for uploading from my photo-editing software (Paint Shop Pro, in my case). As long as you keep the original, high-quality images from your camera, you can then create all the cropped and compressed copies you need. The original is still there if you ever need it.
Dirty DetailsSo compact image sizes start in what you're taking pictures of. That doesn't mean you should never take a picture with grass or a tree (or your rough concrete driveway, or your hardwood floor). If that's part of what your picture is about, then do it. It's hard for the Adventure Team to have a jungle adventure without the jungle, for example.
But if, on the other hand, you're taking a picture of something to sell on EBay, you may not want to photograph it against you pin-striped sheets or sitting on top of your jelly-bean collection, because that isn't what the picture is about. All that clutter in the background is just wasted file space.
Bringing in the CropsOne easy way to reduce the file size of images before you upload them is to crop unnecessary stuff from the edges. Figure out what the picture is about, and cut off the rest. Yes, a well composed image is going to leave some open space around the subject, but when in doubt, crop.
The point here is not just to make the dimensions of the image smaller, though you'll probably do that. The point is that often the most "noisy" parts of an image (and thus the hardest to compress) are on the edges. For instance, in a picture of an action figures standing in the back yard, do you
really need all that grass on the bottom of the picture? It's kind of a law of nature. Gravity pulls clutter down to the bottom of the picture. Nature grows it up on the edges (plants, trees, mountains), and the atmosphere sometimes tosses it in at the top (clouds). The action figure or vehicle in the middle of the picture may be the easiest thing in the frame to compress. Cut off ten percent of the grass at the bottom, and you cut off thirty percent of the file size.
Size Does Still MatterI said that image size was not the biggest consideration to file size, but it is still a consideration. Just because your camera can record 5 megapixels doesn't mean you necessarily need to share them all with the world. In fact, if the intent is for people to look at it on their screen, the vast majority of that information is just going to be wasted.
If you learn nothing else, learn how to use your photo editing software to resize your images. Remember that you'll probably want to save the reduced-size image as a separate file, and keep your camera original untouched. Once you lose that information by saving a downsized image, you can't get it back. Yes, your paint program can resize the smaller image back to the original size, but it will end up looking like our blocky example about, and not your beautiful original.
How big should your images be? Well, probably no bigger than your average viewer's screen, and probably not even that. Remember that most web browsers clutter up the screen with scroll bars, menu bars, and so on. You just get the smaller space left in the middle. I'd say that 800 x 600 is a good "big" image size, and that many images can be much smaller. Remember that if you've cropped your image as I said, many will be tall and skinny, and some will be short and wide. Just resize it so that the width is no more than about 800, and the height no more than about 600, and you're pretty safe. Much larger than that is wasted on most people's screens, unless you think they'll need to be able to zoom in to view details for some reason (as might be the case in a "how-to" illustration, for example).
Reducing the size of the image, even a little, can be more important than you think. The information that makes up an image grows much faster than the linear dimensions do. For example, a raw 500x400 image doesn't have twice as much information in at as one 250 by 200, it has
four times as much. A 1000 x 800 image has 16 times as much information as one 250 x 200, and so on. Compression can offset that to some extent, and usually does, but when you can, smaller is better.
When creating web pages, a common mistake is to confuse options in your web editing software that set
display sizes for actually resizing the image. That is to say, somebody will upload a 5 megapixel camera image to their web site, and then tell their web-page editor to display it as a 100 x 200 pixel image on the user's screen. But they're still storing the full 5 megapixel image on their site, and every user who views the site his to download that huge file (with the bandwidth use that goes with it), even though it only displays as a tiny picture on their computer.
Always resize the image using a photo editor program to the final size, then upload
that file to your web page.
Goes Down Smooth (for advanced users)One other trick to reduce image file sizes is to remove some of the random noise that appears in images. Some of this noise can come from "grain" in the image. Noise like that can turn an empty sky or a solid color wall into a compression nightmare, but not add much of anything to the image. Likewise, all those pores and tiny wrinkles in your portrait are not only making you look old before your time, they're also making the image file way bigger.
One way to reduce this noise is simply to soften or blur the images, like when old Hollywood movies used soft-focus lenses to make aging actresses look better in close-ups. You can try this (usually using editing functions in your photo-editing software, not by changing camera focus), and there are sometime reasons to do it, but often this is throwing the baby out with the bath-water. You not only blur the solid areas of the image, but the lines and borders that separate them.
Some photo-editing programs have ways around this. For example, Paint Shop Pro has a function called an "edge preserving smooth." This effectively blurs the solid areas of an image that may contain useless noise, while keeping the lines and edges crisp and solid. It can take out your wrinkles and pores without turning your nose into a blob or your eyes into smudges. It can smooth the sand on a beach but still leave the ocean horizon a razor-sharp line.
The more creative among you may want to consider more labor-intensive methods, manually retouching parts of a picture, or selecting areas to blur or soften, but that's beyond the scope of the casual user making an average picture for upload.
As Big as it Needs to BeJust remember that your images, and your image files, should be just as large as they need to be to show your subject and deliver your message, and no more. Beyond that, trim the fat. Cut clutter off the edges of the image. Resize the images to be just a big as it needs to be, and no larger. Consider reducing noise and clutter that add nothing to your picture. Set your compression settings enough to reduce the size of your files without detracting from your delivered image.
Doing these things will save disk space, cut upload times, cut download times, reduce bandwidth charges, and make your web pages load faster. They'll make both you, and the people viewing your images, happier, and what's not to like about that?


