Showing posts with label How-to. Show all posts

Monday, November 24, 2008

Where does he get those wonderful toys?

I'm assuming that most anyone who would be reading this is familiar with my weekly photo comic, Minions at Work. MaW is created (mostly, some occasional photo manipulation is used to) using 1/6th scale action figures, sets, and props.

The other day, I got this note from Minions reader Phil M.:

I love your comics. I was wondering, where did you find all the scaled down items? most of them look like the correct scale for the "minion" you have. I have never seen trash cans, golf carts, etc.
Just wondering...


Fair, question, but one I figured only a fraction of Minions readers would be interested in. So rather than cluttering up their space with what would have to be a lengthy post, I decided to answer over here, at my seldom-used hobby blog, where it was more likely to be seen by interested parties (and where interested Minions readers would be able to find it).

So, just for starters, let's take a look at the latest cartoon (you can, by the way, click on any of these to view a larger version):


Okay, the pat answer to Phil's question is, "everywhere." I've spent several years obsessively building up huge collection of figures, set-pieces, props, and accessories. Some are made. Some are found as action figure or doll accessories. Some come from the most unlikely places.

So what I'm going to do is use some cartoons as examples, talk about where the various items in them came from, and use that to offer more general advice about where you might find things of your own.

Let's just kind of go left to right and discuss things as we find them.

Number Two is talking on a pretty nice phone. The phone is a modified kitchen magnet I found at a kitchen store. I had to do some cutting and modification to make the hand-set removable.

Since the set is non-magnetic, I stuck it to the wall temporarily using a putty-like reusable adhesive clay sold for mounting posters and the like. You can find it in most any office supply stuff, and it's good for a million and one things when making dioramas. It doesn't dry out, so I keep blobs of it stuck to the side of a cabinet adjacent to my "Minions" workbench/studio, ready for immediate use. Like I said, it's reusable, so when I pull down the blob holding the phone to the wall, it will go back up there for reuse.

In the foreground there are some sandbags. Those are accessories that come with "Power Team" military action figure play-sets. Since most of my Minions use Power Team bodies, I've bought a lot of those over the years. The bags are actually hollow plastic, and open on the back, and so only look good from the front. I almost threw them away at some point, but I'm glad I didn't.

Not only are they handy for giving a set that pseudo-military "lair" look, but the hollow backside is great for hiding battery-powered LED "puck" lights, which I often use to as blue fill-lights in my photo set-ups. Actually, there's a light hidden there, but I forgot to turn it on before shooting. Whoops.

The rats fighting on top of the bags are toy-store items, sold as part of line of clear plastic tubes carrying various plastic animals. Some tubes are sold with nothing but various colored rubber rats, and I've bought a bunch of these. Again, handy around the lair, and I use mostly the black ones, which most of the rats in the tubes are white or tan. Save those for the lab-scenes.

The broken table and green storage drum are also Power Team items. The table isn't broken. It just snapped together in the first place, so I just snapped it back apart to make it appear smashed. It will be good as new next time I need it.

You can't see it well here, but the cell door is scratch-built. It's made from foam core, cardstock, toothpicks (for bars in the window), craft store hinges, and a padlock-charm found in a bead store.

1/6th scale doors are hard to come by, and I should make some more in various styles.

The wooden crates were found in thrift stores. Crates like these are used as containers for gift-soaps, bath products, little jars of jelly and jam, and other such things. I think the fad for these may be over, but there are still zillions of them cluttering up grandma closets everywhere.

The trash cans also came from thrift stores. They're at once surprisingly common, and hard to find. They're made as promotional items and sold to garbage and recycling companies, usually imprinted with their logos. The idea is you use them for pencil cups, paper clips, and the company's number is on your desk next time you need trash service. I've managed to pick up maybe half-a-dozen different ones in various colors. I don't know ANY place to pick these up at retail, but if you really want one, calling up the various trash companies in your area might turn one up. Good luck explaining WHY you want it.

Okay, let's move onto another prop-intensive cartoon.


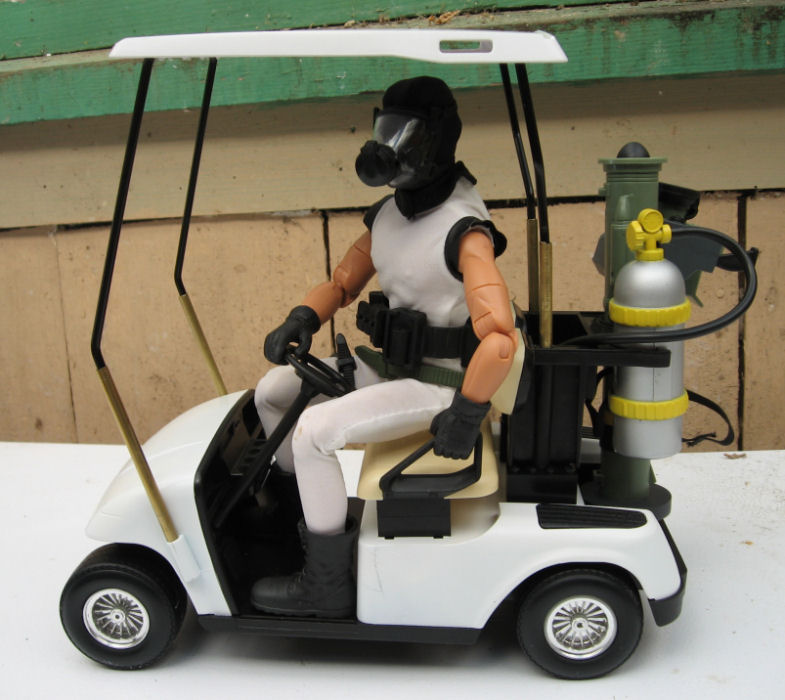
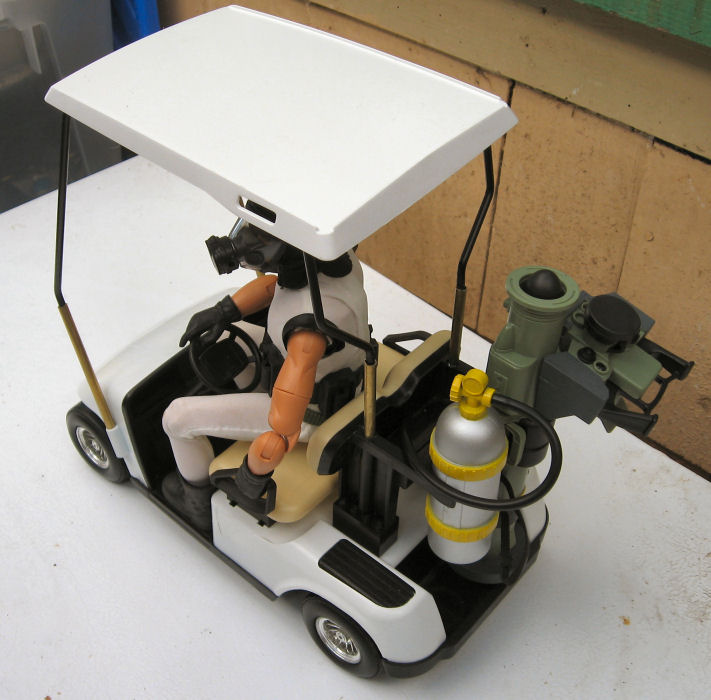
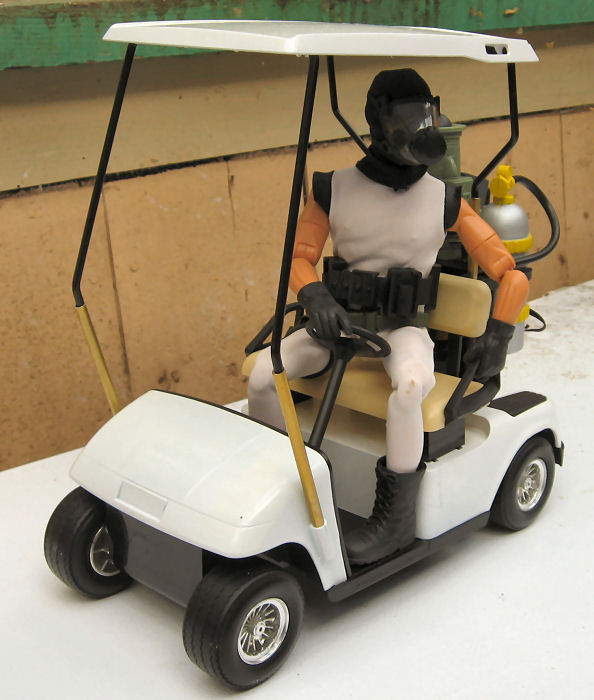
Phil mentioned the Minionmobile, so I had to include it. The Minionmobile is obviously a golf cart. It was sold as part of some die-cast vehicle line a few years back, and it's actually more like 1/8th scale, not 1/6th. The roof was way too low for a 1/6th figure, so I had to extend the metal rods that support the roof and raise the seat to allow for more leg-room. You can see details on how I did it here. It doesn't look bad, and actually, I think the "clown car" aspect adds a subtle bit of humor everywhere it appears.

The clips in the back are designed to hold golf bags, which were missing on my example of the golf cart (I saw it in stores, but mine came from a thrift store again). So, instead, we have a GI Joe anti-tank missile launcher back there, and a scuba tank from an 18" knock-off action figure sold at Wal-Mart a few years back. (I bought some on clearance with idea of making giants or monsters out of them.)

While this golf-cart may be hard to find (check eBay), there are alternatives. Wal-Mart sold an RC Yamaha Rhino 4-wheel ATV last year, and there's a golf cart in the current "High School Musical" fashion-doll line that has possibilities.

The traffic cones are Power Team items again, and I wish I had more of them. They're great little props.

The high-tech curbs are rails from an Imaginex building set I think. More thrift store finds. The nukes are actually launchers from a Quest Aerospace Micromax model rocket starter set. I bought a bunch of these on clearance a few years back, mainly for the rockets and motors. The launchers I didn't have much use for, until I noticed how much they did look like some kind of nuclear storage canister or warhead. Now they show up regularly in Minions at Work sets.

Now onto something that shows a whole variety of prop-sources:


Going left to right again:
The wonderful console is part of a "Muppets in Space" action figure playset from a few years back. I got a bunch of these very cheap on clearance, and they're just full of great parts and set pieces. The console was plenty big enough, but it was too low, so it's removed from its original base and mounted on an inverted plastic cup sold as a desk organizer.

You can see the edge of an arched doorway in the back. This is actually one of those "sold on TV" gizmos called a "Can-A-Round." They're white plastic tracks designed to allow you to slide cans of soda and beer around to the back of your fridge. Or something. Seems like a stupid idea to me, but when painted gray, they look like high-tech girders and bulkheads. I have two or three sets, and I use them all the time.

The back wall is foam-core board (office supply or craft store) painted silver. It's decorated with PVC plastic pipe from the hardware store, held on with metal clips, screws, and nuts, also purchased there. The louvered vents are sold as under-eave vents for home roofs. Lots of goodies can be found in the hardware store, if you browse everywhere, and thing of things in terms of form, not intended function.

The equipment rack in the background is another one of those wooden gift crates I mentioned earlier. I painted it black, and stuffed it with a variety of military field radios (Hasbro GI Joe, Power Team, 21st Century toys), again, repainted and detailed using hardware spray paints and craft acrylic paint.

The chairs are all fashion doll items. Fashion doll lines are good sources for furniture and household items, though they often need repainting (lots of pink). Barbie, Bratz and My Scene lines are all good sources of stuff.

The table is thrown together. The top is just a piece of scrap wood put in as packing material in an "assemble it yourself" bookcase I bought a while back. The pedestal bases are a couple of curtain hardware things I spotted at the thrift store (form, not function, again). The top is held on with more of that poster putty stuff.

The top of the podium is a doll-house item. Standard doll-houses are 1/12th scale, half the size of 1/6th, but a lot of usable items can be found at doll-house suppliers. This was a desk-top lectern though, so I had to build the base myself, using wood scraps, and decorative molding strip (hardware store). Craft paint tied it all together.

The map and stand are from a Power Team set again, as is the green crate.

The briefcase actually was sold as a novelty gift item. It has a manicure set inside! But the latches, handle, and all the hardware work fine, and it's in pretty good scale. I've also seen these sold as business card holders. Business and desk-top novelty items and premiums often yield interesting items. In addition to the trash cans and briefcases, I've also picked up some cool office chairs, beach chairs, desktop computers, and other goodies sold as novelty or promotional goods.

The red table is another wooden crate. The yellow thing on top is part of some toddler playset. I found it at a thrift store, liked the shape, and made a few modifications to the "screen" on the side, replacing animal stickers with green cardstock (so I can easily Photoshop in computer displays or whatever).

The phone is our magnet again from the first cartoon. I've got a lot of novelty magnets that are useful props: computers, desk phones, pay phones, blenders, coffee-makers, dustbusters, clothes irons, toasters, lunchboxes, crates of fruit, pots and pans, toaster ovens, microwave ovens, aquariums, lunchboxes, gumball machines, wine bottles, all sorts of stuff. It pays to spin through the kitchen store every once in a while.

Okay, one more, in part to see how the same props get used again and again in different ways. This is Cap'n Rehab's submarine.


The porthole in the background is some kind of fiberboard ring I found in the floral section of a craft store. I have no idea what it's used for. I spay painted it gray, put in some scrapbook paper for the "reef scene" outside, and stuck it to the wall with more putty.

The ship's wheel was a wall hanging I bought at a tourist-trap gift store (I live in a beach town). The metal base for it (which you can't see) was made from a brass candle holder and some copper-pipe fittings from the hardware store.

In the foreground, there's the Muppet's in Space console again. Behind Number 9, you can see one of those rocket-launcher "nukes" again. The red barrel is a repainted Power Team item. The lamp thingies on top is actually an old, novelty salt-and-pepper set. I think I got it for $2 at a junk shop.

The arched doorway is made from our friend the Can-A-Round again. The door in the middle is cardboard and some textured scrapbooking paper I got at a craft store.

The high-tech crates came with figures in the GI Joe "Sigma Six" line.

The rubber duck around Cap'n Rehab's neck was part of a set of novelty earrings I spotted while following my wife into an accessory store at the mall. (Really guys, if your wife or girlfriend is at all crafty, it pays to follow her into bead, craft, and fabric stores now and then. You can go in by yourself, but the strange women who work in these places seem to have a talent for asking embarrassing questions.)

The little Nautilus desk model in the foreground was an accessory for a smaller scale Captain Nemo action figure I bought on deep clearance a while back. (I had no interest in the figure, but he came with a ton of cool accessories. I've also seen cool, usable for 1/6th accessories in other small-scale figures. Wrestling figures, the entire Muppets line being examples. (I got a cool mop and janitor's rolling bucket, a footlocker, some books, and food items with Muppets figures.) But for things like desk models, look for smaller die-cast toys. Nothing spruces up a military office like a model fighter plane, missile, or tank on the desk, and they're all over the die-cast section of the toy store. I've also found similar things in gumball machines and museum gift-shops.

I could keep doing this, but this post has gotten pretty long already. General hints:

Develop a "one-sixth eye." Develop the habit of looking at things in scale. Potential props are everywhere. For instance, I noticed one day while taking the protective cap off a "sports bottle" style bottle of drinking water I got at the theater, that it looked like a miniature Tupperware style bowl. I collected a few and added them to my box of kitchen and food items.

For specific ready-made 1/6th items, check fashion doll toy lines, but also look for novelty items elsewhere, sold as novelty clocks, souvenirs, key-chains, lighters, pencil sharpeners, magnets, desk accessories, business give-aways, jewelry, charms, etc. In addition to toy and hobby stores, you should also be browsing craft stores, bead stores (lots of interesting charms, bits of metal hardware, clasps, etc.), kitchen stores (especially for magnets and other novelty items), gift stores, souvenir stores (in my experience, the junkier the better), museum gift shops, zoo gift shops, and office supply stores.

Finally, you'll notice that a lot of my stuff comes from thrift stores. Thrift stores, garage sales, junk-stores, swap meets, rummage sales, are full of useful prop items. Just use the 1/6th eye. A wooden jewelry box is a desk. A pencil cup is a waste basket. A novelty metal cocktail skewer or letter-opener is a sword.

This stuff is literally everywhere, and often the coolest items are cheap or free. It's all a matter of having the eye, and the creativity, to find them.

Tuesday, September 02, 2008

Thinking inside the Box

After doing over 125 "Minions at Work" photo cartoons, I'm getting a little bored. Not with the Minions but with the sets I photograph them on.

My "stage" for the Minions is nothing but a small workbench on which I throw together sets using a variety of backdrops and walls (most built of foamcore board) and a variety of other "wild" set pieces, such as columns, beams, arches, and doorways. I can really do a wide variety of sets by swapping my basic pieces around, but for the most part, they have one thing in common. They're flat.

Because of the single-panel format for "Minions at Work," it's generally important to see all the characters in a scene clearly: who they are, what they're doing, what their body language is, and what they're holding. That's hard to do when you get more than two characters in a scene, especially if you're also struggling to get an interesting angle on the set (something else my current setup makes difficult).

Somebody is always turned the wrong way, or you can't see their hands when you need to, or you can't see what they're holding, or where they're looking, or something else that's important to the scene or the joke.

But it's also difficult to make multi-level sets to my requirement. I need modular flexibility. I need things that are sturdy and versatile. I need things that are self-supporting and that don't eat up too much of my limited (especially front-to-back) bench space. And most of all, I need cheap.

Here's a solution I've come up with (click on any of the images for larger versions):


Yeah, boxes. These are recycled "shoebox" sized Express Mail boxes. I've just glued the flaps shut and covered them with self-adhesive shelf-paper, also known as contact paper.

Contact paper is wonderful stuff, with all sorts of uses. It's cheap, comes in useful sizes, sticks well to most surfaces without additional glue or tape, and can be used to disguise or repurpose all sorts of common objects for use in our 1/6th world.

The big problem is the limited patterns available and their applicability to 1/6th sets. A lot of the patterns are florals or other decorative patterns that aren't much use to me, and there are wood-grain patterns that are way out of scale for 1/6th use.

On the other hand, there are sold colors, geometric patterns (like black and white or other checks, good for floor coverings, and stripes, which have some uses), and metallic. Here's an on-line-site to show you some of the patterns and colors you may also find in your local stores.


I've used the metallic papers before, but for this project, I went with a couple of stone patterns, one a gray granite and another a gray marble.

Why two patterns? Well, while either pattern can be used for both walls and floors, it's my feeling that the coarse pattern of the granite is better for floors, and the smoother pattern of the marble is better for walls.

Also, cover a box with one pattern, and it still looks rather like a box. But if the sides are one pattern, and the top another, then it takes on a bit more weight and reality.

But remember, I said flexible, and that's where I got sneaky. The trick her is that, in a photo, normally you can only see at most three of the six sides of a box. If you see an exposed side with one pattern, you'll tend to assume that the reverse face of the box is the same, but it doesn't have to be.

So for my boxes, I covered the ends, one wide side, and one narrow side with marble, and one wide side and one narrow side with granite. By flipping and rotating the boxes to expose various combination of surfaces, two little boxes can be used for an awful lot of different things.

Let's start with something simple. Stood on ends, the boxes become modular, free-standing wall panels. These can be used to provide a stub wall in the foreground of a picture, or to suggest a doorway or hall where none actually exists. Turn them one way, and you've got granite walls.

Turn them the other way, and you've got marble.

One thing to remember for photo purposes is, it isn't important what you build, it's what people see, and what they fill in mentally to complete the picture.

So while we can see this is just a couple of boxes on end, if you were to zoom in or crop to eliminate the tops of the boxes, the viewer will just assume it's a wall that extends all the way to some invisible ceiling. Same with the sizes. If the picture doesn't show the end of the wall, the viewer will assume it continues well beyond the picture, even if the wall overhangs the frame by a fraction of an inch.

Of course, I've only got two boxes, so the wall is necessarily pretty small. Making two more would allow for much more sizable walls, and the flexibility to create a doorway in the middle.

But while this is useful, my primary purpose for creating these was to create some verticality to my sets. Let's see how that works...

Here, by flopping the boxes on their side, I create a raised walkway or second level along the back of the set. This isn't a full "story" bump by any means, but it's enough to allow background characters to be seen clearly over foreground ones, and it adds some visual interest.

Note that I've put the granite "walkway" side on top, and the marble on the front. The fact that the floor is also covered with granite pattern ties the set together.

This setup would also work as a large display shelf of some sort, like a museum or trade show-exhibit, or a runway for a fashion show or a strip club. These things are just as flexible as your imagination.

In a perfect world, the gap between the two boxes wouldn't be dead center in the shot, but it's easy to hide behind an object or character, or to Photoshop out. You could also use a scrap of the same pattern contact paper to cover the gap. Or, you could just live with it, and assume it's a natural seam in the stonework.

Okay, here we flip the boxes, and we have a higher, narrower walkway. Still not a full story, but enough to provide some real separation between the levels.

Okay, the next step to tie these things into a scene is to enhance them with props. I happen to have three of these Power Team traffic barriers, so I'll put them on top of the box walkway. Now it looks more like a balcony or catwalk of some sort.

Of course, you may not have something ready made like this. One thing to remember is that cardboard is really easy to work with. You could punch or drill some evenly spaced holes and make removable stanchions out of wooden dowels or tubing. (Remember though, any holes you make in a side may limit its usability as a wall for later use) Connect the stanchions with scale-sized-ropes or small chain (check the jewelry department at craft stores) and you've got hand-rails.

Now, let's get a little more creative in both our arrangements of the boxes, and the use of props.

In this example, by flipping the boxes in two different directions, and careful exposure of a bit of that granite pattern, we've got a wall with a set-back shelf that we can fill with decorative props.

This somehow reminds me of Stargate SG-1 and the interior of a Goa'uld mother-ship. Once again a longer wall would be better, and you could also add to the height by stacking more boxes on top.

(Most of the Egyptian props, by the way, were purchased in the aquarium department of a pet store. The gong is a brass nick-nack I picked up at a thrift store.)

This arrangement suggests the base of a massive column, perhaps along the side of a great temple or hall. Once again, I've arranged the boxes to create a shelf, and added another aquarium department prop to sell it.

A row of two or three of these would be even more effective in suggesting a large and impressive space. As I said before, let their imaginations work for you. Show them three, and they'll imagine a dozen.

This scene would also be greatly improved by a backdrop more in keeping with the foreground (it could just be a sheet of foamcore covered with more marble paper, and some decorations added, like hanging tapestries created from cheap scarves or from scrapbook papers purchased in a craft store.

Finally, here's a slight variation on the above arrangement, used to create an impressive platform from which an Evil Overlord can address their attentive Minions. The custom-built lectern that I've built from wood and molding scraps is a big plus, but you could simply provide a box of roughly the same proportions (perhaps also disguised with shelf paper) for them to stand behind.

This scene would be greatly improved by hanging something on the backdrop, such as a flag, banner, shield, or logo.

Ironically, my first use of these in Minions at Work really doesn't fit any of the above. Mostly they're used to support a pre-existing set piece, my metal catwalk prop. Here's the cartoon. If you're interested in seeing how the catwalk was built (it's an easily reproducable design from parts you can get in most home-centers or hardware stores), you'll find a post on it here.

Of course, while the granite and marble patterns work well for me in a lot of applications, they won't work everywhere, or for everything. If you don't find the pattern you need in contact paper, check the fancy papers sold by the sheet in the scrapbook section of most craft stores. Paper can be glued to the box or applied with double-sided tape. You can even create your own papers by taking photos (culled form the net or shot with your own camera) and printing them on a color printer (heavier paper stock is easier to work with than standard printing paper). Using your own camera, you can capture weathered wood, cracked concrete, stone, rock tile, rusted metal, or whatever else you need, and scale it for use in 1/6th (or other scale) scenes.

Tuesday, March 04, 2008

Star Wars Helmet Tutorial

I'm not hugely into 1/6th Star Wars figures. I have a few, but not many. But I know there are tons of Star Wars fans, collectors, and customizers out there, so I'm passing along a couple methods of producing removable helmets for Empire troops.


The first is pretty straight-forward. The starting point in this case is a Hasbro TIE fighter pilot, though this technique would probably work for other Hasbro troops such as the storm-trooper, sand-trooper, clone-trooper, and maybe even Boba Fett or Darth Vader.

The figure shown is in fact just a thrift-store special I found nude. As you can see, the Hasbro TIE pilot is mounted on one of those awful Action Man/Hall of Fame bodies. I don't much like the proportions on these, or the lack of articulation (especially the lack of ankle rotation and head tilt).


One option on improving one of these figures is simply to remove the head and transplant it to a GI Joe body of your choice. The head-posts are completely compatible. Of course, you still have to contend with transplanting the molded glove-hands and the sewn-on costumes, but it's doable. But you're still stuck with a non-removable helmet, and that bothers me. Besides, maybe you just want a helmet to sit on a shelf or table in a diorama. So lets turn that TIE fighter "head" into a helmet.

First step is to remove the head. I used the "boil and pop" method. Dip the head into a pot of boiling water to soften the rubber, the pry it gently off the neck post. A narrow tool like a small screwdriver is very helpful in this task.

Take great cautions not to scald yourself, as the hot water likes to find its way inside the hollow head and cavities of the bodies and arms, then dribble out on you as you're working on the figure.

Here's the bottom of the removed head. You can see the opening for the figure's neck post. You can also see a ridge around the bottom of the helmet that probably represents where the real helmet ended. I chose to use that as my cut line. I've heard of people using Dremel moto-tools to cut these, but that's huge overkill. The head is soft vinyl and not very thick. I used a brand-new hobby-knife blade, and it cut like butter.

Again, use caution not to slip and cut yourself, or to cut too far into the helmet. Slow and gentle pressure is the way to go.

Here's the bottom of the helmet. The opening is plenty big for almost any kind of 1/6th figure head.

Here's the finished helmet shown on a molded-shirt CC-Joe with a WW2 head. If anything, this helmet is over-sized.

Our next project is much more challenging. Our starting point is a Burger-King kid's meal toy. These were out a year or two ago, and they aren't hard to find on eBay, or for that matter, at thrift stores and garage sales. There are a couple other figures in this line that might also provide useful helmets (I think there was a Clone Trooper and a Boba Fett, for instance).

The toy is a solid molded figure held together with those damned security screws (triangular openings in the head) that are on so many fast-food toys. (If anyone knows a source for an affordable driver to fit these, please tell me about it.) There's a light mechanism inside activated with a button on the backpack.

Since the helmet is molded as part of the whole, the first challenge is to cut it off. This would be MUCH easier if you could take the figure apart first, but lacking the right tool, and not wanting to take the time to try and drill the screws out, I just started cutting.

A Dremel tool probably would be useful here, but I don't use mine much, and I wasn't confident I could avoid cutting too much, especially in the complex little curves around the "jaw" of the helmet. So I opted for one of my favorite tools, a razor saw. I just took a lot of time and patience going round and round the helmet, coming at the joint line from all angles and taking away a bit of plastic at a time. It was tricky, but I got it done.

Here's the bottom after I cut it off. First problem, the neck opening is way too small. Second problem, the head is full of STUFF, including the LED light and battery holder. I used small needle-nosed pliers to break the tabs holding the light in and removed it. I then was able to work a small pair of diagonal-cutting pliers inside from the bottom and cut the post that contained the screw. This weakened it enough I was able to rip the two halves apart. Again, the right tool for the job would have made this so much easier.

Here are the two halves of the helmet. All the interior junk needs to go. I attacked it using two different sizes of diagonal cutters to "nibble" plastic interior parts out, and a pair of needle-nosed pliers to grab, twist, and break off what was left. Again, patience is required. Again, a Dremel tool would be an option, but be careful not to cut or grind through the outside shell.

Here's what I was left with. A Dremel probably would be the best way to enlarge the bottom opening, but I just sort of whittled things out using a sharp hobby knife, taking away the plastic a sliver at a time. Though I removed all the alignment pins, there's a lip around the edge that makes it easy to put back together properly. I glued the halves together with a bead of super-glue.

Here's the finished helmet on a CC Joe. This is a much tighter fit than the TIE helmet, but I had no trouble getting it on the Joe, and even got it on a much larger Power Team head. I think this is rather close to scale, actually. At least it looks right to me.

The nice thing about this is the you can care up plenty of extra Storm Trooper helmets, if you want them for custom projects or to make a squad of troops. Of course, you'll need to come up with armor for them. Since the original 1:1 Storm Trooper armor was made from vacuum-formed plastic sheet, and home vacuum-forming isn't difficult at all, it wouldn't be that hard for somebody to create some molds to mass-produce 1/6th Storm Trooper armor. Combine that with some simple black body suits, and you could crank out 1/6th Storm Troopers by the dozens!
Go on! I dare you! (And send me a set of armor when you're through.)

Saturday, April 14, 2007

My solution to the RC Yamaha Rhino head-room problem


A lot of people earlier this year were lucky enough to pick up radio controlled Yamaha Rhino utility ATVs that Wal-Mart had clearanced out at fire-sale prices (I got mine for $25, but I've heard of them going as low as $15).

This is very close to being a 1/6th vehicle, but the head room allowed under the roll bar makes getting a figure in there a tiqht squeeze. To fit, a figure needs to be short and well articulated (like an SA-body GI Joe). Taller figures, or with legs that aren't as flexible, or that had large head-gear just didn't fit.

There have been many solutions to this. Some people have removed the top cross-bar completely, or removed it to the rear, or raised the entire cage. Well, here's my solution, using hardware taken from a "Steel Tec" building set that I got at a thrift store for just a few bucks. Steel Tec sets and collections of parts often go for cheap on EBay (shop wisely, and you'll spend more shipping it than buying it) and all those little brackets and beams are great for work on 1/6th vehicles.


I used a couple of triangular brackets which raise the bar a little in the front, and a lot in the back. I think this configuration blends in well, and allows more head room while still preventing an un-belted figure from flying out of the vehicle during violent maneuvers. I had to drill out the side bars of the roll cage to take the larger Steel Tec screws, and I had to use my drill to slightly elongate the rear hold in the bracket to line up with the spacing of the existing screw locations in the side bar (find some small nuts and bolts, and you might avoid both steps, but I used what I had at hand).

The figure in the vehicle is one of my Minions, which is based on a G3 Power Team figure (tall body with a big head) and has a bulky combat helmet, making him pretty close to a worst-case for me. He fits just fine, so this can double as a Mk 2 Minionmobile.

Oh, and that's our cat Sydney. She seems to think she needs to be in every picture we take around here. Well, here she is in another one.

Thursday, February 01, 2007

How Big is your Image File?

Okay, not intended to be a personal question. Over on one of the Yahoogroups I frequent, Power Team, there's been a discussion related to the groups filled-up photo albums, and what to do about it. I made the statement that most people don't care to learn the technicalities of managing the size of their image files. Somebody called me on it, so here I am, giving you a chance to learn a little more about this esoteric subject, if you're interested.

Fact is, the issue of image sizes is often counter-intuitive. We're used to "megapixels" as marketing speak, but most of us have very little idea how images are stored in our cameras (and in turn on our computers), or why a picture from one 6-megapixel camera can look much better than another 6-megapixel camera.

Okay, I don't intend to get side-tracked into a camera discussion, but if you follow and understand what I tell you here, it does apply to your camera and may help you better understand how to use its features.

I'll try to keep things simple and non-technical, and that means (for you techheads out there) that I may make some simplifications and generalizations about things. Just relax and cut me some slack. If what I say here isn't always absolutely true, most of the time it's true enough.

As I said, the number of pixels that a camera can detect doesn't always translate into a better image. Likewise, two images on your computer of the same absolute size (say 800 pixels wide, and 600 pixels tall) may have much different file sizes. In both cases, the major issue is something called file compression.

Okay, you've probably noticed in one way or another that image files take up a lot of memory (space on your camera's memory card, space on your hard disk, and so on). What you maybe don't know is that it could be much worse. Almost every image on your computer and in your camera uses some form of compression to make it smaller than it would be otherwise.

What is an image file?
To understand how an image file is compressed, you need to understand first what an image file is.

I used the word "pixel" back there and took it for granted that you'd know what I was talking about, but I'm not sure that's a safe assumption. In general terms, a pixel is a dot. Each dot has characteristics of color and brightness that are recorded in digital form (those ones and zeros you keep hearing about, which can be ignored for our purposes) on your camera or computer. Depending on the type of file and the options chosen, various amounts of information can be stored for each pixel.

The simplest kind of image just has two conditions for the pixel, on (white for instance) and off (which could represent black). But in this day and age, it's rare to see an image that doesn't have color. Some images have just a few colors available. Most photos have a LOT.

Think of it as box of crayons. If you have a box of eight crayons, you're pretty limited in how realistic a picture you can draw. If you have 256 crayons, you'd be able to draw a better picture. Well, many of the images you have on your computer have tens of thousands of crayons to chose from, and most images will use a fair percentage of those. The more crayons you've got, the more information has to be recorded to show which crayon is used to draw any given pixel.

So in basic terms, an image file is something like this.

Pixel 1 (Starting in the upper left hand corner): Pixel 1 is color 11,320 from our box of about 32,000.

Pixel 2 (the next pixel in the top row, but one to the right of pixel 1): Pixel 2 is color 11,321 from our box of about 32,000.

And so on, repeated (in our 800 x 600 example image) 800 times, until we skip down to the left of the second row, and repeat, the whole process repeating 600 times until you reach the bottom right of the picture.

So in a raw, uncompressed file, file size is pretty simple. It's the amount of space each pixel takes up multiplied by the number of pixels. Two pictures of the same size will be the same size, no matter if one is of a blank, white, wall, and the other is of a forest. That's simple, but it's wasteful of storage space, and as I said, image files are inconveniently large. Anything we can do to make them smaller is a good thing. But how do you make the file smaller, without making the image itself smaller?

Squeezing it Down

The funny thing about pictures is that, while a picture may have a lot of pixels, in many images a lot of those pixels are in patches that are exactly the same, and if they aren't the same, they're darned similar. For example, image a picture of your favorite GI Joe sitting on a table outside. Below him is grass and other "ground clutter," but behind him is a clear, blue sky.

Imagine looking at a pixel in the middle of that sky. Let's just call it's color, "blue." Maybe the next pixel to the left is the same blue, and the one beyond that just a TINY bit lighter blue, and the next beyond that back to the original blue again. In fact, you could go a fair distance in any direction from our pixel, and no be able to find a color that was much different than that original pixel.

Sure, some of them are different, but most are so close that they're difficult or impossible to tell apart with the naked eye. If you can't tell them apart, then the computer (or camera) is wasting a lot of space storing information that really doesn't serve much of any purpose. A computer (or the software built into a camera) could look at those similar colors and decide they were too close to tell apart, and set them all to one, average color.

Having turned a bunch of almost identical colors into really identical colors, imagine that, instead of storing "pixel 1, pixel 2, pixel 3" we could instead store "starting 100 pixels from the left and 120 pixels down there's a rectangle. It's 150 pixes tall and 500 pixels wide, and all those pixels are color 11,320 of around 32,000, AKA 'blue.'" We just defined 50,000 color pixels with one sentence. In computer terms, we just saved a butt-load of storage space.

Okay, now imagine the software takes your entire picture and divides it into a whole bunch of rectangles, and defines each one in the same way. Some of those rectangles, say a piece of blue sky, or a white-washed wall, or the big yellow side of the Mobile Support Vehicle may be pretty large, and defining them will save a ton of space.

But other rectangles will be smaller, say the skin on a cheek between the eye and the crease around somebodies mouth, or the middle part of an orange on a table, or the white in a little patch of cloud floating in that blue sky. Defining those areas will still save space, but not nearly so much. It may take just as much storage space to define an area 10 x 50 pixels as it does for one 100 x 500. Some places on the image, in a bed of gravel, or a patch of grass, or in the leaves of a tree, or in uncle jack's herringbone sports-jacket, the rectangles may get so small that it isn't worth making them at all. You'll do just as well to record the individual pixels.


It's easier to see how this works if you look at an image that's been over-compressed to the point of looking "jaggy." Like this one. You might want to click on it for a closer look. Notice that a blue sky isn't just ONE shade of blue. There may be hundreds of shades in the original image. But maybe you can turn it into ten or twenty shades, and your eye usually won't notice. Even in our super-compressed example here, there are still four bands of different blue in the sky, but obviously you do notice.

Notice the smaller blocky areas of the same color, the parts of his uniform, the table he's sitting on. Then look at the really "noisy" parts of the image, the grass, his his detailed boots, the rocket launch pads in the background. Of the total image size here, very little of it is that blue sky, or the white table top. Most of it is in those "dirty" areas. Life is in the details. So is file size.

Most cameras, and most photo editing programs on your computer will somewhere have options on how aggressively to compress images. More compression lowers quality, until you eventually get the "paint-by-numbers" mess you see above, but less compression means bigger file sizes. There's a happy sweet spot somewhere that you can live with. Generally, I go for less compression on the camera, but more compression when I save things for uploading from my photo-editing software (Paint Shop Pro, in my case). As long as you keep the original, high-quality images from your camera, you can then create all the cropped and compressed copies you need. The original is still there if you ever need it.


Dirty Details

So compact image sizes start in what you're taking pictures of. That doesn't mean you should never take a picture with grass or a tree (or your rough concrete driveway, or your hardwood floor). If that's part of what your picture is about, then do it. It's hard for the Adventure Team to have a jungle adventure without the jungle, for example.

But if, on the other hand, you're taking a picture of something to sell on EBay, you may not want to photograph it against you pin-striped sheets or sitting on top of your jelly-bean collection, because that isn't what the picture is about. All that clutter in the background is just wasted file space.

Bringing in the Crops
One easy way to reduce the file size of images before you upload them is to crop unnecessary stuff from the edges. Figure out what the picture is about, and cut off the rest. Yes, a well composed image is going to leave some open space around the subject, but when in doubt, crop.

The point here is not just to make the dimensions of the image smaller, though you'll probably do that. The point is that often the most "noisy" parts of an image (and thus the hardest to compress) are on the edges. For instance, in a picture of an action figures standing in the back yard, do you really need all that grass on the bottom of the picture? It's kind of a law of nature. Gravity pulls clutter down to the bottom of the picture. Nature grows it up on the edges (plants, trees, mountains), and the atmosphere sometimes tosses it in at the top (clouds). The action figure or vehicle in the middle of the picture may be the easiest thing in the frame to compress. Cut off ten percent of the grass at the bottom, and you cut off thirty percent of the file size.

Size Does Still Matter
I said that image size was not the biggest consideration to file size, but it is still a consideration. Just because your camera can record 5 megapixels doesn't mean you necessarily need to share them all with the world. In fact, if the intent is for people to look at it on their screen, the vast majority of that information is just going to be wasted.

If you learn nothing else, learn how to use your photo editing software to resize your images. Remember that you'll probably want to save the reduced-size image as a separate file, and keep your camera original untouched. Once you lose that information by saving a downsized image, you can't get it back. Yes, your paint program can resize the smaller image back to the original size, but it will end up looking like our blocky example about, and not your beautiful original.

How big should your images be? Well, probably no bigger than your average viewer's screen, and probably not even that. Remember that most web browsers clutter up the screen with scroll bars, menu bars, and so on. You just get the smaller space left in the middle. I'd say that 800 x 600 is a good "big" image size, and that many images can be much smaller. Remember that if you've cropped your image as I said, many will be tall and skinny, and some will be short and wide. Just resize it so that the width is no more than about 800, and the height no more than about 600, and you're pretty safe. Much larger than that is wasted on most people's screens, unless you think they'll need to be able to zoom in to view details for some reason (as might be the case in a "how-to" illustration, for example).

Reducing the size of the image, even a little, can be more important than you think. The information that makes up an image grows much faster than the linear dimensions do. For example, a raw 500x400 image doesn't have twice as much information in at as one 250 by 200, it has four times as much. A 1000 x 800 image has 16 times as much information as one 250 x 200, and so on. Compression can offset that to some extent, and usually does, but when you can, smaller is better.

When creating web pages, a common mistake is to confuse options in your web editing software that set display sizes for actually resizing the image. That is to say, somebody will upload a 5 megapixel camera image to their web site, and then tell their web-page editor to display it as a 100 x 200 pixel image on the user's screen. But they're still storing the full 5 megapixel image on their site, and every user who views the site his to download that huge file (with the bandwidth use that goes with it), even though it only displays as a tiny picture on their computer.

Always resize the image using a photo editor program to the final size, then upload that file to your web page.


Goes Down Smooth (for advanced users)

One other trick to reduce image file sizes is to remove some of the random noise that appears in images. Some of this noise can come from "grain" in the image. Noise like that can turn an empty sky or a solid color wall into a compression nightmare, but not add much of anything to the image. Likewise, all those pores and tiny wrinkles in your portrait are not only making you look old before your time, they're also making the image file way bigger.

One way to reduce this noise is simply to soften or blur the images, like when old Hollywood movies used soft-focus lenses to make aging actresses look better in close-ups. You can try this (usually using editing functions in your photo-editing software, not by changing camera focus), and there are sometime reasons to do it, but often this is throwing the baby out with the bath-water. You not only blur the solid areas of the image, but the lines and borders that separate them.
Some photo-editing programs have ways around this. For example, Paint Shop Pro has a function called an "edge preserving smooth." This effectively blurs the solid areas of an image that may contain useless noise, while keeping the lines and edges crisp and solid. It can take out your wrinkles and pores without turning your nose into a blob or your eyes into smudges. It can smooth the sand on a beach but still leave the ocean horizon a razor-sharp line.

The more creative among you may want to consider more labor-intensive methods, manually retouching parts of a picture, or selecting areas to blur or soften, but that's beyond the scope of the casual user making an average picture for upload.

As Big as it Needs to Be
Just remember that your images, and your image files, should be just as large as they need to be to show your subject and deliver your message, and no more. Beyond that, trim the fat. Cut clutter off the edges of the image. Resize the images to be just a big as it needs to be, and no larger. Consider reducing noise and clutter that add nothing to your picture. Set your compression settings enough to reduce the size of your files without detracting from your delivered image.

Doing these things will save disk space, cut upload times, cut download times, reduce bandwidth charges, and make your web pages load faster. They'll make both you, and the people viewing your images, happier, and what's not to like about that?

Wednesday, August 23, 2006

Making an easy weapon-rack


Maybe you've seen those cool grid-type weapon racks in 1/1 size. If nothing else, you might have seen them in the ballistics lab set on CSI: Las Vegas. I've always liked those, and I even think that somebody (BBi or Hot Toyz maybe?) made a 1/6th version, but somehow I never ended up with one.

Now maybe you've heard about the concept of a "one-sixth eye." It developing the sense of looking at everything you see as a potential 1/6th prop, and evaluating it accordingly. The other day I was in my local Ace Hardware store looking around (while fending the over-helpful sales people off with a stick, as usual) when I spotted something in the paint department that sent my One-Sixth-O-Meter right to stop.

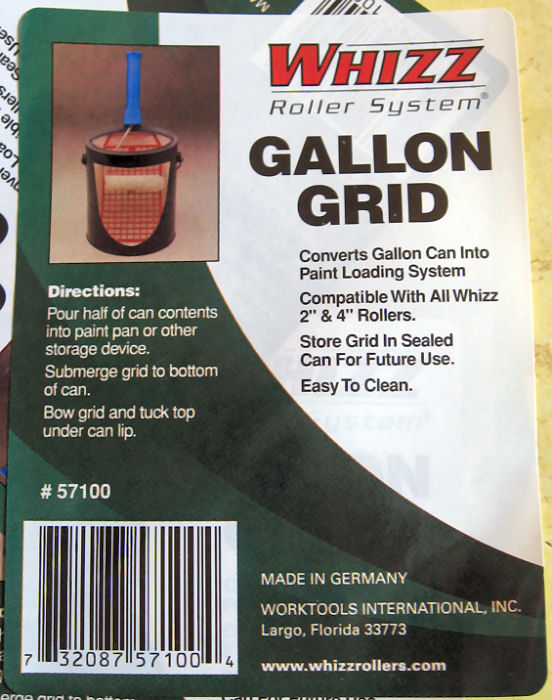
It was a cool little plastic grid molded in off-white speckled plastic, part of some sort of fancy roller system, the Whizz Roller System It wasn't even in a package. It was just a plastic grid with a sticker on it, hanging on a peg. Price: 99 cents. At first I couldn't be sure what it was good for, but I knew there would be something I could do with it. I almost bought just one, but on impulse, I picked up all four that they had in stock.

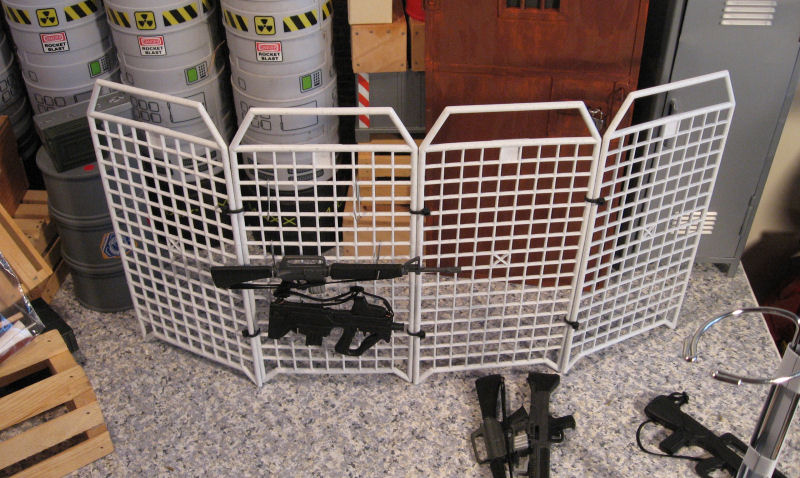
It didn't take me long to realize that they'd be interesting attached together edge-to-edge. I looked around for an easy way to do that, and ended up settling on small, black-plastic wire-ties that I already had on hand. I used two along each edge, pulled tight, and cut the excess off with scissors.

By now, I was starting to think weapon rack. My intent was to make a free-standing, four-sided rack, but for maximum flexibility as a prop, and for easy storage, I didn't tie the final corner together. That way, it could be folded into a square footprint, fanned out as a screen-type rack, or even be used as a safety or crowd-control fence.

The next issue was how to make hooks to hang weapons on the rack. Whatever I did had to be cheap and easy to mass produce. After several dead-end ideas, I settled on using light-duty, wire, paper clips. I used the inner loop of the clip intact, bent the larger loop out about 45-degrees, then cut it off (using wire cutting pliers) leaving about a half-inch stub, I then bent up the last eight of an inch or so using pliers, to make it more of a secure hook.

The small loop from the clip goes over the grid. The weapon itself hangs on the cut-off stub. (It occurs to me that another alternative that might work would be to use wire Christmas ornament hooks, and they'd probably work unmodified)


Here's the final result, with only a few weapons installed on one side. This would look equally at home in the firearms locker for an assault team, in a ballistics lab, a police property room, or an arms-dealer's show-room.

Friday, July 28, 2006

Tree how-to follow-up

I was gratified, and maybe a little surprised at all the positive feedback in email and many forums, you're only seeing a tiny fraction of it here) I've gotten on the "make a tree" post. Given all the quick-and-dirty set and prop building I'm doing for "Minions," you'll probably see more in the future. Please let me know what particular things you'd like to see, and what you like (or don't) about the posts I do make.

As always thanks for reading! (And viewing!)

Wednesday, July 26, 2006

Only God (and now you and me) can make a tree


In my photo dioramas I've been making lots of use of pre-printed papers sold in the scrapbooks sections of craft stores. I've successfully used them to represent grass, sand, brick walls, and even water. But after doing last week's park-scene for Minions, it got me thinking about other "stock" props I could build for future use.

One thing it occurred to me would be nice to have would be a bunch of tree trunks for forest scenes. Yes, you can use real wood, but the stuff is heavy, dirty, hard to store, and sometimes just doesn't look right. Maybe there was a better way.

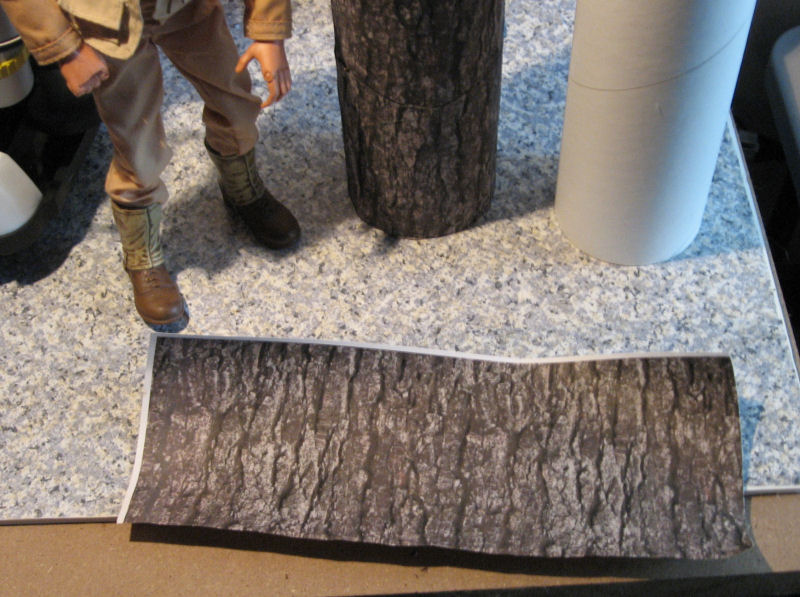
I started to wonder if I could find a "bark" paper to use, but I trip to the craft store turned up nothing. Then I had another thought: why not print my own?

I used Google's handy image-search function (searching on "bark") to come up with a couple of likely source images. Then I picked my favorite and used Paint-shop Pro to "clone" the image three across to make it wider. Finally, I printed it on my inkjet printer using the "stretch to fit page" option. I printed three copies, to give me enough sheets to work with.

My thought was that I could glue them around cardboard tubes. Yes, they'd be smooth, but my experience is that realistic textures usually don't look flat to the 2-D eye of the camera. I figured if I just wrapped it around a tube or dowel, it would look good enough, especially if it appeared in the background of a scene.

This is the same trick that computer game makers use when they "map" a detailed texture onto a fairly simple 3-D object to achieve a realistic look without bogging down the computer or console rendering the scene. In this case, I was "mapping" the flat bark texture onto my simple tube shape.

Thinking about it, however, I realized that I could go the computer one better, and easily add some real texture to my printed sheets. Here's how I did it...

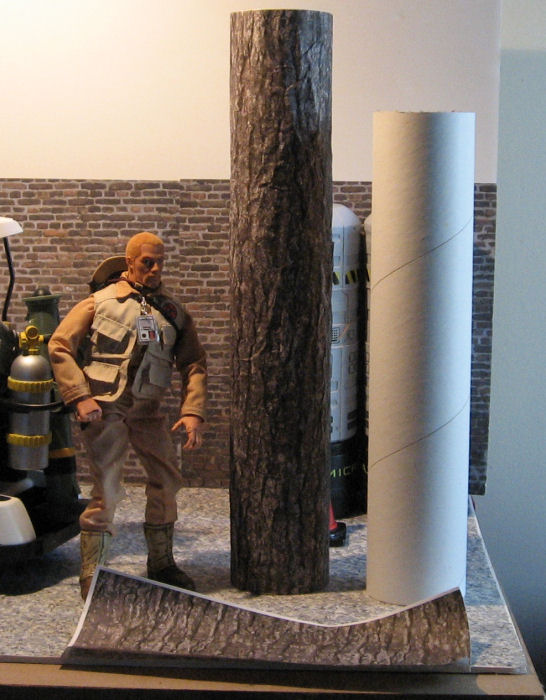
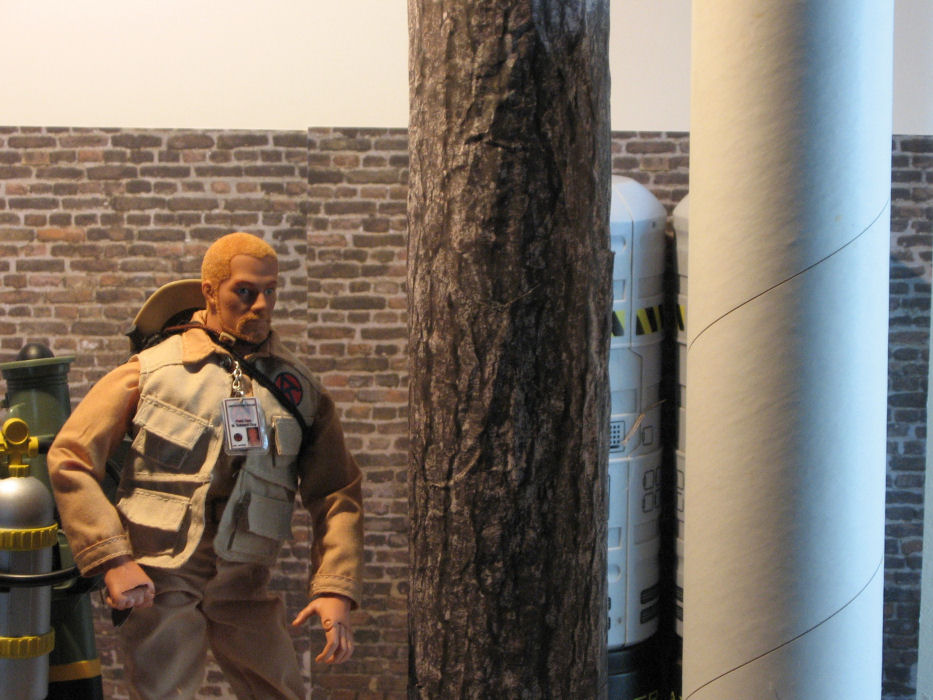
First, I selected my core form, a 3-inch mailing tube that I had laying around my shop. You can see a piece of the "naked" tube on the right side of the pictures. Most any cardboard tube would work, from a couple of paper-towel tubes spliced end-to-end, to a piece of carpet-tubing to create giant redwoods.

I determined that it would take most of three sheets to cover the tube, and that the long direction of my printed sheet would go around the tube with minimal overlap. For ease of construction, I decided to use transparent tape instead of glue. I carefully lined up all the joints so that the tape and seams are all hidden on the back side of the tree. (This is a key trick for pulling this stuff off easily. Don't build or detail things that people aren't going to see. The viewer's mind will fill in the rest of the bits that you leave off.)

I started at the bottom, trimming the white edges off the sheet where they'd show. This is where the real texture comes in. I then took the sheet and rolled it up into a small tube, then crushed it, rolling the resulting mess between my hands to add more folds and creases. Then I carefully flattened the sheet, which now had nifty texture that would pick up highlights and make the profile edges of my tree trunk look more realistic.

Razor-straight lines are a dead-give-away that something is artificial, and the human eye is very good at spotting straight-lines.

I took this in consideration when rapping the second sheet around the trunk. I planned to overlap the sheets slightly anyway, so I hand-trimmed the bottom of the sheet in a kind of "wave" that would help disguise the seam. After taping the sheet (both the lower sheets were also taped to the tube at the top, where the tape would be hidden by the overlap from the sheet above) I finished off with the final one.

I've got some ideas on how to add roots and limbs to my tree, but I haven't tried them out yet, and for a forest scene, the trunk is the most important part. You can whip up a whole grove of these in an evening while watching TV. Remember to used a variety of tube sizes and bark textures and colors for a more realistic "forest" You could even print out some "knot holes" and other tree features, cut them out, and paste them on for a more realistic look.

One other advantage of using multiple tube sizes is that you can store them compactly nested inside one another. Try that with something you rescued from your wood-pile!

Wednesday, July 19, 2006

Making a MinionMobile


For some time, I've been considering making a custom vehicle for my "Minions" photo cartoons. I thought about a Barbie camper conversion or a Jeep or something in that size range, but it occurred to me that I had a possibly more useful candidate on hand. After all, any super-secret complex back in the 60s and 70s (good or evil) used industrial golf-carts to shuttle through its cavernous depths.

A while back, KB Toys had a nice looking toy golf cart for sale. Unfortunately, they were maybe 1/10th scale, just too small for 1/6th figures, so I passed on it. Then, some months back, I spotted one for cheap in a thrift store and couldn't pass on it. The body and roof are plastic, and the roof supports are heavy metal rod, and I thought perhaps I might be able to modify it for use with GI Joes.

I completely disassembled the toy for inspection, cleaning, and painting. I decided the original green body panels weren't industrial enough, so I went for a sterile, Krylon Fusion "satin white." The roof was already white, but I painted it as well, to make it more opaque and hide the plastic sheen.

My initial thought was that the cart could be stretched between the front and rear body sections to provide more leg room, and then the roof raised slightly. But as I looked at it, I realized that would be very complicated, and weaken the structure of what was actually a pretty rugged little toy. There was also the matter of the roof, which would either have to be stretched, removed, or have heavily modified supports.

It was my wife, Chris, who came up with a better solution. She suggested that if the seat were simply raised so that the figure's knees weren't up in his chest, it would look much more in scale. It seemed possible that I could put some washers on the screws holding in the seat to raise it a bit, or perhaps even build a riser of some sort for it to sit on. The job was made somewhat more critical by the fact that the screws that hold on the seat and seat back assembly also hold on the rear body and contribute to the strength of the entire structure.

I decided that some kind of riser was going to be necessary, and before I started fabricating something new, I started digging through my parts boxes for something sturdy and ready made. Just for sizing purposes, I dug out some Lego blocks to see how high the seat should go. But after looking at the blocks for a while, I realized that they'd be ideal as the risers themselves.

I have to admit, adding Legos to a permanent construction project seemed somehow "wrong," especially since I had to drill a hole through the centers of the blocks for the screw, and modify the "buttons" on top of the rear risers so the seat-back/cargo holder assembly would sit flat. But Legos are cheap, and I have a ton of them (I can't resist buying them when I see them cheap in thrift stores, so I've got quite a collection). Not only were they sturdy and perfectly sized, but I was even able to get black ones so no painting was necessary!

The seat sits on a pair 2x4 block risers, two-blocks tall. Same for the seat-back assembly. I replaced the original screws with longer #6 sheet-metal screws selected from the hardware store.

That done, it was time to raise the roof. This was complicated in that not only did it now need a "scale" adjustment to allow for the taller figure, but now the seat itself was higher. I used threaded rod from the hardware store to make pins that fit in the original roof mounting holes, then cut sections of brass tubing (hobby shop metal stock) to slide over the pins and the bottoms of the original supports, connecting them together. These are just friction fitted at the moment. Some epoxy may eventually come into play, and I'll paint the tubing black to match the existing support posts.

The very tall appearance has a bit of "clown car" aspect to it, but it isn't bad, and the Minions ARE supposed to be funny, after all. I looked around for some accessories to fit in the club rack in back, and found first a scuba-tank from one of those cheap 14" Action Man knock-off figures that Wal-Mart used to sell. Poison gas, maybe? Something radioactive? Then I noticed a Hasbro javelin anti-tank missile, and sure enough, it was a perfect fit in the other side of the rack! The Minions are loaded for bear! I thought the idea of this silly little cart with a missile on it was just funny in itself.

I'm still not finished. The steering column needs to be longer and more vertical, and I may add a larger steering wheel while I'm at it. Not sure. I'll probably add a few markings as well, but I'm still thinking about that. "Official Lair Business Only," maybe?

Monday, July 17, 2006

DVD Extras for "Minions: Walking the Dinosaur"


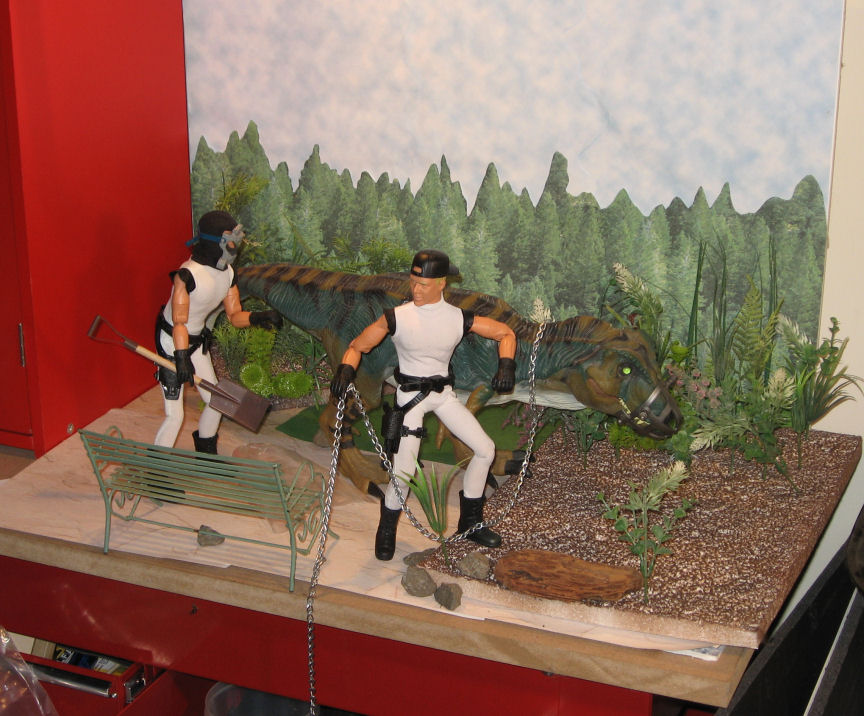
I'm really pleased with how this installment of "Minions," titled "Walking the Dinosaur" turned out visually, so here are some "behind the scenes" shots of the set.

I made extensive use of printed papers sold in craft stores for scrapbooking in this set. The ground is simply overlapping sheets of a "stucco" print. There are also some small scraps of a "grass" print to break up the lines. The backdrop is a cut-and-paste job onto a sheet of foamcore, using pieces of two different sheets, a "cloudy sky" sheet, and a "pine forest" pattern. I covered most of the sky with overlapping sheets of the sky pattern, then filled in the horizon with hand-cut pieces from the "forest" sheets. I probably used about four sheets of each.

The "dirt" area is actually a sheet of scrap packing foam hit with brown spray paint. I didn't use foam-safe paint, so it melted the surface into an irregular texture, and bits of white foam are showing up through the foam. I wasn't sure how it would work, but seen from the side, the white actually breaks up the dark brown and makes it look more like a natural ground-cover.

The plants are all plastic, consisting of bits of aquarium plants (bought cheap at a thrift store), and some dollar-store mixed greenery that I took apart to make smaller plants. The rocks are just some driveway gravel I picked up right outside my office door. The brown "log" is actually a piece of driftwood, the only real plant mater in the shot.

The park bench is metal. I found it in a thrift store (in metal housewares, not in toys) for about two bucks. The shovel is a craft-store item. The chain was purchased by the foot at the hardware store. The dinosaur is a "Jurassic Park" T-Rex, possibly one of the nicest toy dinosaurs ever made. I currently own three of them, and I'm always keeping my eyes open for more.
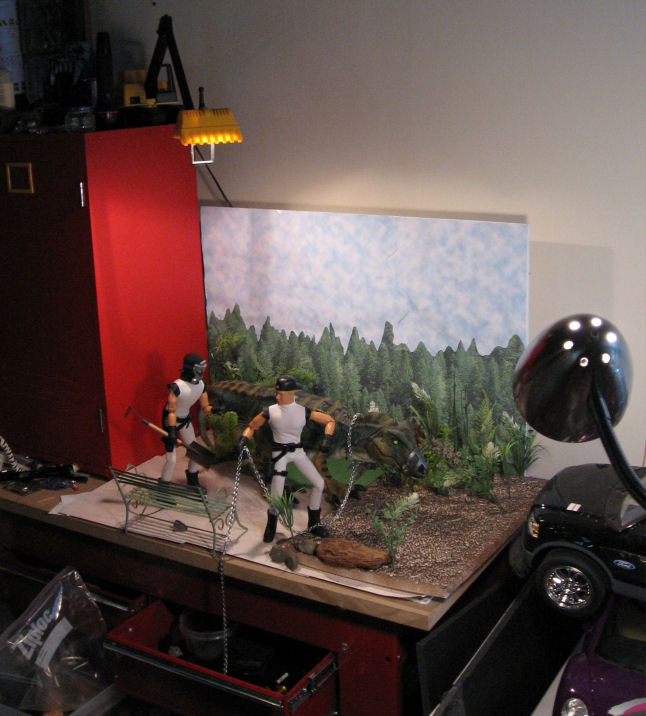
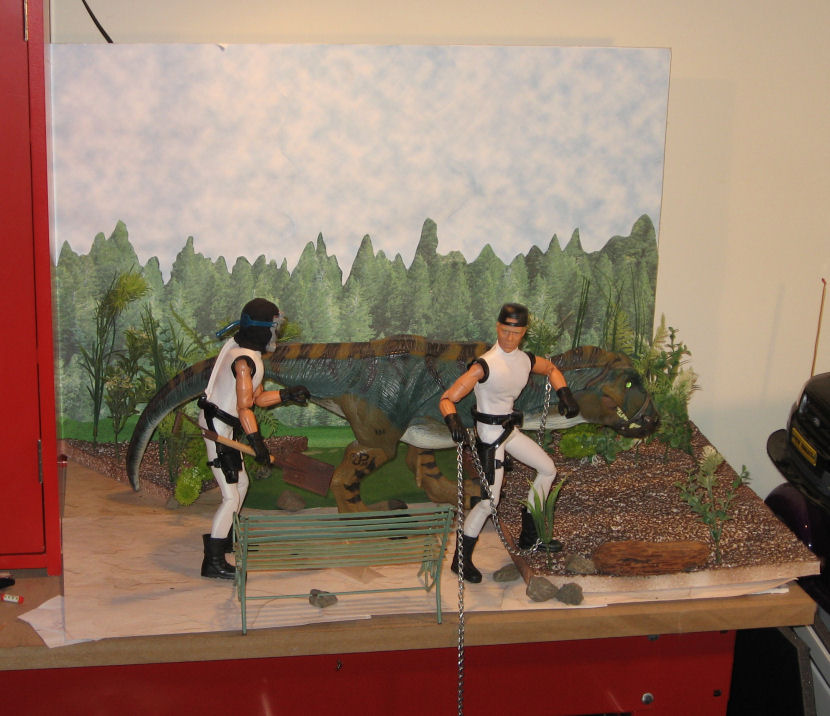
I did do a slight bit of digital retouching in Paint Shop Pro, using the "clone" tool to hide the edges of the foam sheet, and the "smear" tool to break up the edges of my cut-out trees and make them look more realistic.

The whole thing only took me twenty minutes or so to set up using things I had on-hand. I pays to think ahead and stockpile basic backgrounds and props like these.

Monday, June 19, 2006

You will believe a Joe can fly!

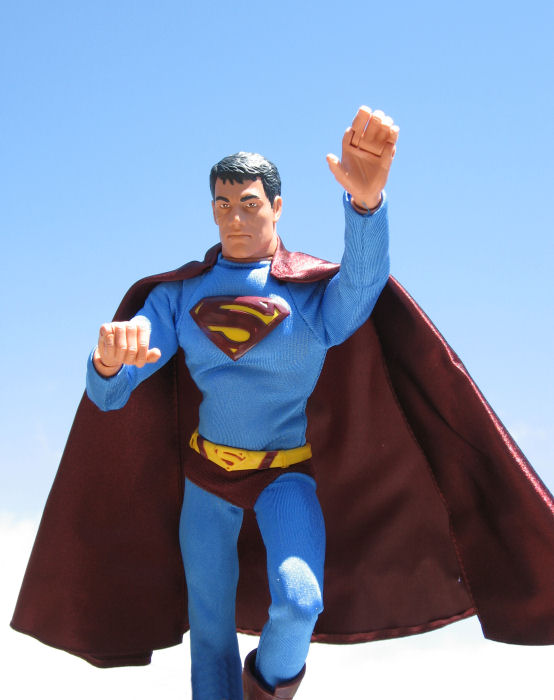
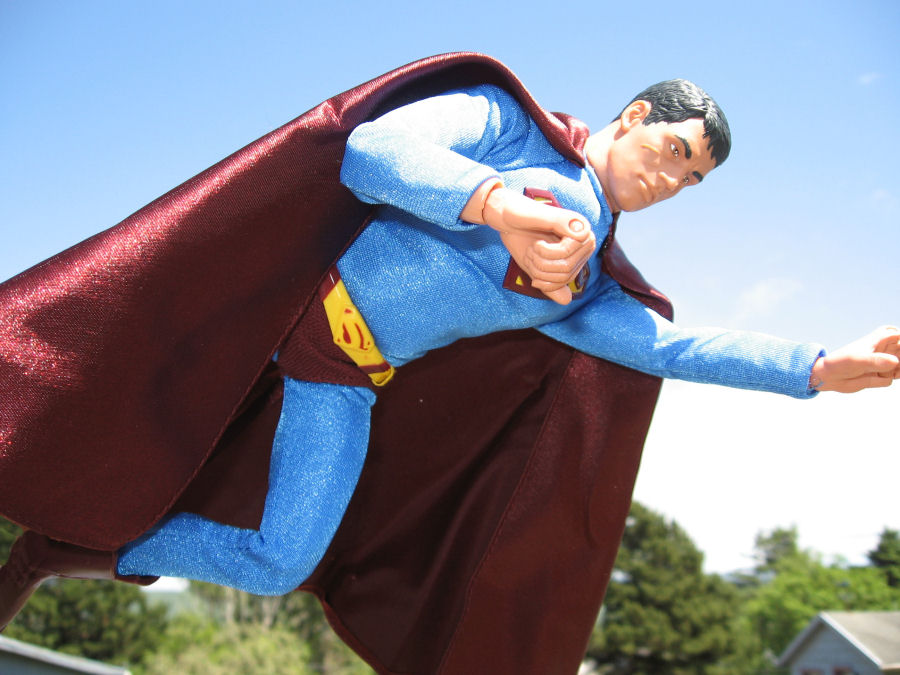
I broke down and bought a "Ken as Superman" doll at Wal-Mart the other day for the costume. It galled me a bit to buy a suit of unknown quality and fit for $14.95, but now that I have it home, it was a bargain. I tossed the Ken and replaced it with an SA Joe. The Gung-ho Grip hands are good for flying poses, and he has the small feet, which fit the boots just fine. The bottom of the Velcro doesn't quite close, but it's well-covered by the cape.

I like the textured logo and the logo-belt-buckle, and while I was initially put off by the dark red, it's really growing on me. This is just a really nice Superman costume, and I doubt an expensive collector's figure could have done much better.

So how did Superman get a scar on his face? Well, he cut himself shaving, of course!


Monday, June 12, 2006

Catwalk construction details


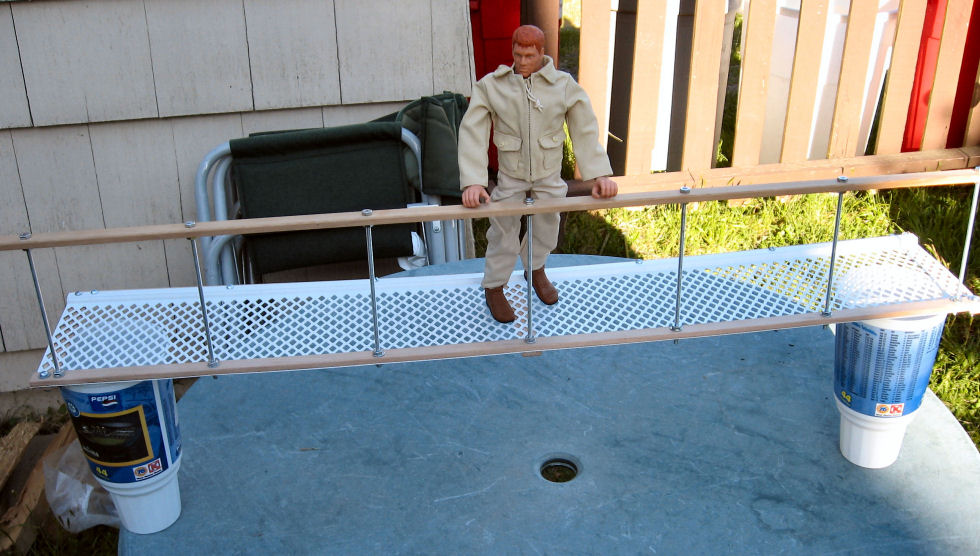
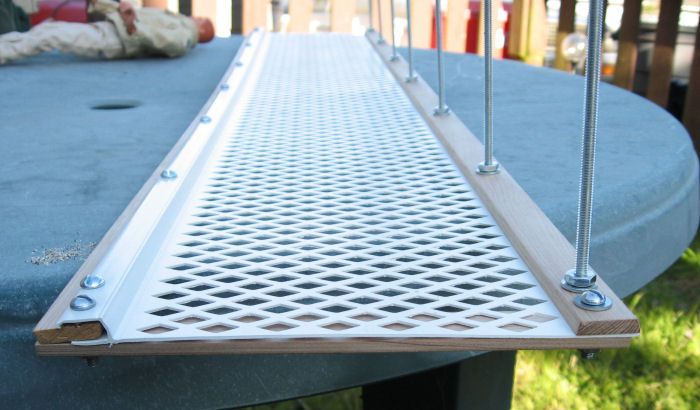
Here are some detailed construction shots on my catwalk accessory. It's constructed totally out of standard hardware-store materials. The most exotic stuff is the plastic "gutter guard" grating (meant to keep leaves and trash out of house gutters) that I used as the base of the catwalk.

You can see in this photo that there's a bit of sag at this point. I hadn't decided if I should add the second railing or not, and if it should be a complete railing, or have a pass-through. The sag decided it. These railings contribute a huge part of the strength of the catwalk, turning it into a "U" shaped beam and keeping it stiff, despite its fragile appearance.

From this angle, you can see the railing and lower supports, all made from rectangular molding picked up in the lumber department. This stuff is cheap, easy to work with, and has all sorts of 1/6th applications. Most of the cutting (for precision, and so I didn't have to keep going back and forth to the shop while I worked on this) was done with an Xacto razor saw and miter box. I used the same tools to cut the threaded rod used for the railing uprights.

Here's a detail of the railing support. Threaded rod, nuts, washers, that's all they are. Note the nuts above and below the railing, and also above and below the bottom rail. To make sure the holes lined up between the bottom rail and the hand-rail, I clamped them together and drilled them both at once.


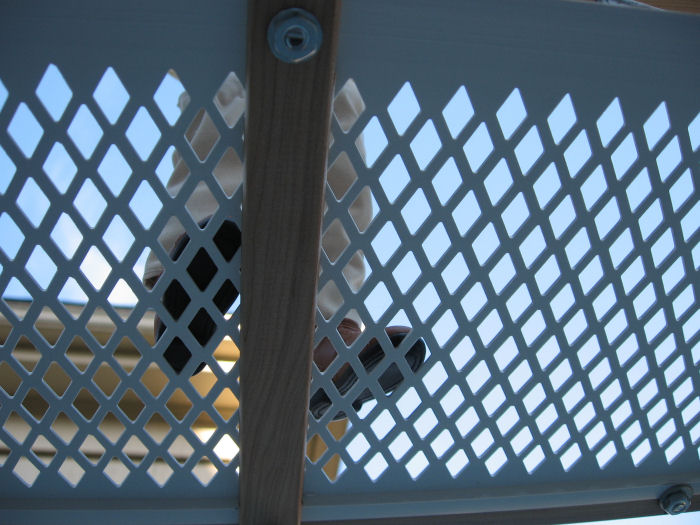
Here's a detail from underneath. As you can see, I can shoot photos from below as well as above or the side. The perforated plastic also casts interesting shadows, making for dramatic lighting. The plastic itself is thin and rather flexible. The wooden railings along both sides, as well as the wooden handrails, provide most of the strength.


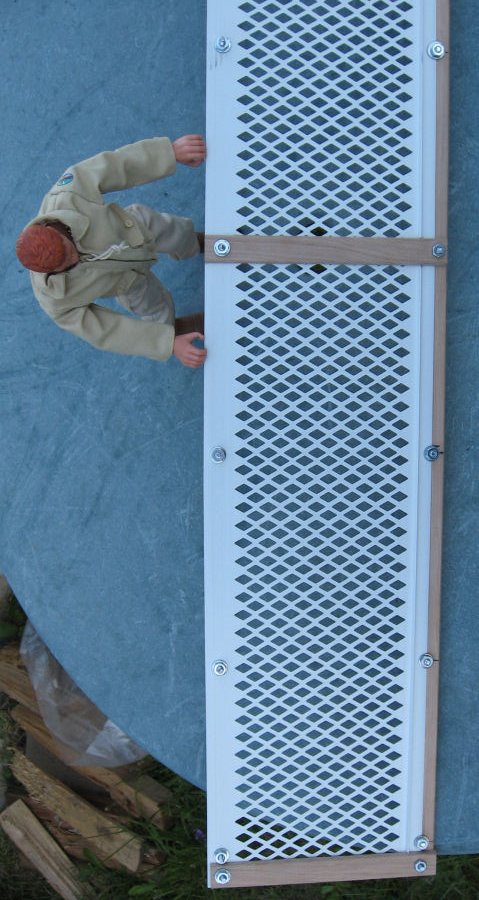
Another view from below. Notice the cross-pieces (one at each end, one in the middle), and the fact that one railing sits on TOP of the plastic, while the other fits inside a molded grove on that side. You'll be able to see this better in the end-detail shot.


Here's the end. You can see how the molded-in grove grips one of the lower rails, and how the other is bolted on top of the flat plastic.

The whole thing was done in just a few hours working in front of the television. The tools included the afore-mentioned saw and miter-box, an electric drill, a tape measure, a few spring clamps, some pliers, and a box-end wrench to tighten the nuts. I finished it off with a few spray-coats or reddish-brown primer.

Most anyone should be able to duplicate this project with pretty minimal effort. If you don't need a catwalk, think of it as a balcony, ship railing, boarding gangway, or foot-bridge.