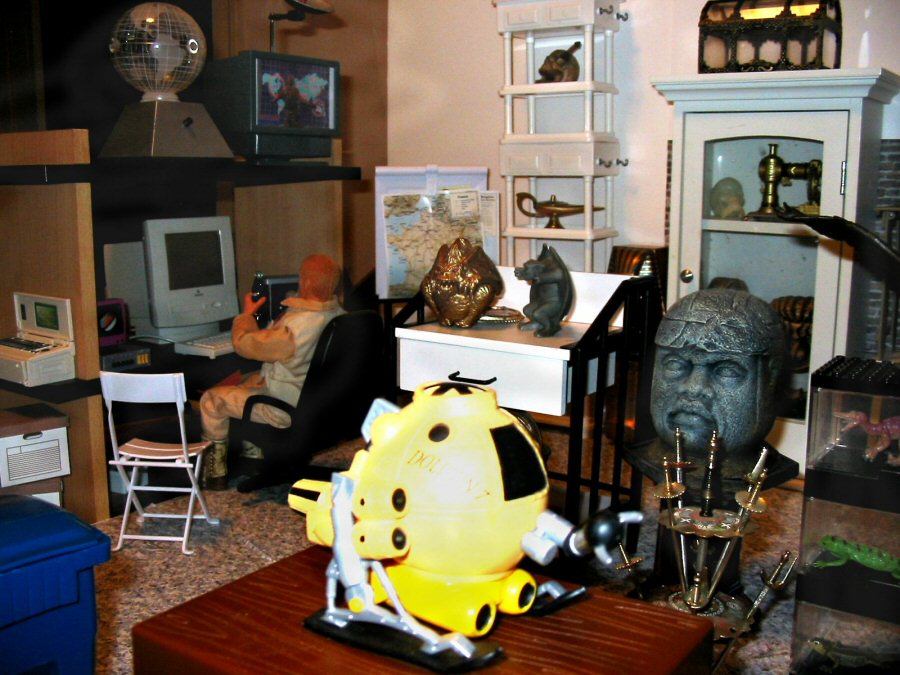
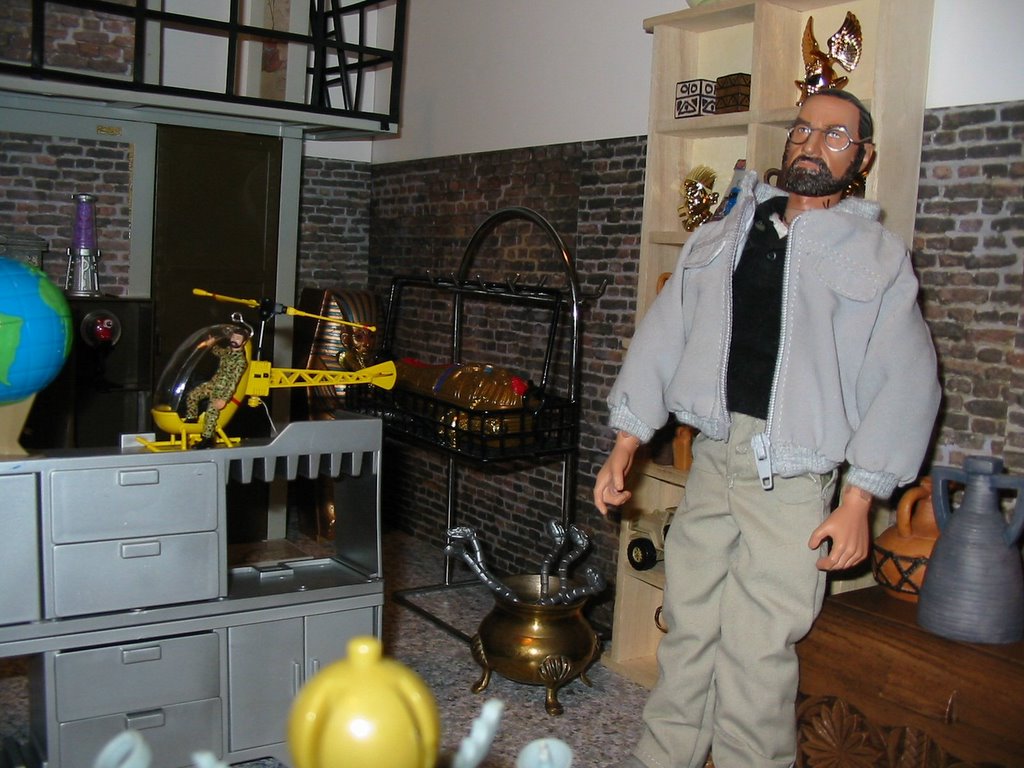
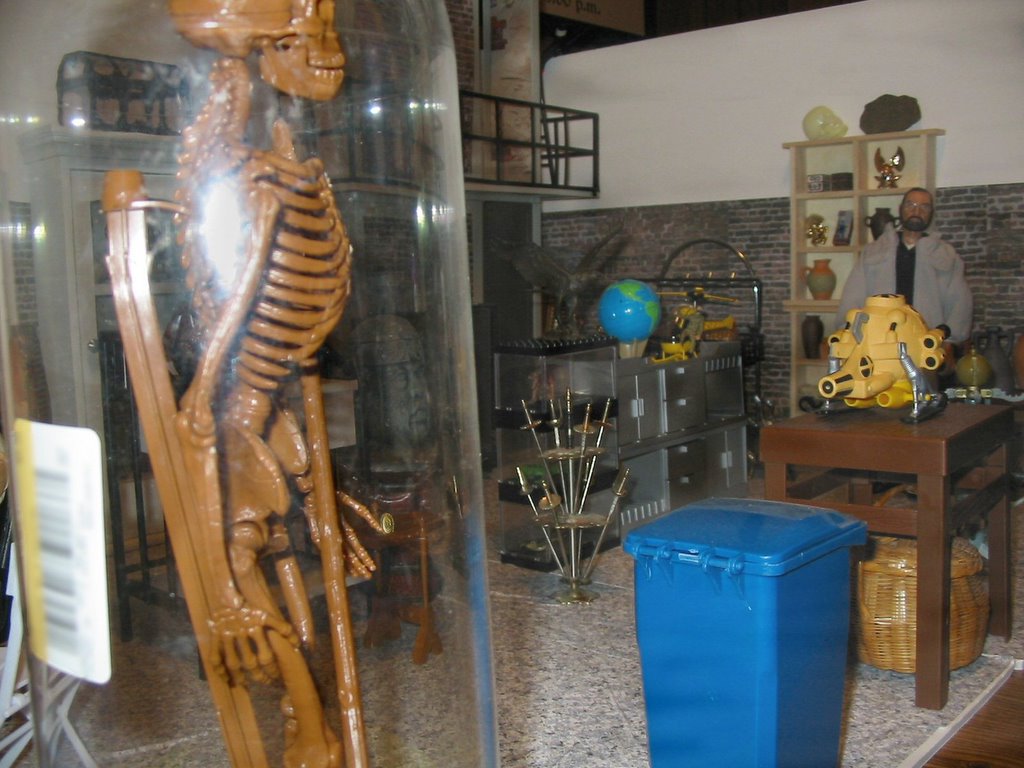
Showing posts with label props. Show all posts

Monday, November 24, 2008

Where does he get those wonderful toys?

I'm assuming that most anyone who would be reading this is familiar with my weekly photo comic, Minions at Work. MaW is created (mostly, some occasional photo manipulation is used to) using 1/6th scale action figures, sets, and props.

The other day, I got this note from Minions reader Phil M.:

I love your comics. I was wondering, where did you find all the scaled down items? most of them look like the correct scale for the "minion" you have. I have never seen trash cans, golf carts, etc.
Just wondering...


Fair, question, but one I figured only a fraction of Minions readers would be interested in. So rather than cluttering up their space with what would have to be a lengthy post, I decided to answer over here, at my seldom-used hobby blog, where it was more likely to be seen by interested parties (and where interested Minions readers would be able to find it).

So, just for starters, let's take a look at the latest cartoon (you can, by the way, click on any of these to view a larger version):


Okay, the pat answer to Phil's question is, "everywhere." I've spent several years obsessively building up huge collection of figures, set-pieces, props, and accessories. Some are made. Some are found as action figure or doll accessories. Some come from the most unlikely places.

So what I'm going to do is use some cartoons as examples, talk about where the various items in them came from, and use that to offer more general advice about where you might find things of your own.

Let's just kind of go left to right and discuss things as we find them.

Number Two is talking on a pretty nice phone. The phone is a modified kitchen magnet I found at a kitchen store. I had to do some cutting and modification to make the hand-set removable.

Since the set is non-magnetic, I stuck it to the wall temporarily using a putty-like reusable adhesive clay sold for mounting posters and the like. You can find it in most any office supply stuff, and it's good for a million and one things when making dioramas. It doesn't dry out, so I keep blobs of it stuck to the side of a cabinet adjacent to my "Minions" workbench/studio, ready for immediate use. Like I said, it's reusable, so when I pull down the blob holding the phone to the wall, it will go back up there for reuse.

In the foreground there are some sandbags. Those are accessories that come with "Power Team" military action figure play-sets. Since most of my Minions use Power Team bodies, I've bought a lot of those over the years. The bags are actually hollow plastic, and open on the back, and so only look good from the front. I almost threw them away at some point, but I'm glad I didn't.

Not only are they handy for giving a set that pseudo-military "lair" look, but the hollow backside is great for hiding battery-powered LED "puck" lights, which I often use to as blue fill-lights in my photo set-ups. Actually, there's a light hidden there, but I forgot to turn it on before shooting. Whoops.

The rats fighting on top of the bags are toy-store items, sold as part of line of clear plastic tubes carrying various plastic animals. Some tubes are sold with nothing but various colored rubber rats, and I've bought a bunch of these. Again, handy around the lair, and I use mostly the black ones, which most of the rats in the tubes are white or tan. Save those for the lab-scenes.

The broken table and green storage drum are also Power Team items. The table isn't broken. It just snapped together in the first place, so I just snapped it back apart to make it appear smashed. It will be good as new next time I need it.

You can't see it well here, but the cell door is scratch-built. It's made from foam core, cardstock, toothpicks (for bars in the window), craft store hinges, and a padlock-charm found in a bead store.

1/6th scale doors are hard to come by, and I should make some more in various styles.

The wooden crates were found in thrift stores. Crates like these are used as containers for gift-soaps, bath products, little jars of jelly and jam, and other such things. I think the fad for these may be over, but there are still zillions of them cluttering up grandma closets everywhere.

The trash cans also came from thrift stores. They're at once surprisingly common, and hard to find. They're made as promotional items and sold to garbage and recycling companies, usually imprinted with their logos. The idea is you use them for pencil cups, paper clips, and the company's number is on your desk next time you need trash service. I've managed to pick up maybe half-a-dozen different ones in various colors. I don't know ANY place to pick these up at retail, but if you really want one, calling up the various trash companies in your area might turn one up. Good luck explaining WHY you want it.

Okay, let's move onto another prop-intensive cartoon.


Phil mentioned the Minionmobile, so I had to include it. The Minionmobile is obviously a golf cart. It was sold as part of some die-cast vehicle line a few years back, and it's actually more like 1/8th scale, not 1/6th. The roof was way too low for a 1/6th figure, so I had to extend the metal rods that support the roof and raise the seat to allow for more leg-room. You can see details on how I did it here. It doesn't look bad, and actually, I think the "clown car" aspect adds a subtle bit of humor everywhere it appears.

The clips in the back are designed to hold golf bags, which were missing on my example of the golf cart (I saw it in stores, but mine came from a thrift store again). So, instead, we have a GI Joe anti-tank missile launcher back there, and a scuba tank from an 18" knock-off action figure sold at Wal-Mart a few years back. (I bought some on clearance with idea of making giants or monsters out of them.)

While this golf-cart may be hard to find (check eBay), there are alternatives. Wal-Mart sold an RC Yamaha Rhino 4-wheel ATV last year, and there's a golf cart in the current "High School Musical" fashion-doll line that has possibilities.

The traffic cones are Power Team items again, and I wish I had more of them. They're great little props.

The high-tech curbs are rails from an Imaginex building set I think. More thrift store finds. The nukes are actually launchers from a Quest Aerospace Micromax model rocket starter set. I bought a bunch of these on clearance a few years back, mainly for the rockets and motors. The launchers I didn't have much use for, until I noticed how much they did look like some kind of nuclear storage canister or warhead. Now they show up regularly in Minions at Work sets.

Now onto something that shows a whole variety of prop-sources:


Going left to right again:
The wonderful console is part of a "Muppets in Space" action figure playset from a few years back. I got a bunch of these very cheap on clearance, and they're just full of great parts and set pieces. The console was plenty big enough, but it was too low, so it's removed from its original base and mounted on an inverted plastic cup sold as a desk organizer.

You can see the edge of an arched doorway in the back. This is actually one of those "sold on TV" gizmos called a "Can-A-Round." They're white plastic tracks designed to allow you to slide cans of soda and beer around to the back of your fridge. Or something. Seems like a stupid idea to me, but when painted gray, they look like high-tech girders and bulkheads. I have two or three sets, and I use them all the time.

The back wall is foam-core board (office supply or craft store) painted silver. It's decorated with PVC plastic pipe from the hardware store, held on with metal clips, screws, and nuts, also purchased there. The louvered vents are sold as under-eave vents for home roofs. Lots of goodies can be found in the hardware store, if you browse everywhere, and thing of things in terms of form, not intended function.

The equipment rack in the background is another one of those wooden gift crates I mentioned earlier. I painted it black, and stuffed it with a variety of military field radios (Hasbro GI Joe, Power Team, 21st Century toys), again, repainted and detailed using hardware spray paints and craft acrylic paint.

The chairs are all fashion doll items. Fashion doll lines are good sources for furniture and household items, though they often need repainting (lots of pink). Barbie, Bratz and My Scene lines are all good sources of stuff.

The table is thrown together. The top is just a piece of scrap wood put in as packing material in an "assemble it yourself" bookcase I bought a while back. The pedestal bases are a couple of curtain hardware things I spotted at the thrift store (form, not function, again). The top is held on with more of that poster putty stuff.

The top of the podium is a doll-house item. Standard doll-houses are 1/12th scale, half the size of 1/6th, but a lot of usable items can be found at doll-house suppliers. This was a desk-top lectern though, so I had to build the base myself, using wood scraps, and decorative molding strip (hardware store). Craft paint tied it all together.

The map and stand are from a Power Team set again, as is the green crate.

The briefcase actually was sold as a novelty gift item. It has a manicure set inside! But the latches, handle, and all the hardware work fine, and it's in pretty good scale. I've also seen these sold as business card holders. Business and desk-top novelty items and premiums often yield interesting items. In addition to the trash cans and briefcases, I've also picked up some cool office chairs, beach chairs, desktop computers, and other goodies sold as novelty or promotional goods.

The red table is another wooden crate. The yellow thing on top is part of some toddler playset. I found it at a thrift store, liked the shape, and made a few modifications to the "screen" on the side, replacing animal stickers with green cardstock (so I can easily Photoshop in computer displays or whatever).

The phone is our magnet again from the first cartoon. I've got a lot of novelty magnets that are useful props: computers, desk phones, pay phones, blenders, coffee-makers, dustbusters, clothes irons, toasters, lunchboxes, crates of fruit, pots and pans, toaster ovens, microwave ovens, aquariums, lunchboxes, gumball machines, wine bottles, all sorts of stuff. It pays to spin through the kitchen store every once in a while.

Okay, one more, in part to see how the same props get used again and again in different ways. This is Cap'n Rehab's submarine.


The porthole in the background is some kind of fiberboard ring I found in the floral section of a craft store. I have no idea what it's used for. I spay painted it gray, put in some scrapbook paper for the "reef scene" outside, and stuck it to the wall with more putty.

The ship's wheel was a wall hanging I bought at a tourist-trap gift store (I live in a beach town). The metal base for it (which you can't see) was made from a brass candle holder and some copper-pipe fittings from the hardware store.

In the foreground, there's the Muppet's in Space console again. Behind Number 9, you can see one of those rocket-launcher "nukes" again. The red barrel is a repainted Power Team item. The lamp thingies on top is actually an old, novelty salt-and-pepper set. I think I got it for $2 at a junk shop.

The arched doorway is made from our friend the Can-A-Round again. The door in the middle is cardboard and some textured scrapbooking paper I got at a craft store.

The high-tech crates came with figures in the GI Joe "Sigma Six" line.

The rubber duck around Cap'n Rehab's neck was part of a set of novelty earrings I spotted while following my wife into an accessory store at the mall. (Really guys, if your wife or girlfriend is at all crafty, it pays to follow her into bead, craft, and fabric stores now and then. You can go in by yourself, but the strange women who work in these places seem to have a talent for asking embarrassing questions.)

The little Nautilus desk model in the foreground was an accessory for a smaller scale Captain Nemo action figure I bought on deep clearance a while back. (I had no interest in the figure, but he came with a ton of cool accessories. I've also seen cool, usable for 1/6th accessories in other small-scale figures. Wrestling figures, the entire Muppets line being examples. (I got a cool mop and janitor's rolling bucket, a footlocker, some books, and food items with Muppets figures.) But for things like desk models, look for smaller die-cast toys. Nothing spruces up a military office like a model fighter plane, missile, or tank on the desk, and they're all over the die-cast section of the toy store. I've also found similar things in gumball machines and museum gift-shops.

I could keep doing this, but this post has gotten pretty long already. General hints:

Develop a "one-sixth eye." Develop the habit of looking at things in scale. Potential props are everywhere. For instance, I noticed one day while taking the protective cap off a "sports bottle" style bottle of drinking water I got at the theater, that it looked like a miniature Tupperware style bowl. I collected a few and added them to my box of kitchen and food items.

For specific ready-made 1/6th items, check fashion doll toy lines, but also look for novelty items elsewhere, sold as novelty clocks, souvenirs, key-chains, lighters, pencil sharpeners, magnets, desk accessories, business give-aways, jewelry, charms, etc. In addition to toy and hobby stores, you should also be browsing craft stores, bead stores (lots of interesting charms, bits of metal hardware, clasps, etc.), kitchen stores (especially for magnets and other novelty items), gift stores, souvenir stores (in my experience, the junkier the better), museum gift shops, zoo gift shops, and office supply stores.

Finally, you'll notice that a lot of my stuff comes from thrift stores. Thrift stores, garage sales, junk-stores, swap meets, rummage sales, are full of useful prop items. Just use the 1/6th eye. A wooden jewelry box is a desk. A pencil cup is a waste basket. A novelty metal cocktail skewer or letter-opener is a sword.

This stuff is literally everywhere, and often the coolest items are cheap or free. It's all a matter of having the eye, and the creativity, to find them.

Tuesday, September 02, 2008

Thinking inside the Box

After doing over 125 "Minions at Work" photo cartoons, I'm getting a little bored. Not with the Minions but with the sets I photograph them on.

My "stage" for the Minions is nothing but a small workbench on which I throw together sets using a variety of backdrops and walls (most built of foamcore board) and a variety of other "wild" set pieces, such as columns, beams, arches, and doorways. I can really do a wide variety of sets by swapping my basic pieces around, but for the most part, they have one thing in common. They're flat.

Because of the single-panel format for "Minions at Work," it's generally important to see all the characters in a scene clearly: who they are, what they're doing, what their body language is, and what they're holding. That's hard to do when you get more than two characters in a scene, especially if you're also struggling to get an interesting angle on the set (something else my current setup makes difficult).

Somebody is always turned the wrong way, or you can't see their hands when you need to, or you can't see what they're holding, or where they're looking, or something else that's important to the scene or the joke.

But it's also difficult to make multi-level sets to my requirement. I need modular flexibility. I need things that are sturdy and versatile. I need things that are self-supporting and that don't eat up too much of my limited (especially front-to-back) bench space. And most of all, I need cheap.

Here's a solution I've come up with (click on any of the images for larger versions):


Yeah, boxes. These are recycled "shoebox" sized Express Mail boxes. I've just glued the flaps shut and covered them with self-adhesive shelf-paper, also known as contact paper.

Contact paper is wonderful stuff, with all sorts of uses. It's cheap, comes in useful sizes, sticks well to most surfaces without additional glue or tape, and can be used to disguise or repurpose all sorts of common objects for use in our 1/6th world.

The big problem is the limited patterns available and their applicability to 1/6th sets. A lot of the patterns are florals or other decorative patterns that aren't much use to me, and there are wood-grain patterns that are way out of scale for 1/6th use.

On the other hand, there are sold colors, geometric patterns (like black and white or other checks, good for floor coverings, and stripes, which have some uses), and metallic. Here's an on-line-site to show you some of the patterns and colors you may also find in your local stores.


I've used the metallic papers before, but for this project, I went with a couple of stone patterns, one a gray granite and another a gray marble.

Why two patterns? Well, while either pattern can be used for both walls and floors, it's my feeling that the coarse pattern of the granite is better for floors, and the smoother pattern of the marble is better for walls.

Also, cover a box with one pattern, and it still looks rather like a box. But if the sides are one pattern, and the top another, then it takes on a bit more weight and reality.

But remember, I said flexible, and that's where I got sneaky. The trick her is that, in a photo, normally you can only see at most three of the six sides of a box. If you see an exposed side with one pattern, you'll tend to assume that the reverse face of the box is the same, but it doesn't have to be.

So for my boxes, I covered the ends, one wide side, and one narrow side with marble, and one wide side and one narrow side with granite. By flipping and rotating the boxes to expose various combination of surfaces, two little boxes can be used for an awful lot of different things.

Let's start with something simple. Stood on ends, the boxes become modular, free-standing wall panels. These can be used to provide a stub wall in the foreground of a picture, or to suggest a doorway or hall where none actually exists. Turn them one way, and you've got granite walls.

Turn them the other way, and you've got marble.

One thing to remember for photo purposes is, it isn't important what you build, it's what people see, and what they fill in mentally to complete the picture.

So while we can see this is just a couple of boxes on end, if you were to zoom in or crop to eliminate the tops of the boxes, the viewer will just assume it's a wall that extends all the way to some invisible ceiling. Same with the sizes. If the picture doesn't show the end of the wall, the viewer will assume it continues well beyond the picture, even if the wall overhangs the frame by a fraction of an inch.

Of course, I've only got two boxes, so the wall is necessarily pretty small. Making two more would allow for much more sizable walls, and the flexibility to create a doorway in the middle.

But while this is useful, my primary purpose for creating these was to create some verticality to my sets. Let's see how that works...

Here, by flopping the boxes on their side, I create a raised walkway or second level along the back of the set. This isn't a full "story" bump by any means, but it's enough to allow background characters to be seen clearly over foreground ones, and it adds some visual interest.

Note that I've put the granite "walkway" side on top, and the marble on the front. The fact that the floor is also covered with granite pattern ties the set together.

This setup would also work as a large display shelf of some sort, like a museum or trade show-exhibit, or a runway for a fashion show or a strip club. These things are just as flexible as your imagination.

In a perfect world, the gap between the two boxes wouldn't be dead center in the shot, but it's easy to hide behind an object or character, or to Photoshop out. You could also use a scrap of the same pattern contact paper to cover the gap. Or, you could just live with it, and assume it's a natural seam in the stonework.

Okay, here we flip the boxes, and we have a higher, narrower walkway. Still not a full story, but enough to provide some real separation between the levels.

Okay, the next step to tie these things into a scene is to enhance them with props. I happen to have three of these Power Team traffic barriers, so I'll put them on top of the box walkway. Now it looks more like a balcony or catwalk of some sort.

Of course, you may not have something ready made like this. One thing to remember is that cardboard is really easy to work with. You could punch or drill some evenly spaced holes and make removable stanchions out of wooden dowels or tubing. (Remember though, any holes you make in a side may limit its usability as a wall for later use) Connect the stanchions with scale-sized-ropes or small chain (check the jewelry department at craft stores) and you've got hand-rails.

Now, let's get a little more creative in both our arrangements of the boxes, and the use of props.

In this example, by flipping the boxes in two different directions, and careful exposure of a bit of that granite pattern, we've got a wall with a set-back shelf that we can fill with decorative props.

This somehow reminds me of Stargate SG-1 and the interior of a Goa'uld mother-ship. Once again a longer wall would be better, and you could also add to the height by stacking more boxes on top.

(Most of the Egyptian props, by the way, were purchased in the aquarium department of a pet store. The gong is a brass nick-nack I picked up at a thrift store.)

This arrangement suggests the base of a massive column, perhaps along the side of a great temple or hall. Once again, I've arranged the boxes to create a shelf, and added another aquarium department prop to sell it.

A row of two or three of these would be even more effective in suggesting a large and impressive space. As I said before, let their imaginations work for you. Show them three, and they'll imagine a dozen.

This scene would also be greatly improved by a backdrop more in keeping with the foreground (it could just be a sheet of foamcore covered with more marble paper, and some decorations added, like hanging tapestries created from cheap scarves or from scrapbook papers purchased in a craft store.

Finally, here's a slight variation on the above arrangement, used to create an impressive platform from which an Evil Overlord can address their attentive Minions. The custom-built lectern that I've built from wood and molding scraps is a big plus, but you could simply provide a box of roughly the same proportions (perhaps also disguised with shelf paper) for them to stand behind.

This scene would be greatly improved by hanging something on the backdrop, such as a flag, banner, shield, or logo.

Ironically, my first use of these in Minions at Work really doesn't fit any of the above. Mostly they're used to support a pre-existing set piece, my metal catwalk prop. Here's the cartoon. If you're interested in seeing how the catwalk was built (it's an easily reproducable design from parts you can get in most home-centers or hardware stores), you'll find a post on it here.

Of course, while the granite and marble patterns work well for me in a lot of applications, they won't work everywhere, or for everything. If you don't find the pattern you need in contact paper, check the fancy papers sold by the sheet in the scrapbook section of most craft stores. Paper can be glued to the box or applied with double-sided tape. You can even create your own papers by taking photos (culled form the net or shot with your own camera) and printing them on a color printer (heavier paper stock is easier to work with than standard printing paper). Using your own camera, you can capture weathered wood, cracked concrete, stone, rock tile, rusted metal, or whatever else you need, and scale it for use in 1/6th (or other scale) scenes.

Wednesday, August 23, 2006

Making an easy weapon-rack


Maybe you've seen those cool grid-type weapon racks in 1/1 size. If nothing else, you might have seen them in the ballistics lab set on CSI: Las Vegas. I've always liked those, and I even think that somebody (BBi or Hot Toyz maybe?) made a 1/6th version, but somehow I never ended up with one.

Now maybe you've heard about the concept of a "one-sixth eye." It developing the sense of looking at everything you see as a potential 1/6th prop, and evaluating it accordingly. The other day I was in my local Ace Hardware store looking around (while fending the over-helpful sales people off with a stick, as usual) when I spotted something in the paint department that sent my One-Sixth-O-Meter right to stop.

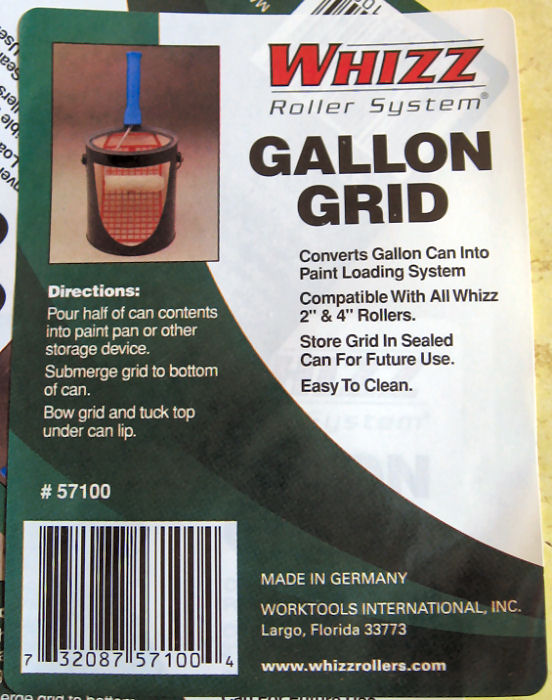
It was a cool little plastic grid molded in off-white speckled plastic, part of some sort of fancy roller system, the Whizz Roller System It wasn't even in a package. It was just a plastic grid with a sticker on it, hanging on a peg. Price: 99 cents. At first I couldn't be sure what it was good for, but I knew there would be something I could do with it. I almost bought just one, but on impulse, I picked up all four that they had in stock.

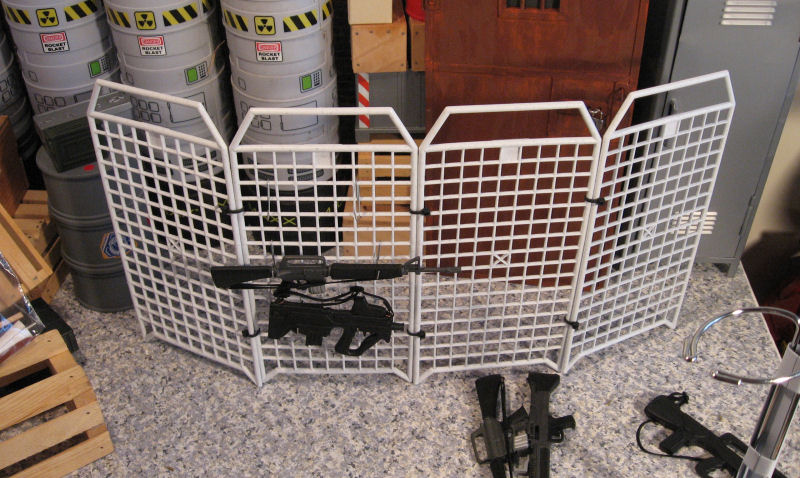
It didn't take me long to realize that they'd be interesting attached together edge-to-edge. I looked around for an easy way to do that, and ended up settling on small, black-plastic wire-ties that I already had on hand. I used two along each edge, pulled tight, and cut the excess off with scissors.

By now, I was starting to think weapon rack. My intent was to make a free-standing, four-sided rack, but for maximum flexibility as a prop, and for easy storage, I didn't tie the final corner together. That way, it could be folded into a square footprint, fanned out as a screen-type rack, or even be used as a safety or crowd-control fence.

The next issue was how to make hooks to hang weapons on the rack. Whatever I did had to be cheap and easy to mass produce. After several dead-end ideas, I settled on using light-duty, wire, paper clips. I used the inner loop of the clip intact, bent the larger loop out about 45-degrees, then cut it off (using wire cutting pliers) leaving about a half-inch stub, I then bent up the last eight of an inch or so using pliers, to make it more of a secure hook.

The small loop from the clip goes over the grid. The weapon itself hangs on the cut-off stub. (It occurs to me that another alternative that might work would be to use wire Christmas ornament hooks, and they'd probably work unmodified)


Here's the final result, with only a few weapons installed on one side. This would look equally at home in the firearms locker for an assault team, in a ballistics lab, a police property room, or an arms-dealer's show-room.

Friday, July 28, 2006

Tree how-to follow-up

I was gratified, and maybe a little surprised at all the positive feedback in email and many forums, you're only seeing a tiny fraction of it here) I've gotten on the "make a tree" post. Given all the quick-and-dirty set and prop building I'm doing for "Minions," you'll probably see more in the future. Please let me know what particular things you'd like to see, and what you like (or don't) about the posts I do make.

As always thanks for reading! (And viewing!)

Wednesday, July 26, 2006

Only God (and now you and me) can make a tree


In my photo dioramas I've been making lots of use of pre-printed papers sold in the scrapbooks sections of craft stores. I've successfully used them to represent grass, sand, brick walls, and even water. But after doing last week's park-scene for Minions, it got me thinking about other "stock" props I could build for future use.

One thing it occurred to me would be nice to have would be a bunch of tree trunks for forest scenes. Yes, you can use real wood, but the stuff is heavy, dirty, hard to store, and sometimes just doesn't look right. Maybe there was a better way.

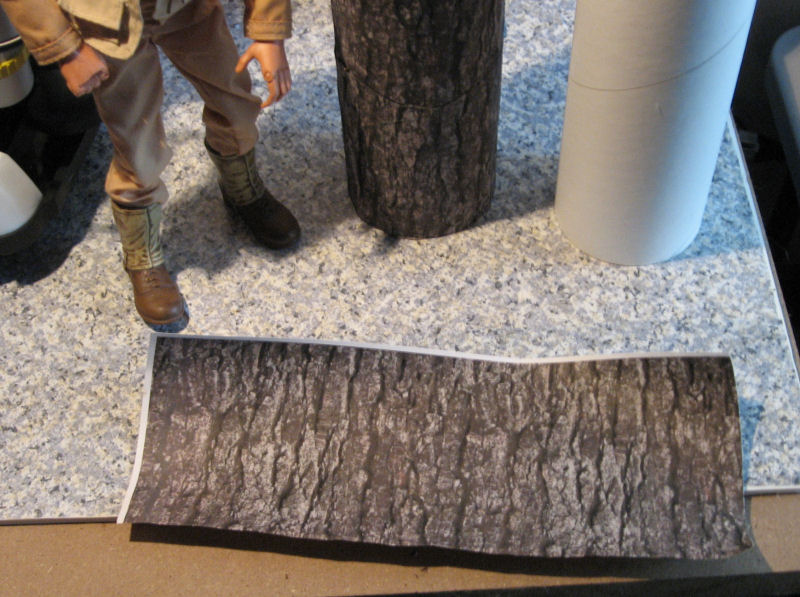
I started to wonder if I could find a "bark" paper to use, but I trip to the craft store turned up nothing. Then I had another thought: why not print my own?

I used Google's handy image-search function (searching on "bark") to come up with a couple of likely source images. Then I picked my favorite and used Paint-shop Pro to "clone" the image three across to make it wider. Finally, I printed it on my inkjet printer using the "stretch to fit page" option. I printed three copies, to give me enough sheets to work with.

My thought was that I could glue them around cardboard tubes. Yes, they'd be smooth, but my experience is that realistic textures usually don't look flat to the 2-D eye of the camera. I figured if I just wrapped it around a tube or dowel, it would look good enough, especially if it appeared in the background of a scene.

This is the same trick that computer game makers use when they "map" a detailed texture onto a fairly simple 3-D object to achieve a realistic look without bogging down the computer or console rendering the scene. In this case, I was "mapping" the flat bark texture onto my simple tube shape.

Thinking about it, however, I realized that I could go the computer one better, and easily add some real texture to my printed sheets. Here's how I did it...

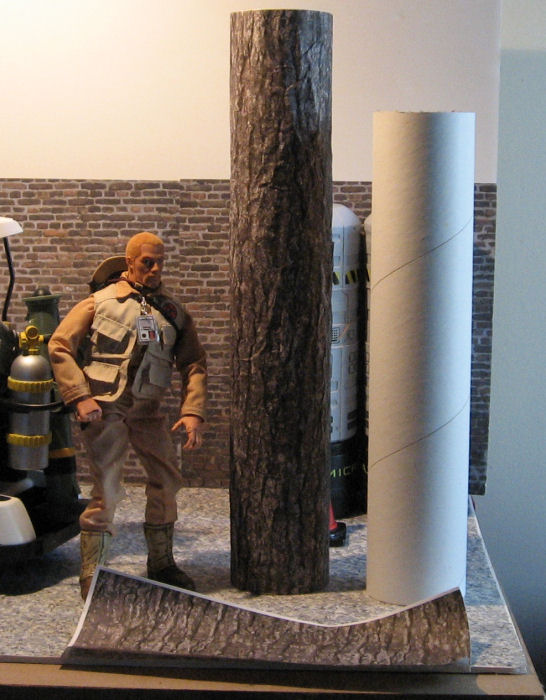
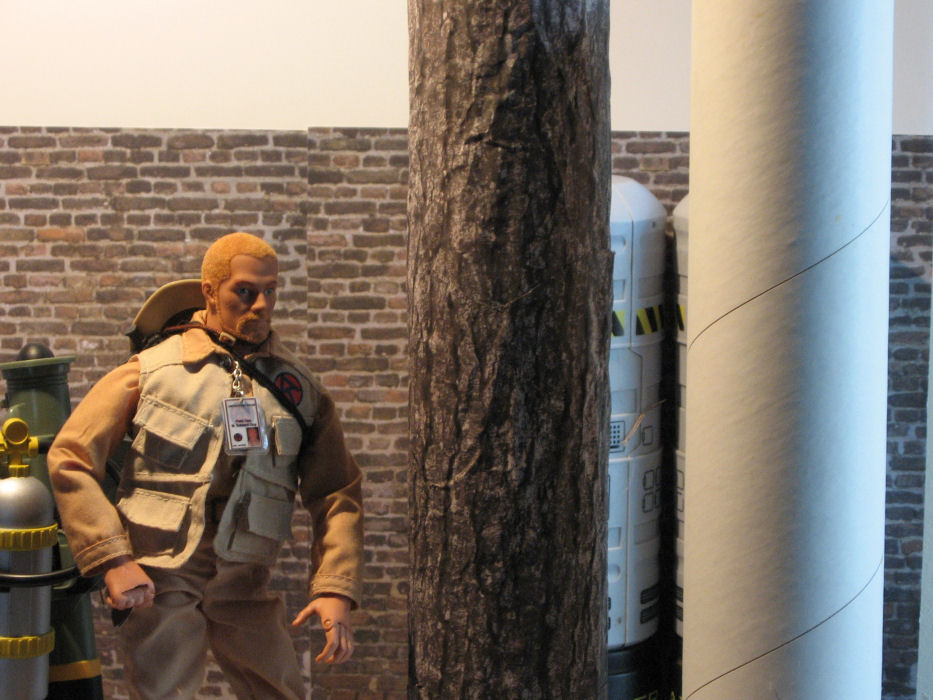
First, I selected my core form, a 3-inch mailing tube that I had laying around my shop. You can see a piece of the "naked" tube on the right side of the pictures. Most any cardboard tube would work, from a couple of paper-towel tubes spliced end-to-end, to a piece of carpet-tubing to create giant redwoods.

I determined that it would take most of three sheets to cover the tube, and that the long direction of my printed sheet would go around the tube with minimal overlap. For ease of construction, I decided to use transparent tape instead of glue. I carefully lined up all the joints so that the tape and seams are all hidden on the back side of the tree. (This is a key trick for pulling this stuff off easily. Don't build or detail things that people aren't going to see. The viewer's mind will fill in the rest of the bits that you leave off.)

I started at the bottom, trimming the white edges off the sheet where they'd show. This is where the real texture comes in. I then took the sheet and rolled it up into a small tube, then crushed it, rolling the resulting mess between my hands to add more folds and creases. Then I carefully flattened the sheet, which now had nifty texture that would pick up highlights and make the profile edges of my tree trunk look more realistic.

Razor-straight lines are a dead-give-away that something is artificial, and the human eye is very good at spotting straight-lines.

I took this in consideration when rapping the second sheet around the trunk. I planned to overlap the sheets slightly anyway, so I hand-trimmed the bottom of the sheet in a kind of "wave" that would help disguise the seam. After taping the sheet (both the lower sheets were also taped to the tube at the top, where the tape would be hidden by the overlap from the sheet above) I finished off with the final one.

I've got some ideas on how to add roots and limbs to my tree, but I haven't tried them out yet, and for a forest scene, the trunk is the most important part. You can whip up a whole grove of these in an evening while watching TV. Remember to used a variety of tube sizes and bark textures and colors for a more realistic "forest" You could even print out some "knot holes" and other tree features, cut them out, and paste them on for a more realistic look.

One other advantage of using multiple tube sizes is that you can store them compactly nested inside one another. Try that with something you rescued from your wood-pile!

Monday, July 17, 2006

DVD Extras for "Minions: Walking the Dinosaur"


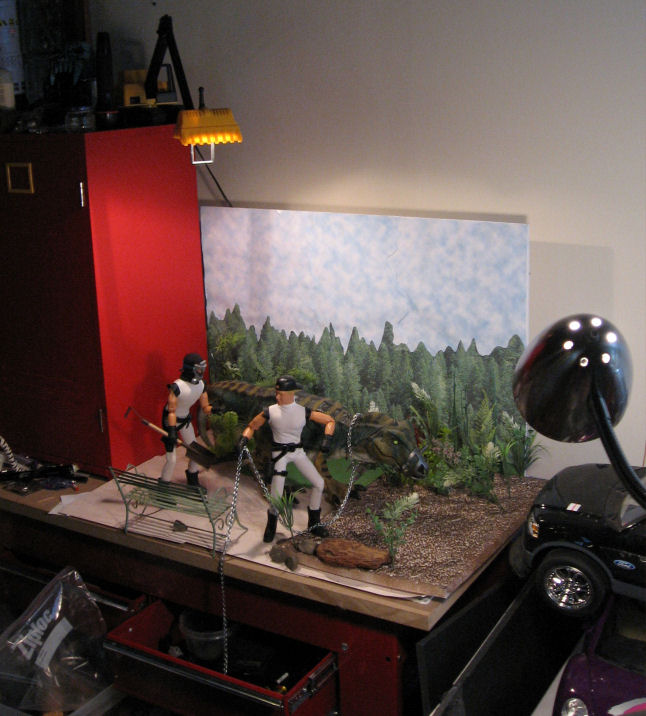
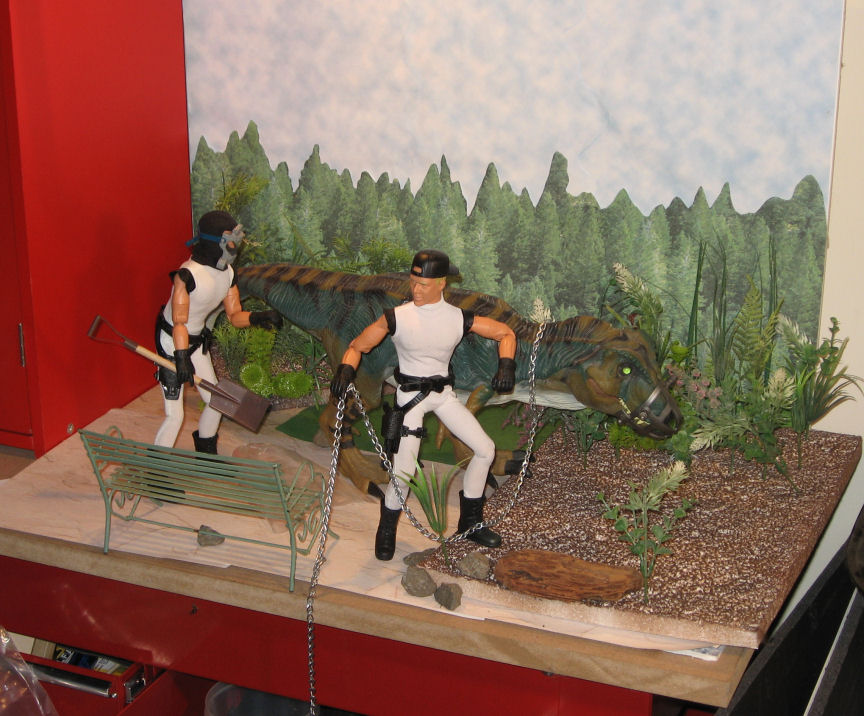
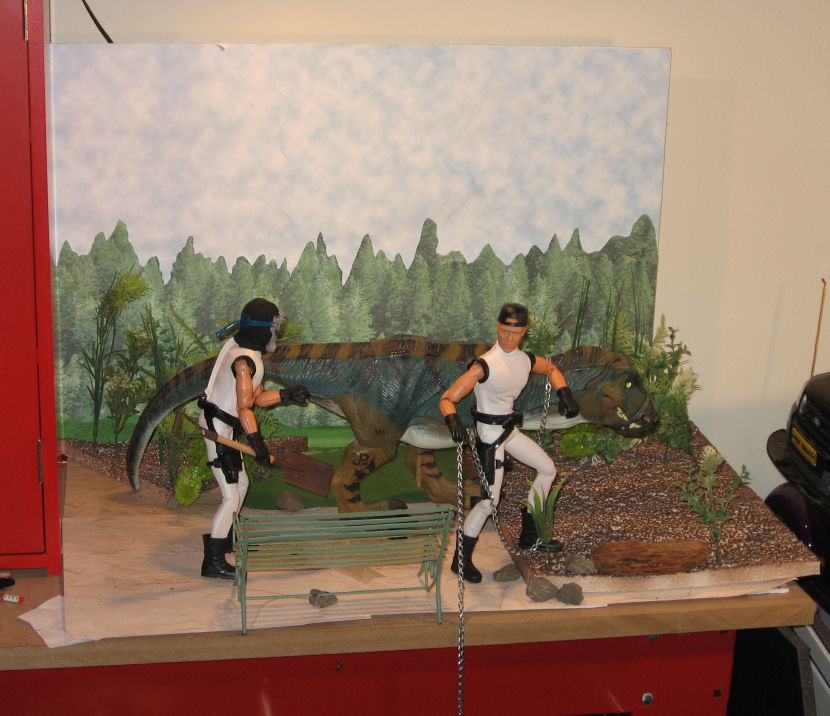
I'm really pleased with how this installment of "Minions," titled "Walking the Dinosaur" turned out visually, so here are some "behind the scenes" shots of the set.

I made extensive use of printed papers sold in craft stores for scrapbooking in this set. The ground is simply overlapping sheets of a "stucco" print. There are also some small scraps of a "grass" print to break up the lines. The backdrop is a cut-and-paste job onto a sheet of foamcore, using pieces of two different sheets, a "cloudy sky" sheet, and a "pine forest" pattern. I covered most of the sky with overlapping sheets of the sky pattern, then filled in the horizon with hand-cut pieces from the "forest" sheets. I probably used about four sheets of each.

The "dirt" area is actually a sheet of scrap packing foam hit with brown spray paint. I didn't use foam-safe paint, so it melted the surface into an irregular texture, and bits of white foam are showing up through the foam. I wasn't sure how it would work, but seen from the side, the white actually breaks up the dark brown and makes it look more like a natural ground-cover.

The plants are all plastic, consisting of bits of aquarium plants (bought cheap at a thrift store), and some dollar-store mixed greenery that I took apart to make smaller plants. The rocks are just some driveway gravel I picked up right outside my office door. The brown "log" is actually a piece of driftwood, the only real plant mater in the shot.

The park bench is metal. I found it in a thrift store (in metal housewares, not in toys) for about two bucks. The shovel is a craft-store item. The chain was purchased by the foot at the hardware store. The dinosaur is a "Jurassic Park" T-Rex, possibly one of the nicest toy dinosaurs ever made. I currently own three of them, and I'm always keeping my eyes open for more.

I did do a slight bit of digital retouching in Paint Shop Pro, using the "clone" tool to hide the edges of the foam sheet, and the "smear" tool to break up the edges of my cut-out trees and make them look more realistic.

The whole thing only took me twenty minutes or so to set up using things I had on-hand. I pays to think ahead and stockpile basic backgrounds and props like these.

Monday, June 12, 2006

Catwalk construction details


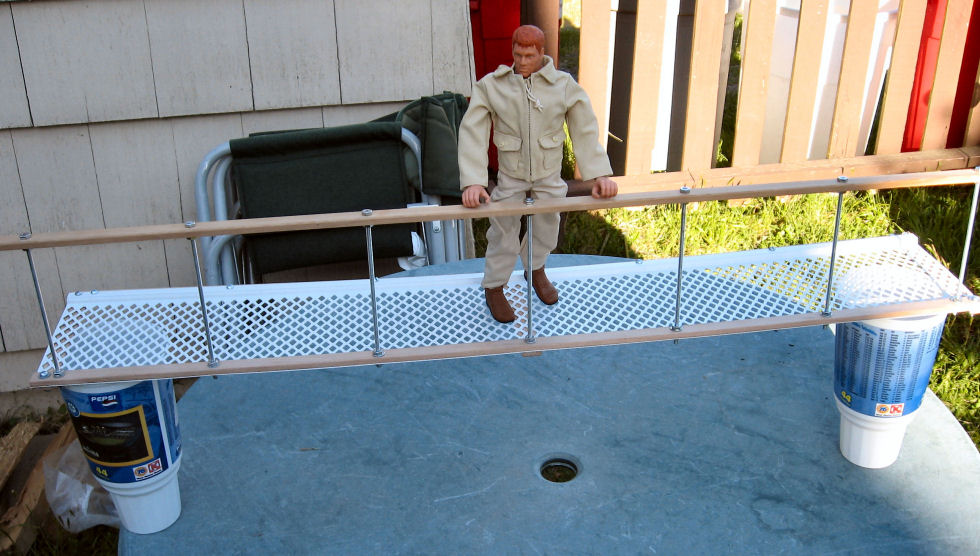
Here are some detailed construction shots on my catwalk accessory. It's constructed totally out of standard hardware-store materials. The most exotic stuff is the plastic "gutter guard" grating (meant to keep leaves and trash out of house gutters) that I used as the base of the catwalk.

You can see in this photo that there's a bit of sag at this point. I hadn't decided if I should add the second railing or not, and if it should be a complete railing, or have a pass-through. The sag decided it. These railings contribute a huge part of the strength of the catwalk, turning it into a "U" shaped beam and keeping it stiff, despite its fragile appearance.

From this angle, you can see the railing and lower supports, all made from rectangular molding picked up in the lumber department. This stuff is cheap, easy to work with, and has all sorts of 1/6th applications. Most of the cutting (for precision, and so I didn't have to keep going back and forth to the shop while I worked on this) was done with an Xacto razor saw and miter box. I used the same tools to cut the threaded rod used for the railing uprights.

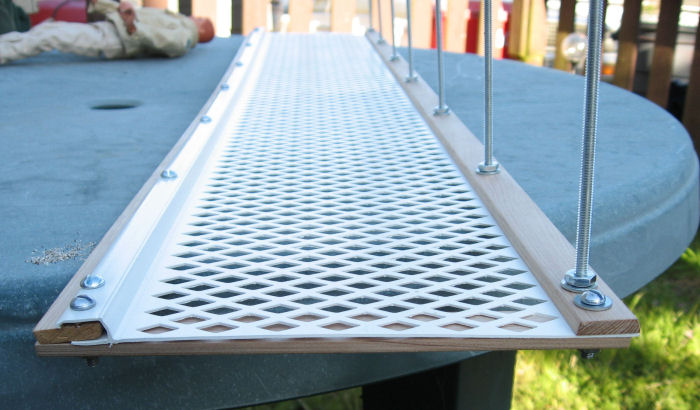
Here's a detail of the railing support. Threaded rod, nuts, washers, that's all they are. Note the nuts above and below the railing, and also above and below the bottom rail. To make sure the holes lined up between the bottom rail and the hand-rail, I clamped them together and drilled them both at once.


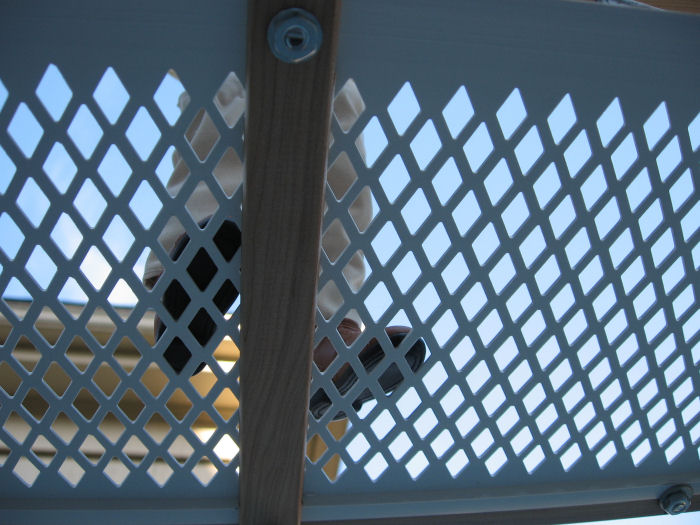
Here's a detail from underneath. As you can see, I can shoot photos from below as well as above or the side. The perforated plastic also casts interesting shadows, making for dramatic lighting. The plastic itself is thin and rather flexible. The wooden railings along both sides, as well as the wooden handrails, provide most of the strength.


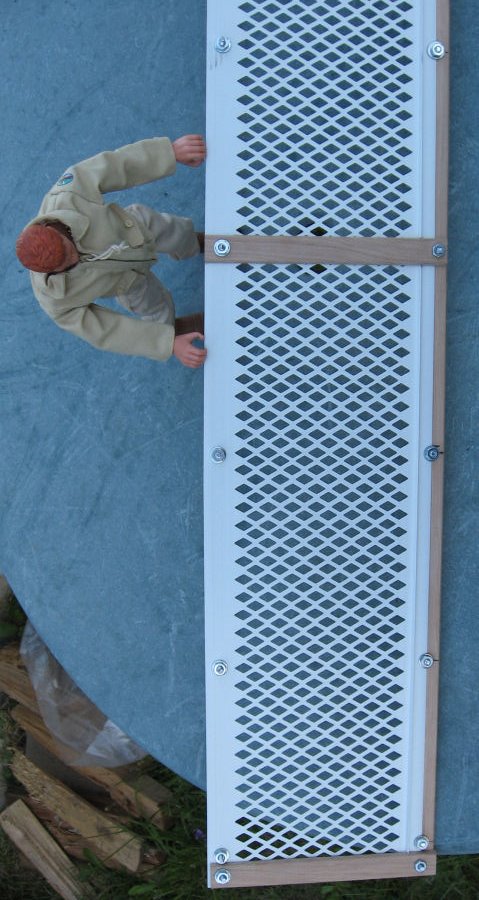
Another view from below. Notice the cross-pieces (one at each end, one in the middle), and the fact that one railing sits on TOP of the plastic, while the other fits inside a molded grove on that side. You'll be able to see this better in the end-detail shot.


Here's the end. You can see how the molded-in grove grips one of the lower rails, and how the other is bolted on top of the flat plastic.

The whole thing was done in just a few hours working in front of the television. The tools included the afore-mentioned saw and miter-box, an electric drill, a tape measure, a few spring clamps, some pliers, and a box-end wrench to tighten the nuts. I finished it off with a few spray-coats or reddish-brown primer.

Most anyone should be able to duplicate this project with pretty minimal effort. If you don't need a catwalk, think of it as a balcony, ship railing, boarding gangway, or foot-bridge.

Monday, May 01, 2006

Minions Extra Feature


As promised, some behind-the-scenes stuff from the latest "Minions" toon posted over at Minions for Hire. This is my employment office set. I thought this came out pretty well, considering how quickly I threw it together. Some notes on the props and set-pieces.

I've used my "universal wall/floor" for the backdrop. This is just a sheet of foamcore board with some shelf-paper stuck to it. I'm getting pretty tired of it, and so are you by now, so I need to make up some new ones for variety. The wood flooring is just a couple of cheap floor tiles I picked up at a dollar store (three for a buck). The "glass" walls are actually a couple of Plexiglas sign holders, a couple of pieces of Plexiglas held in a self-standing wooden base. You can buy these in any office supply, but I got mine for cheap at a thrift store.

The desk is actually a couple of pieces of scrap wood that were used as packing material on some unassembled bookcases I bought last year. They were pre-finished, so all I had to do was find something of the right height to support them. One goes on top, and the other leans against the front. Instant desk. Mind you, I didn't want to take the time to cut down the front one and used it as-found, which is why the desk is so darned tall.

The window is actually a small picture frame, sprayed black, with a photo-copy skyline taped to the back. It hangs on the background using a thumbtack.

The briefcase actually came with a novelty manicure kit (I removed the contents, naturally). I got mine from American Science and Surplus. Item 32646, $3.95 each. (Mind you, you'll need to spend $20-30 on an order for the shipping charges not to eat you alive, but they have lots of cool stuff, so that shouldn't be hard. Or just buy a whole pile of briefcases!)

The phone is a fridge magnet. The in-basket is the lid from a novelty box I got on clearance at a craft store a while back. The wastebasket is a desk-accessory cup I got at Staples office supply. The filing cabinet is a novelty business-car file. These are sold mainly as premium items (there's a business name printed on top) so they're hard to find at retail, but they show up at gift and office supply stores sometimes.

Several items here were just made on my printer. The cut-and-assemble storage boxes with removable lids can be downloaded from Jim's Print-minis. You'll find all sorts of printable props and goodies there. I simply made the sign and desk sign in Microsoft Word and printed them on card-stock. The papers on the desk and in the briefcase were printed in Word as well (three point type), on regular paper, then cut down to size with scissors.

Tuesday, March 14, 2006

Temple guardians (a how-to)


If you read my writing blog, Multiplex of the Mind, you may have seen this recent post about my intention to build an interesting garden feature as a tribute to my departed kitty-friend Banzai. My idea is to build a (roughly) 1/6th scale "lost tomb of Banzai" out of paving stones, earth and plantings. It actually will be built over his burial-place, currently just marked with some old bricks.

Some friends of mine bury all their cats (and they've had lots over the years) in

their yard, and mark each with a special plant. But plants die (as they discovered to their distress recently when the plant marking a favorite cat's grave went south on them). Besides, a plant is just a plant as far as I'm concerned. I'm thinking about the far-future here.

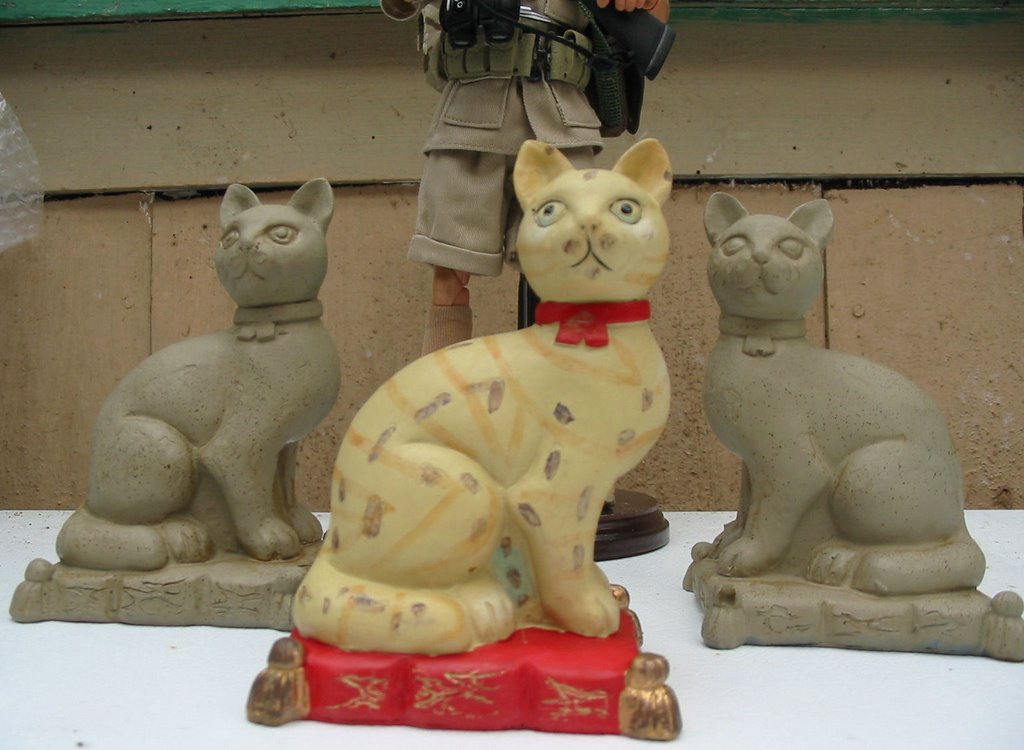
So I've been staring at various kinds of stone and brainstorming what this would look like and how I'd build it. Once thing I wanted was for it to have some statuary and carvings. But how to do that? There are all kinds of lawn statuary, but most are the wrong scale for my tomb, and most are painted in a way that I'd have to undo anyway. I also needed something that looked like it could have been carved thousands of years ago by some lost civilization of cat-worshipers. Here's what I came up with:

I think these look pretty good, but I'm almost ashamed of how little they cost. In actuality, my stone statues are actually a couple of cheap and garish resin-cast statues that I bought at a dollar store. See the second picture for what I started with.

I almost passed on these, but something about the shape caught my eye, and I gave them another look. Resin, cheap or not, should be durable enough to last a good long time outside, and the scale was good. I bought six of them, thinking that would allow me to mess things up experimenting on a few of them, but the first pair turned out pretty well I think. Here's how I did it, in case you'd like to turn some cheap resin of your own into ancient statuary.

First, I sprayed them with gray primer to make sure the shape was as good as I thought it was. I was quite satisfied with the result, but it looked nothing like stone. So after searching around, I got some camouflage color spray paint in a color called "Khaki."

A good coat or two over the gray gave it a much better color, but it still didn't look like stone. To do that, I took a can of brown spray paint and sprayed it into the air several feet over the cats. A cloud of brown particles drifted down, adding dark flecks that suddenly make them look like stone. New stone unfortunately. They needed to be aged.

I boiled up some water in the kettle, threw a couple of Lipton tea-bags in a cup, brewed up the thickest, nastiest cup of tea you've ever seen, and broke out a small paint brush.

First, I washed a coat of tea over the entire cat and set it aside to dry. I repeated it, with a special emphasis on the crevices and folds in the statue. Then I repeated it several more times, concentrating on cracks, folds, and imperfections in the resin. Sometimes I'd slop the tea on, then wipe it off when it was partially dry. Finally, I had the ancient look I was searching for.

The cats you see here aren't quite through though. I'll give them a final clear coat of spray matt medium to protect the tea stains while keeping it dull. Then they'll be ready to decorate the steps of my temple, whatever it looks like.

That still leaves me four cats to play with. I'm thinking about taking a saw to one and find out if I can cut the head off. If so, I may be able to embed it in a mortar wall, or use it to top a pole or column.

I'm still trying to think of other decorative touches that are appropriate. We used to call Banzai the "monkey cat" for the way he'd swing down his cat ladder rather than jump, so adding some monkey figures to the temple would be appropriate too. I'd also like to work in his name somehow, disguised in some kind of ancient writing. I'll keep you posted on my tribute to my little friend.

Banzai always enjoyed sneaking into my Joe photos, so I think he'd like being able to stay in them for years to come.

Wednesday, January 25, 2006

Simple, for a change

After so many heavy-duty features in a row, I thought it was time to step back and do something simple about doing something simple. Not every Joe project has to be a major operation. Sometimes some of the best fun can be found in the kind of simple project that can be done in an evening, or maybe even in a hour while watching your favorite TV program. I'm going to share one of these now, and just incidentally, another.


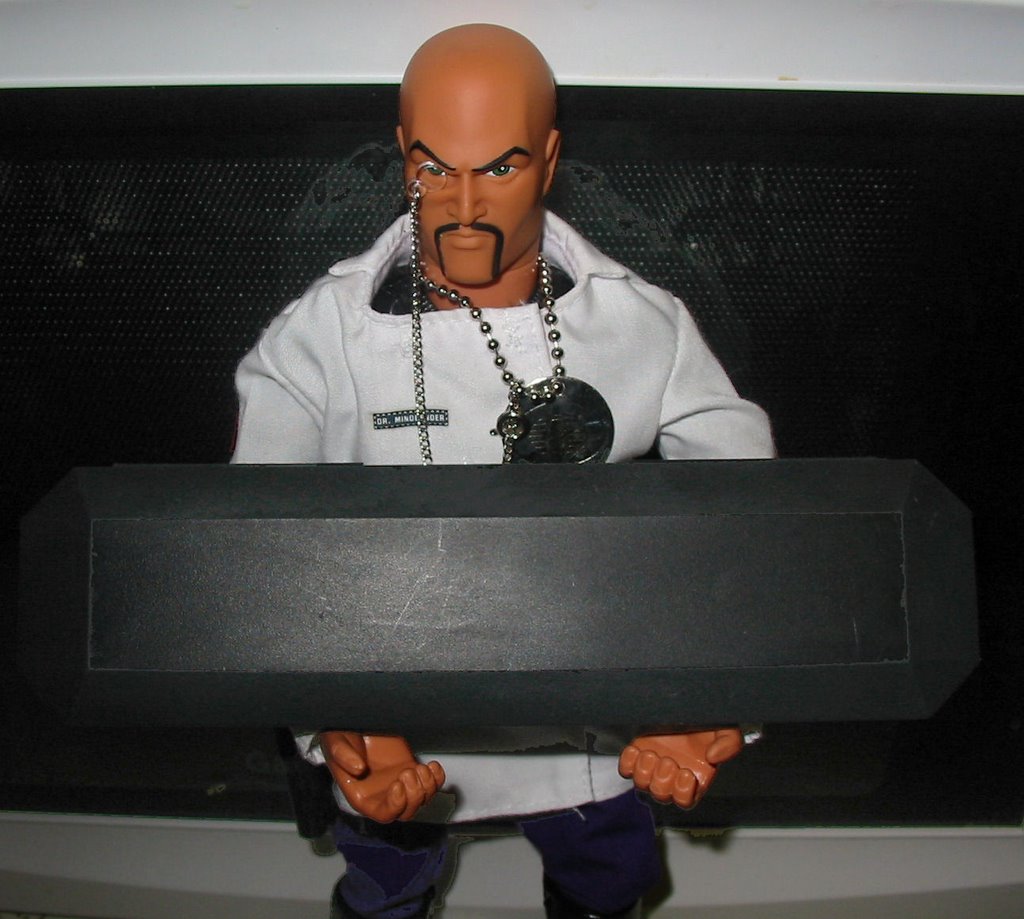
This plastic box showed up at my house a while ago, and immediately got tossed into my Joe project box. It's just a black plastic clamshell box that some kind of ball-point pen came in, and I knew it would have some kind of use.

Okay, black-on-black is not my best choice of photo backgrounds, but to be honest, there isn't much to see. This thing is angular and kind of plain except for the beveled edges. Just a flat box.

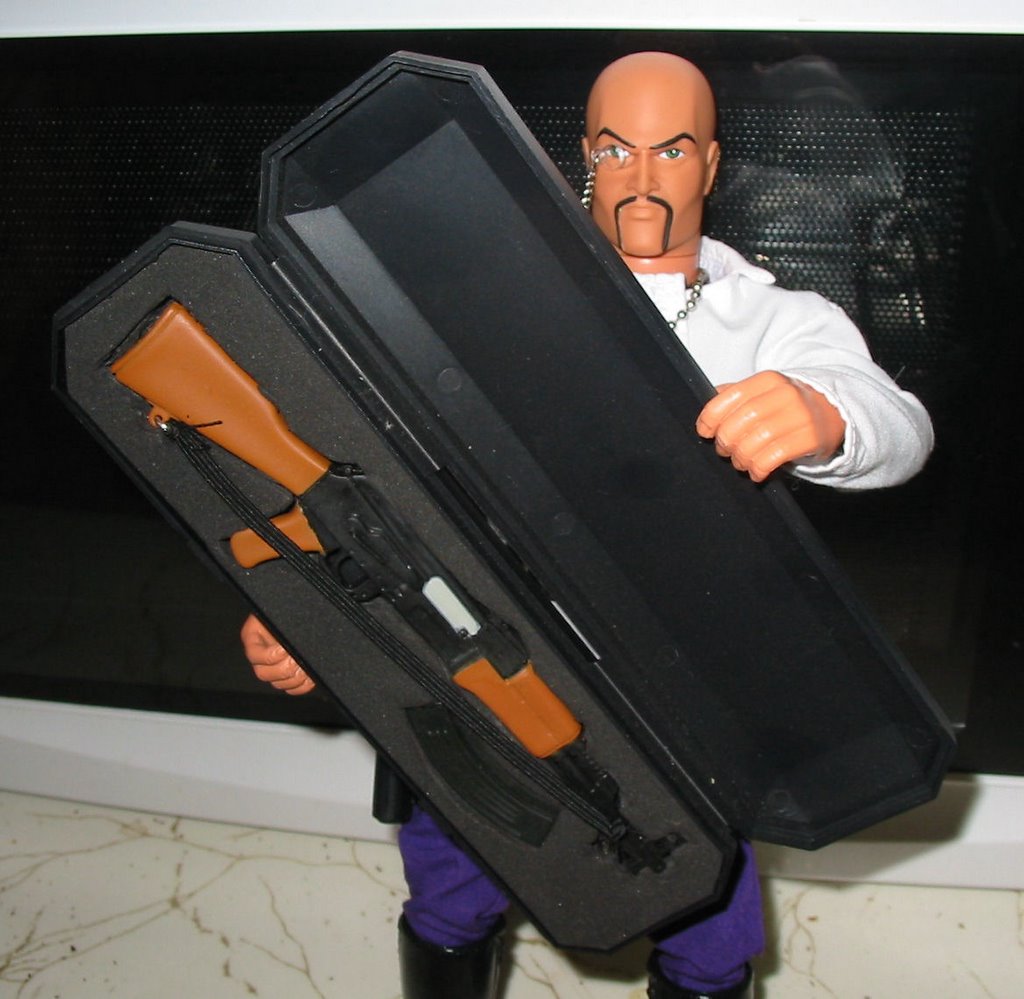
Then one night while watching TV, I had an inspiration, grabbed some craft foam, a hobby knife, a pencil, and a box of 1/6th weapons, and went to work. Before the program was over, I had this:


Step-by-step, here's how to make your own fitted equipment case:

Supply list -
Box or other container
Thick craft foam, black or your choice of color (sold at Wal-Mart and most craft stores)
Weapon or gear of your choice

Tool list -
Small hobby knife with a fresh blade (the pointed triangular kind works best for this)
Safe cutting surface
Pencil

Instructions:

1. Cut a sheet of foam to fit tightly in your box of container. If the box is deep, you way want to cut more than one sheet to provide a "filler" layer in the bottom of the box. My example only needed a single layer of foam.

2. Select your weapon(s) or gear to fit the box. Experiment with layout and decide how you want to position them in the box. If you have space, you can make some extra cut-outs for shells, clips, grenades, scopes, accessories, etc.

3. Once you've decided how things should be laid out, hold each piece in place and trace the outline onto the craft foam.

4. Remove the foam from the box. If you have one or more filler layers, set them aside or leave them in the box. You probably just want to cut the top layer.

5. Place the foam on a safe, flat, cutting surface (a plastic or wood cutting board from a kitchen store works well) and carefully cut along the inside of the pencil lines. Don't try to reproduce every detail, and try to err in the direction of cutting the hole too small. The foam will stretch and compress, and you can always trim more later. But once you cut foam, you can't put it back. Try to make a clean cut, and be sure to cut all the way through to the bottom. It will be easier to cut multiple cut-outs if you leave all the "plugs" from the holes in place until all cutting is finished.

6. One-by-one, starting with the largest, remove the "plugs" from your cut outs, and test-fit each item. It should insert easily, but stay firmly in place on its own. If necessary, remove the item and trim to fit.

7. Re-insert the foam in the box. Insert your weapons and gear. You're done!

Use your imagination in applying this. It can be used for weapons, bombs, spy gear, ancient artifacts, communications equipment, alien embryos, you name it. The foam can be in any kind of box or case, a briefcase, or even a Joe-sized picture frame to display some antique pistols on an office wall. You could even create an "armory wall" that displays dozens of weapons for easy selection and access.

Oh, I did say there was a second "easy project" here. If you have a Dr. Mindbender, compare the monocle on mine to yours. As you can see, I've replaced that lame black string with a piece of real chain. I think it's a huge improvement. I just used a piece of jewelry chain and a jump-ring (a C-shaped, bendable metal ring used to hook things up) picked up at a craft store (you can also salvage both items them from dollar-store jewelry). Rather than attach the other end of the chain to his ear (which seemed strange), I just put a necklace clasp on the other end, so that I could loop it around his dog-tag chain and clip it in place. Not a perfect solution, but it works.

Jewelry chain is another one of those very-useful things to have around. You can use it to make chains for ID tags, Jewelry for your Janes and Cy-girls, key-chains, or to cuff a briefcase to your 1/6th secret-agent's wrist. You can make a watch-chain, a chain for someone's glasses, or use it to keep a foot-locker lid from flopping all the way back when you open it. You could even get kinky with it, but I'm not going there. Get some, and a bag of matching jump rings, at your local craft store. Handy to have around.

Saturday, December 31, 2005

And two more


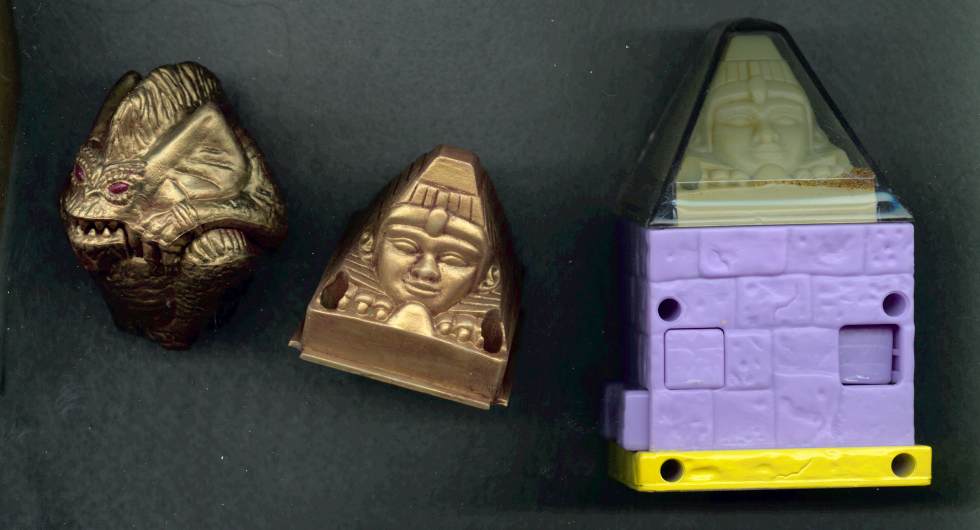
Okay, a few more examples of "found" 1/6th props. It's amazing what a little gold paint can do.

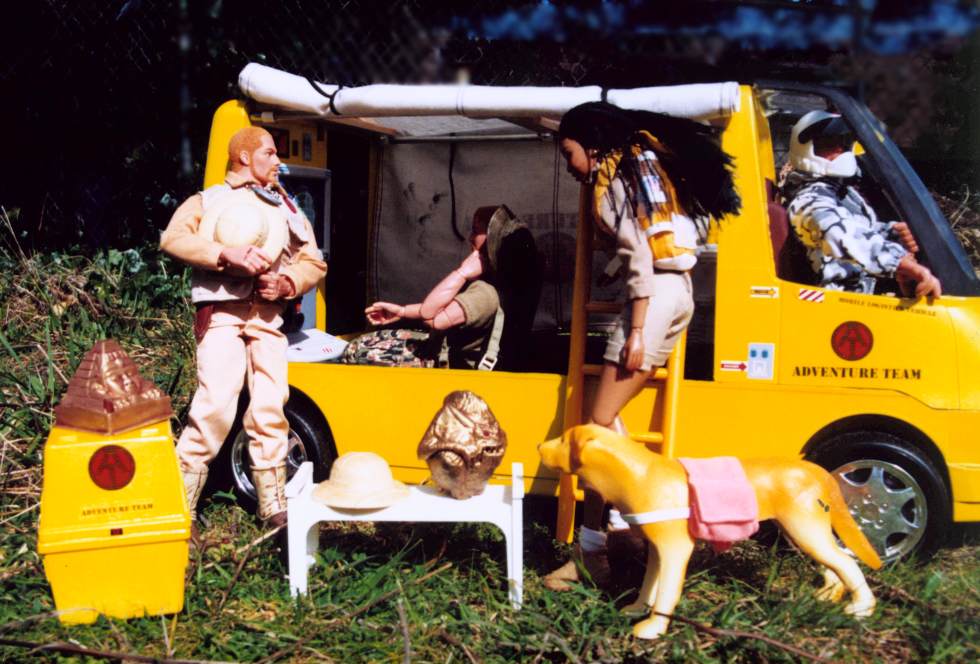
Here are a couple of golden artifacts for my adventure team, to hunt/find/display at headquarters. The thing on right I picked up in the 49-cent bin at a thrift store. It comes apart in the middle, and I suspect it may be a candy capsule of some kind, a tie-in to one of the Gremlins movies. I painted it gold, and added some red to the eyes. Instant "demon idol." As a bonus the gems from a modern "Mummy's Tomb" set are hidden inside.

The thing on the right is a fast-food toy as-found in that same 49-cent bin. I took it apart, removed the little pyramid from the top, hit it with some more gold paint, and another cool artifact.
In this next shot, you can see them being used in an actual AT photo. Adventure Dog seems very suspicious of that demon idol. Does he know something the rest of the Adventure Team doesn't?

And one more


Since I'm behind on posting, how about a cat-free post?

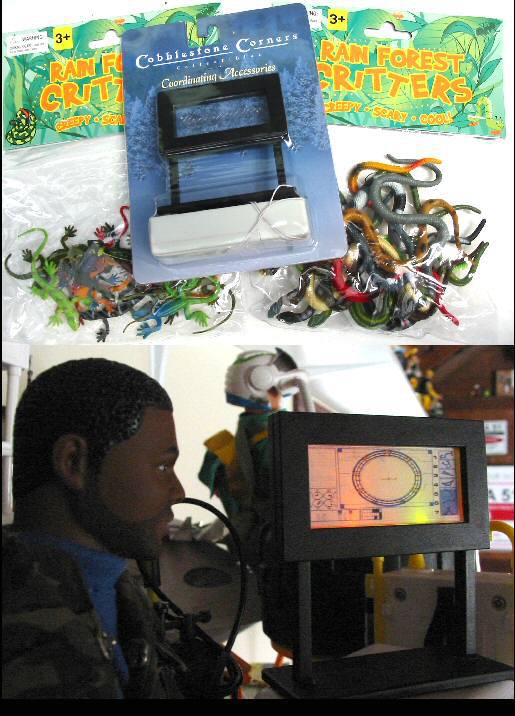
With 1/6th stuff rapidly getting scarce on shelves, it's more important than ever to develop that "1/6th eye," and spot your props where you can find them. Here are some items I found at a Dollar Tree a year or so back.

First, bags of snakes and lizards. These really juice up any jungle or swamp scene.

Second, an illuminated sign intended for a Christmas village. It's illuminated by colored LEDs in the black frame. I turned it into a computer monitor, by prying it apart to slide out the clear, plastic, insert. I sanded it to remove the raised lettering, and to "frost" the glass. Then I printed a paper insert and slid this in behind the plastic, and backed it with foil. This is the result.

Yes, if you're paying close attention, the screen print is a negative image of the Stargate dialing computer display from "Stargate SG-1." I stole the picture from the web (a handy source for all sorts of Joe-sized maps and screen displays).

Wednesday, December 21, 2005

Back from my trip


Well, I'm back from my trip. Obviously I didn't post while I was gone, but I did pick up some nifty 1/6th items I hope to post pictures of soon.

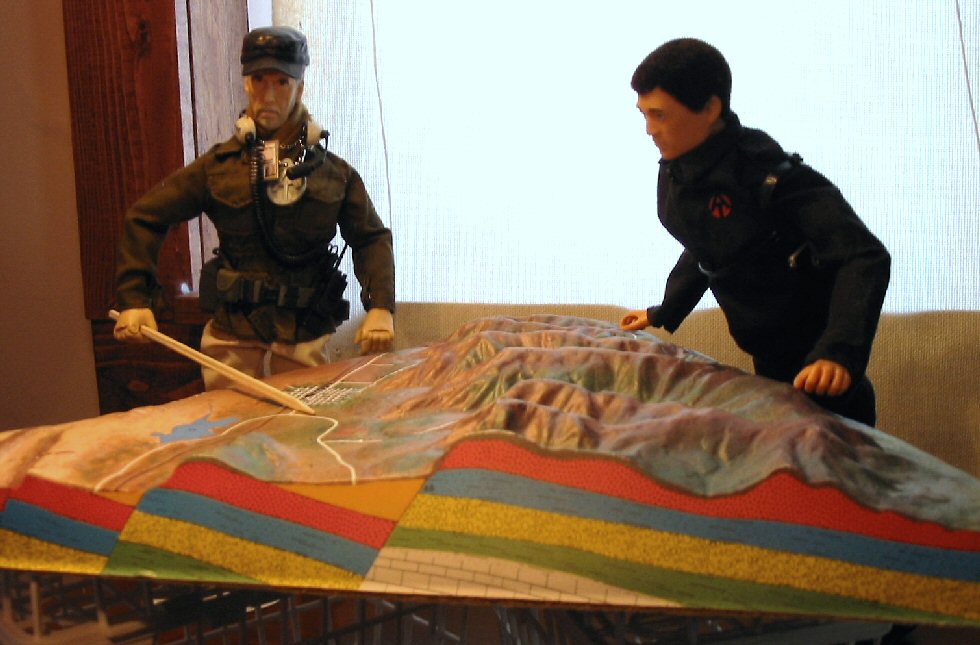
Just to get something up tonight, here's a quick post of a not-very-good picture. This is one of the more interesting thrift store finds I've ever made, a set of triangular plastic geology models, representing various kinds of terrain, and the underlying geology. As you can see, they make great "war room" models for my Adventure Team commander and a TC Adventurer.

I've got a box with probably half-a-dozen different of these, and they'll show up in a photo shoot one of these days.

Sunday, December 04, 2005

Bad Dog


Returning today to one of my more recent group posts, though likely seen here in greater variety and detail than you could see previously.

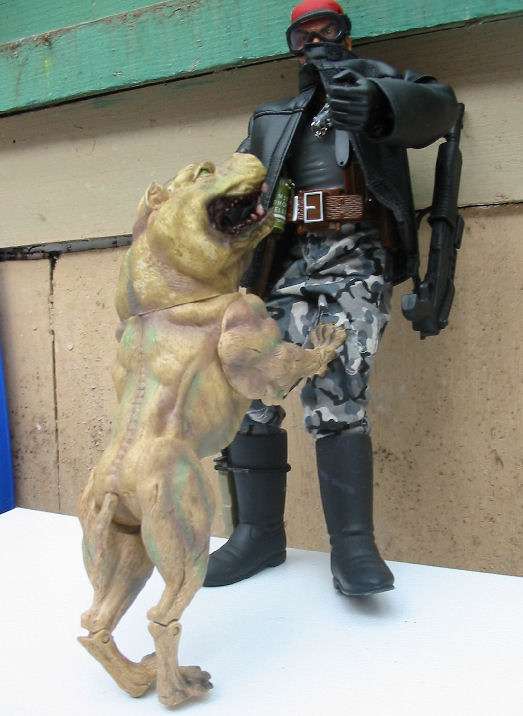
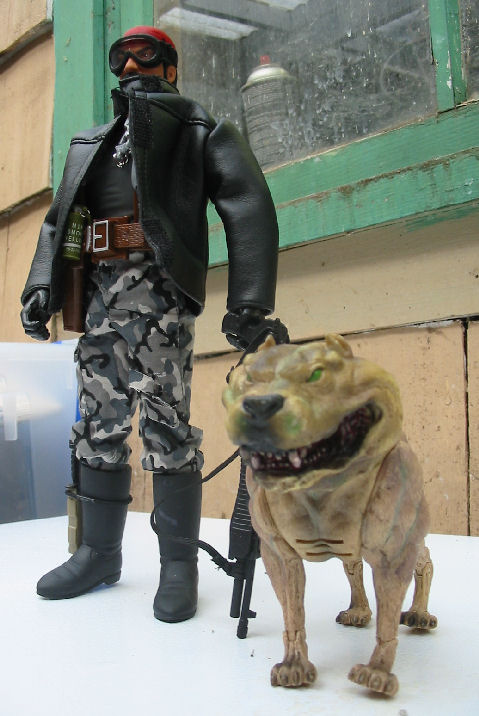
This "Hulk Dog" is from the second wave of "Incredible Hulk" movie theaters. In the movie, of course, the gamma-ray mutated hounds were huge, but in the case of this 6" scale figure, it turns him into a decent-sized 1/6th dog.

The front and rear legs are jointed, and the head (which turns side-to-side via a cut-joint) is rubbery, so the mouth can bite and hold onto things reasonably well. Sure, he won't pass for a "normal" dog, but in a fantasy or sci-fi setting, he's great. In this case, I figure my bad-ass kitbashed character has probably been letting his pup drink from the sludge ponds at the toxic waste dump where he hides out.

A studded leather or chain collar would finish this guy off nicely. I may have to add one at some point.

Another good example of how you shouldn't limit your 1/6th shopping to 1/6th scale characters.

The Adventure Team - basement?

Not much time today, so just a quick post to keep my "something every day" promise.

As I said, when I posted the "Adventure Team Headquarters" shots a post or two back, I've been collecting props and furniture for this for a long time. The shelf-display in this shot represents an earlier effort, and an earlier concept. The heavily kitbashed "Ferris" figure was put together with the idea of a new generation of adventurers, coming along and following in their father's footsteps.

So it really isn't an Adventure Team Headquarters. The inspiration is more "Eric Forman's Basement" from "That 70s Show." Note, however, that many of the props found their way into the later display.

Friday, December 02, 2005

A visit to Adventure Team headquarters

I mostly missed out on the GI Joe Adventure Team as a kid. It came along too late, when I was supposedly outgrowing my painthead military Joes. But I was very aware of the line, and it had a great deal of appeal to me.

Perhaps it was just that I spent so much of my life on and around military bases. That stuff was just kind of every-day for me. But the spies, explorers, and adventurers were something different and exciting, and I loved reading the old Popular Mechanics and Popular Science magazines, with all their futuristic vehicles and gadgets (how mundane those magazines seem today, though it's gotten better in the last couple years).

But one aspect that seemed especially interesting to me was the Adventure Team Headquarters. Yes, yes, there's the vinyl, plastic, and cardboard pop-up set that was sold, but that only suggested to me what the real ATHQ might be like. I figured it had to be one-part command post, one part club-house, and one part museum. When I got back into the hobby, I immediately started collecting props to create my "ultimate headquarters." Believe it or not, I'm still not there, but every once in a while I did all my stuff out and see how come I can come. This is one of my efforts from a year or so back. Worth blowing up, as there's tons of interesting detail.


There's literally every kind of prop you can imagine in here. Knick-knacks, props from smaller-scale action figures, museum shop items, aquarium decorations, doll-house furniture, advertising items, craft-store bits, you name it. Only a few things here were actually intended as 1/6th props: the Power Team folding chair and "movie-screen" map, the Ever-Sparkle white-board and training tower used as part of the back wall, the "Mummy's Tomb" mummies, a couple GI Joe map tubes and portable computers, a few odd tables, and so on. But most of this stuff has been "repurposed" for Joe use.