Showing posts with label vehicle. Show all posts

Tuesday, July 15, 2008

New Bright CXT Truck

I found one of these monsters, trashed out and no remote, at the Goodwill yesterday for $3.99. Despite a little flack from my wife, I couldn't pass on it. As big as it is, it's 1/10th scale or smaller, and the cab (even if the door opened) is way too small for a Joe. Maybe if you wanted a Sigma 6 semi, this would be just about right. I think this came with a dump bed, but it was broken off this one, as were many of the grab bars, and the steps on the driver side.
What really interested me is the chassis and the wheels. It's BIG. The wheels are 6 inches in diameter (with duals on the back). It's 29 inches long (14 feet 6 inches in Joe scale) and 14 inches across (seven feet scale), which gives it a bigger footprint than the New Bright H2, and it's taller. They learned their lesson with the H2. It's very light for its size. The motor is also small too though, which makes me wonder how much power it has, even with a 19.2v battery.
Operationally, it's a bust. It came with a battery, but I don't have a charger for the 19.2v batteries. But more importantly, no remote, and since it has a multi-band switch, I'm guessing it won't work with the New Bright 49mhz remote that I already have (it IS 49 mhz, so there's a slight possibility that it might work on one switch position, but not the others). I hate to invest $20 in another battery and remote (if I can find one) if my remote isn't going to work, and I can't test it without a charged battery.

My thought is to strip the body and use the chassis for some project. But if I want it motorized, I may have to install a completely new RC system (and I'd probably go to standard RC-type batteries too).

Here are some pictures, with a Soldiers of the World Jeep and some Joes for size reference.


The underside. The battery compartment looks almost identical to those with a snap-in 9.6v battery. The batteries do have the same footprint, but the 19.2v battery has slightly different contacts and flanges so you don't accidentally get them mixed up, and the 19.2v battery is twice as thick. Note that while it looks like there's tons of ground clearance, the front end and gearbox are still pretty low to the ground.


Note that the truck looks plenty tall, but when you compare Joe to the tiny doors, you seek the scale doesn't work at all


It's not tons longer than the Jeep, but it's wider.


Friday, October 19, 2007

New Bright 1/6th RC Hummers

Click on pictures for full-sized versions


Because somebody over on my Joe's Garage Yahoo Group requested it, here are some pictures of my latest Goodwill find, a 1/6th (more or less) New Bright RC H3 Hummer, seen side-by-side with the yellow New Bright H2 Hummer I've had for a couple years.

I only paid $9.95 for the H3. It didn't have a charger or remote, but the remotes on most of the large New Bright vehicles are interchangeable as long as you have the right frequency (either 49 MHz, or as in this case 27 MHz, and I've got remotes for both frequencies). Last I checked, you can also order replacement remotes directly from the New Bright website for a very reasonable $10 plus shipping. I can use the same remotes for both Hummers, my two New Beetles, and my F-150 pickup.

The H3 is lighter and has more guts (perhaps just because it's lighter) than the H2, and corrects the H2's too-soft springs (which have it bouncing all over the road). On the other hand, it isn't as pretty or detailed, and lacks the working doors, or even clear windows and an interior. The body is just a shell. I may end up stripping it down to the chassis for an Adventure Team vehicle project of some kind. I haven't decided.

As for the H2, it has its problems, but with a GI Joe Adventure Team passenger and driver inside, a few accessories, and some understated Adventure Team decals, it still looks cool, and nothing will ever take that away.

Tuesday, June 05, 2007

A Top for the Schwimmy


Yesterday at the thrift store I spotted one of these Land-Rover-like Bratz "Safari Cruiser" vehicles. It was missing some key parts (most notably the doors and windshield) but I didn't complain because it was only a $1.99! I figured that at this price I could scavenge a few parts and throw the rest away if I wanted. I was especially intrigued by the soft-top, and wondered if possibly I could adapt it to some other vehicle.

Once I got it hope, I carefully separated the top, which somebody at the store had helpfully attached with several complete wraps of clear packing tape. Looking around the room, my eye happened to fall on my AT-converted 21st Century Schwimmenwagen. I plopped the top on there, and to my amazement, it was a near perfect fit!


In these front views, it may look like the top hangs off the side, and in the back it does a bit, since the top is straight-sided and the side rails o the schwimmenwagen curve a bit, but I don't find it objectionable. Though it may appear to hang out a bit in the front too, the bottom rails of the top-frame are almost exactly the width and size of the schwimmy's side-rails at that point.

It sticks out a bit farther in the front than it really needs to (though having a sunshade over the windshield in the tropics is logical) and it looks wide, but that's mainly because the schwimmy windshield is so darned narrow. It isn't the width of the interior cabin space, which in turn is much narrower than the vehicle itself.


The top has a rigid plastic frame over which is stretched a removable fabric top with clear plastic windows. It is quite nicely done. The side and rear flaps are held down with plastic snaps, and can individually be opened and rolled up. Three tie-back straps with their own snaps are provided to hold the retracted flap.


The only real issue is how to attach it to the vehicle. Actually, it sits there pretty well, but it's easy to knock off. At the very least, some kind of positioning pins or tabs would be nice. I'm also planing to paint the frame black (it's currently dark green).

Of course, as you can see, the AT Schwimmy still doesn't have headlights or tail-lights. I plan to add operational ones with a slightly more modern look than the original, but I haven't worked out the best way to do that yet. I plan to use high brightness LEDs, but it's the housings that I can't quite work out. One of these days.


As for the Safari Cruiser, fear not that it will end up on the scrap-heap. Though it would certainly provide a load of cool parts, once I got the top off, I realized that without the doors it reminded me of the Mini Mokes that were used as Village taxis in the classic TV series, The Prisoner. That caused me to take a liking to it, and I decided that it may become yet another Minions at Work vehicle to go with the two golf-cart-style Minionmobiles.

Saturday, April 14, 2007

My solution to the RC Yamaha Rhino head-room problem


A lot of people earlier this year were lucky enough to pick up radio controlled Yamaha Rhino utility ATVs that Wal-Mart had clearanced out at fire-sale prices (I got mine for $25, but I've heard of them going as low as $15).

This is very close to being a 1/6th vehicle, but the head room allowed under the roll bar makes getting a figure in there a tiqht squeeze. To fit, a figure needs to be short and well articulated (like an SA-body GI Joe). Taller figures, or with legs that aren't as flexible, or that had large head-gear just didn't fit.

There have been many solutions to this. Some people have removed the top cross-bar completely, or removed it to the rear, or raised the entire cage. Well, here's my solution, using hardware taken from a "Steel Tec" building set that I got at a thrift store for just a few bucks. Steel Tec sets and collections of parts often go for cheap on EBay (shop wisely, and you'll spend more shipping it than buying it) and all those little brackets and beams are great for work on 1/6th vehicles.


I used a couple of triangular brackets which raise the bar a little in the front, and a lot in the back. I think this configuration blends in well, and allows more head room while still preventing an un-belted figure from flying out of the vehicle during violent maneuvers. I had to drill out the side bars of the roll cage to take the larger Steel Tec screws, and I had to use my drill to slightly elongate the rear hold in the bracket to line up with the spacing of the existing screw locations in the side bar (find some small nuts and bolts, and you might avoid both steps, but I used what I had at hand).

The figure in the vehicle is one of my Minions, which is based on a G3 Power Team figure (tall body with a big head) and has a bulky combat helmet, making him pretty close to a worst-case for me. He fits just fine, so this can double as a Mk 2 Minionmobile.

Oh, and that's our cat Sydney. She seems to think she needs to be in every picture we take around here. Well, here she is in another one.

Wednesday, January 10, 2007

Amazing 1/5th Scale Ferrari 250GTO


Been a while since I posted here. When I've had a few moments of Joe-time lately, I've been pretty busy with my weekly 1/6th photo-comic Minons at Work. If you haven't visited for a while, check it out. New cartoons every week, and we just opened a Cafe Press shop so you can buy Minions at Work shirts, mugs, and other gear.

But I just had a hole open up in my schedule, allowing me a little time to catch up some things. Last year we made a stop in Las Vegas and I got to do a little sight-seeing. While wandering through the Grand Canal shopping area of the Venetian Casino and Resort, I spotted this incredible near-Joe-sized Ferrari in a shop window and took a couple shots. It was late at night, and the shop was closed (things DO close in Las Vegas, despite what they tell you) so I couldn't see the price tag or description. My best guess based on the level of detail and craftsmanship was "if you have to ask, you can't afford it." From what I've been able to find out, that's close. Here are some more details here. 3,600 Euros folks, shipping NOT included. Still, it was cool to see.

Wednesday, July 19, 2006

Making a MinionMobile


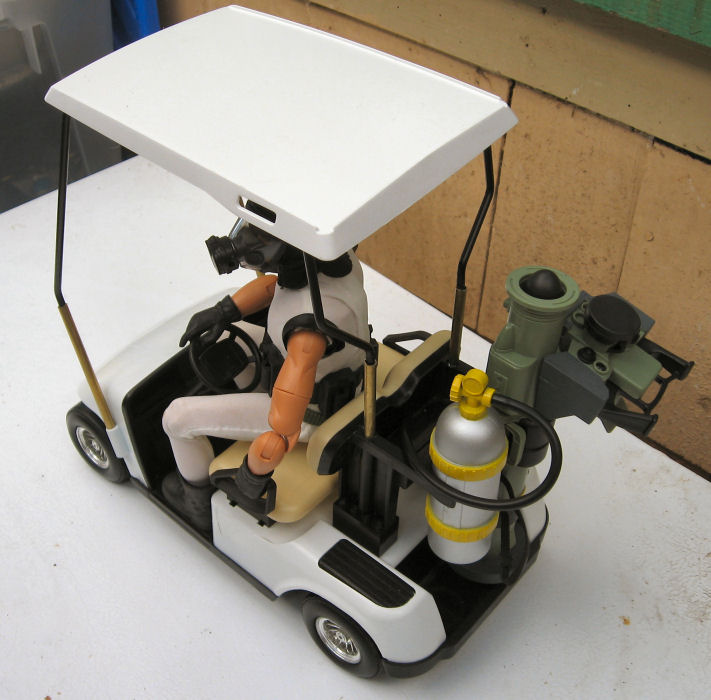
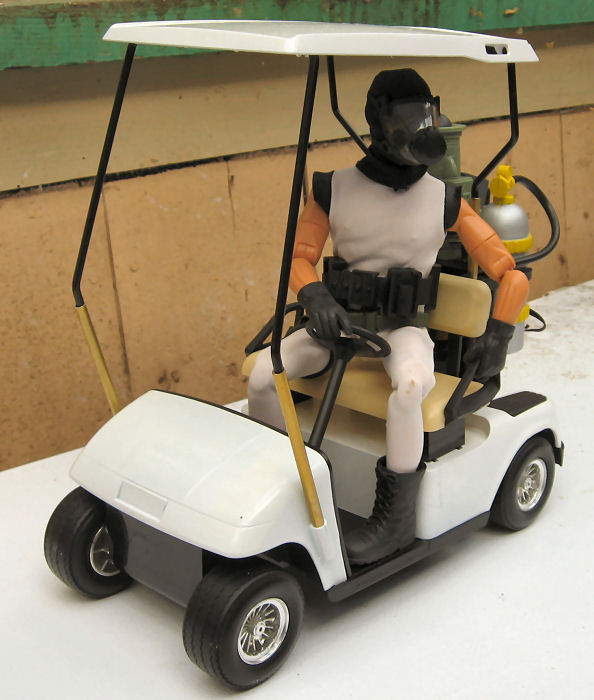
For some time, I've been considering making a custom vehicle for my "Minions" photo cartoons. I thought about a Barbie camper conversion or a Jeep or something in that size range, but it occurred to me that I had a possibly more useful candidate on hand. After all, any super-secret complex back in the 60s and 70s (good or evil) used industrial golf-carts to shuttle through its cavernous depths.

A while back, KB Toys had a nice looking toy golf cart for sale. Unfortunately, they were maybe 1/10th scale, just too small for 1/6th figures, so I passed on it. Then, some months back, I spotted one for cheap in a thrift store and couldn't pass on it. The body and roof are plastic, and the roof supports are heavy metal rod, and I thought perhaps I might be able to modify it for use with GI Joes.

I completely disassembled the toy for inspection, cleaning, and painting. I decided the original green body panels weren't industrial enough, so I went for a sterile, Krylon Fusion "satin white." The roof was already white, but I painted it as well, to make it more opaque and hide the plastic sheen.

My initial thought was that the cart could be stretched between the front and rear body sections to provide more leg room, and then the roof raised slightly. But as I looked at it, I realized that would be very complicated, and weaken the structure of what was actually a pretty rugged little toy. There was also the matter of the roof, which would either have to be stretched, removed, or have heavily modified supports.

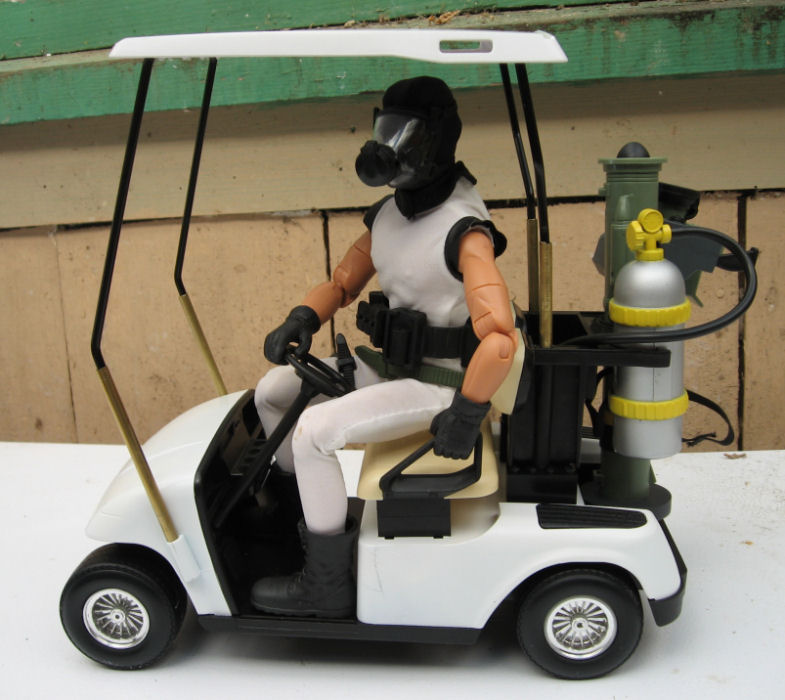
It was my wife, Chris, who came up with a better solution. She suggested that if the seat were simply raised so that the figure's knees weren't up in his chest, it would look much more in scale. It seemed possible that I could put some washers on the screws holding in the seat to raise it a bit, or perhaps even build a riser of some sort for it to sit on. The job was made somewhat more critical by the fact that the screws that hold on the seat and seat back assembly also hold on the rear body and contribute to the strength of the entire structure.

I decided that some kind of riser was going to be necessary, and before I started fabricating something new, I started digging through my parts boxes for something sturdy and ready made. Just for sizing purposes, I dug out some Lego blocks to see how high the seat should go. But after looking at the blocks for a while, I realized that they'd be ideal as the risers themselves.

I have to admit, adding Legos to a permanent construction project seemed somehow "wrong," especially since I had to drill a hole through the centers of the blocks for the screw, and modify the "buttons" on top of the rear risers so the seat-back/cargo holder assembly would sit flat. But Legos are cheap, and I have a ton of them (I can't resist buying them when I see them cheap in thrift stores, so I've got quite a collection). Not only were they sturdy and perfectly sized, but I was even able to get black ones so no painting was necessary!

The seat sits on a pair 2x4 block risers, two-blocks tall. Same for the seat-back assembly. I replaced the original screws with longer #6 sheet-metal screws selected from the hardware store.

That done, it was time to raise the roof. This was complicated in that not only did it now need a "scale" adjustment to allow for the taller figure, but now the seat itself was higher. I used threaded rod from the hardware store to make pins that fit in the original roof mounting holes, then cut sections of brass tubing (hobby shop metal stock) to slide over the pins and the bottoms of the original supports, connecting them together. These are just friction fitted at the moment. Some epoxy may eventually come into play, and I'll paint the tubing black to match the existing support posts.

The very tall appearance has a bit of "clown car" aspect to it, but it isn't bad, and the Minions ARE supposed to be funny, after all. I looked around for some accessories to fit in the club rack in back, and found first a scuba-tank from one of those cheap 14" Action Man knock-off figures that Wal-Mart used to sell. Poison gas, maybe? Something radioactive? Then I noticed a Hasbro javelin anti-tank missile, and sure enough, it was a perfect fit in the other side of the rack! The Minions are loaded for bear! I thought the idea of this silly little cart with a missile on it was just funny in itself.

I'm still not finished. The steering column needs to be longer and more vertical, and I may add a larger steering wheel while I'm at it. Not sure. I'll probably add a few markings as well, but I'm still thinking about that. "Official Lair Business Only," maybe?

Friday, March 24, 2006

A V-22 Osprey for Joe?

Today I've decided to talk about the scaling of Joe-sized vehicles. In more contemporary terms, this is a source of great controversy. Many fans of accurate military Joes have complained about vehicles sold as "1/6th scale" which are in fact a good deal smaller. Some of the more notorious are the 21st Century Bradley Fighting Vehicle, the Hasbro M8 armored car, and the 21st Century Little Bird. Most of these vehicles were 1/8th scale or smaller, and that made a lot of people unhappy.

But the fact is, most military (and civilian) vehicles are simply too large to be practical as mass-market items in true 1/6th scale. An F-22 Raptor scales over ten feet long. An M1A1 Abrams tank would be over five feet long and two feet wide. A Chinook cargo helicopter (including rotors) would be sixteen and half feet long! You aren't going to find these on the shelves at Wal-Mart any time soon. So something has to give. Either the vehicles have to be made smaller than scale, or they don't get made at all.

Fact is, shrunken vehicles are part of the great history of our hobby. Yet there's more than one way to shrink a vehicle, as we'll soon see. Other than just anal attention to scale, one of the major complaints about the not-quite 1/6th vehicles I mentioned above is that they didn't work well with figures. Pilots have to be jammed into the front of the Little Bird (which didn't even have room to include the pedals). The M8 really doesn't have room for a driver with legs attached, and troops don't fit well in the Bradley.

Fact is, near as I can tell, these vehicles are more or less scale, just not the scale people wanted. They were reduced, in all dimensions, to fit some arbitrary specification (to fit a box, or to be produced at some price point, or to fit a shelf, or to be shippable).

But that isn't the only way to do things. The other way, the better way I think, is "selective compression." Selective compression reduces dimensions individually with an eye to both the requirements and the intended use. For instance, if the goal is to make a vehicle fit in a box 48" long, the engine compartment might be reduced in size, leaving the cab area unchanged and large enough for a full-scale figure. Of the dimensions of the vehicle might all be reduced, and then the roof-height increased enough so the figure will fit.


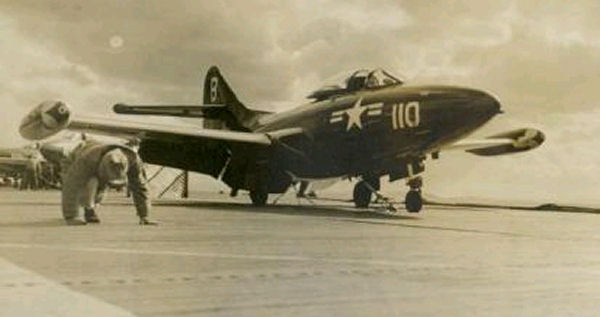
When done well, one can hugely change the dimensions of a vehicle and still capture "look and feel" of the original. One classic example, even if it takes things to extremes, is the vintage Irwin Panther jet airplane seen below, along with the real-life Grumman Panther jet on which is it based.

Mind you, not a single dimension or line of the jet remains unchanged. In fact, a scale Panther jet would have a length and wing-span both over six feet! I don't have the dimensions of the Irwin Jet, but I'd guess it's under a third of that. Yet there is no doubt that one plane is based on the other. Irwin designers boiled the panther down to a form that preserved its essence, but that a child could pick-up and fly around the room. On top of that it would hold (just barely) a 1/6th GI Joe figure.


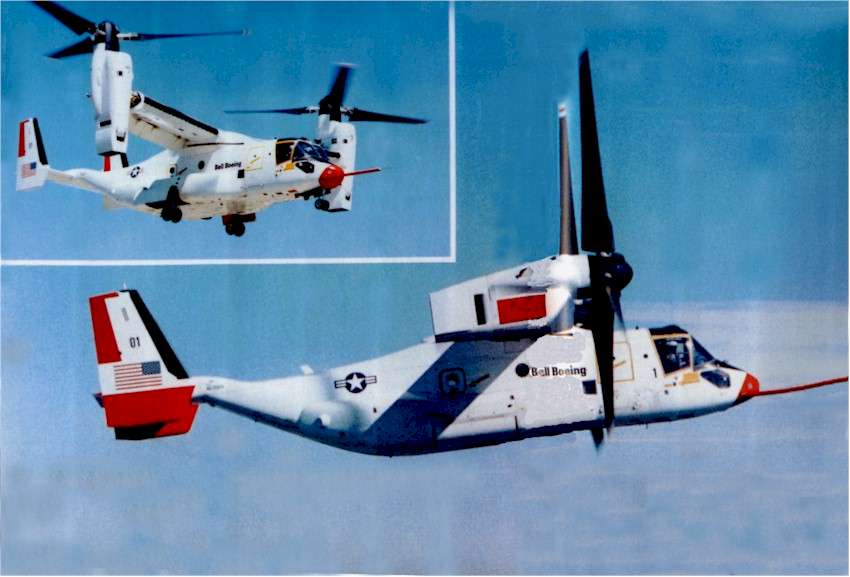
Let's try applying these principles to a modern military vehicle that seems very Joe-worthy, the V-22 Osprey tilt-rotor. The Osprey is a cutting-edge hybrid vehicle combining some of the best features of a helicopter and a fixed-wing cargo airplane. It can fly rapidly and smoothly to a distant target, hover or land vertically to deploy or recover troops, and then fly rapidly back to base. It's an ambitious aircraft that's had it's share of problems, but if the bugs can be worked out its truly revolutionary.

Trouble is, for Joe purposes, it's just way too big. Each rotor alone would be over six-feet in diameter! The fuselage would be nearly six feet long. The span, including rotors, would be almost 14 feet! Young Hercules himself couldn't lift this monster and fly it around the room, even if he had a room big enough.

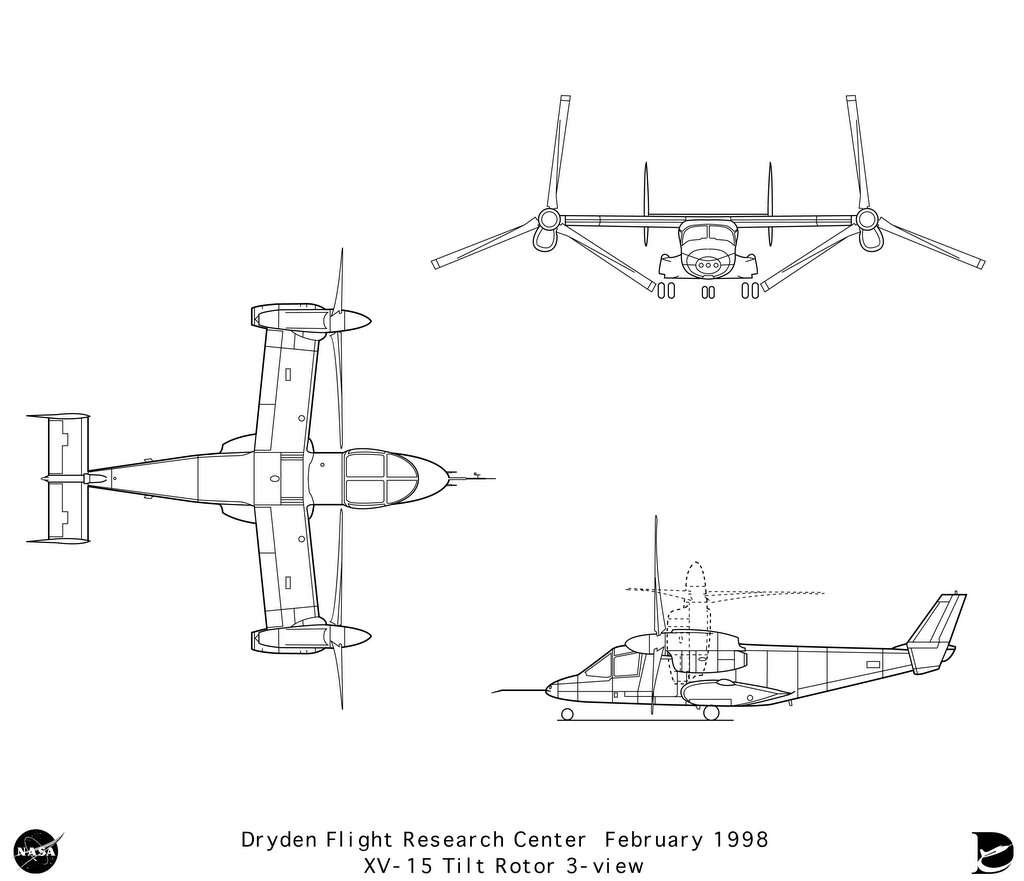
So, how to make a "kid friendly" version that would fit Joe and still be recognizable ? Well, my first move is to drop the V-22 entirely, and go to its predecessor, the experiment XV-15. Though the two vehicles look a lot alike, the XV-15 is already 20% smaller. Still not nearly small enough, but that 20% is something we don't have to cut.


Here's a 3-view drawing of the XV-15, courtesy of NASA. I used this (specifically, the top view) as the basis of my compression. My first move was to load it into my paint program and chop it into individual parts: cockpit, wings, rotors, tail-cone, tail surfaces, rotors.

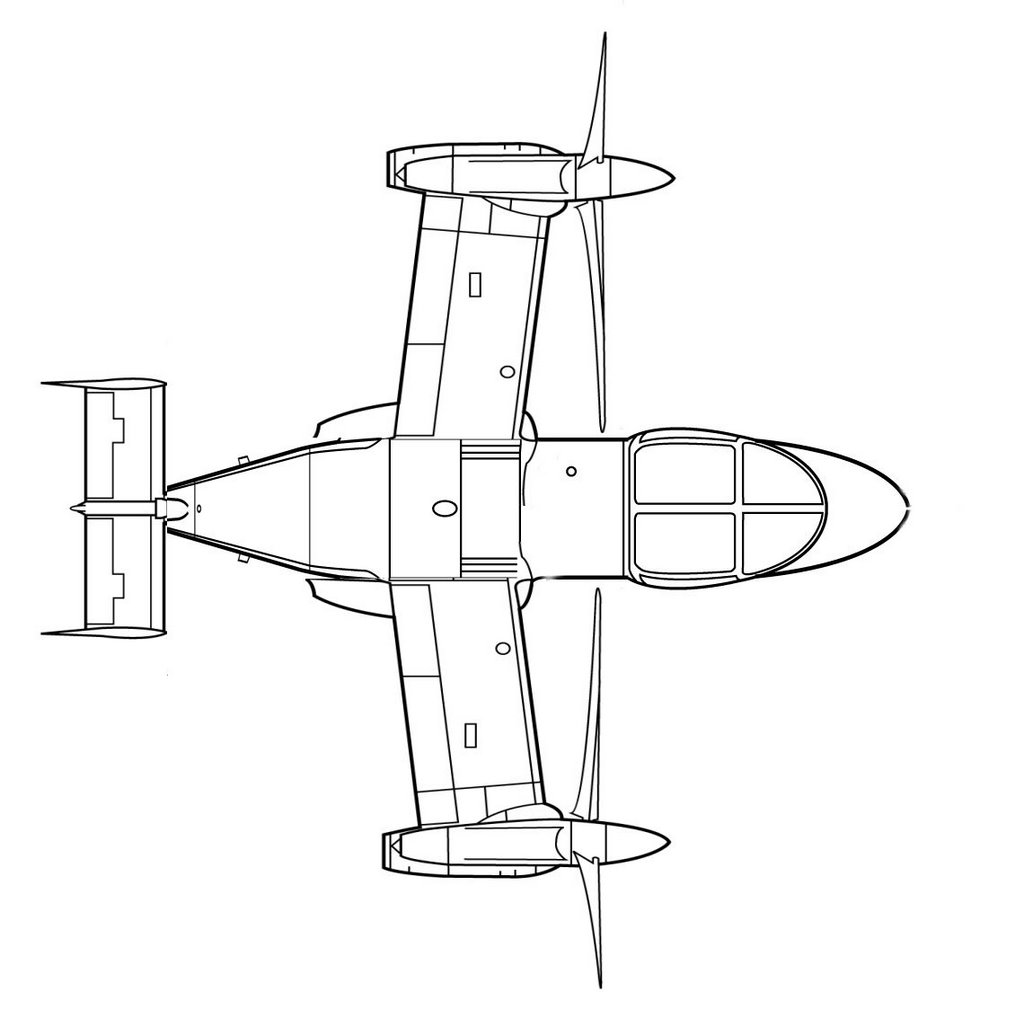
Then I started eliminating anything that wasn't necessary. The straight sections of the fuselage fore and aft of the wing were cut out and discarded. The tail was still too long, so I shortened it a bit, and then shrunk the tail surfaces. The wings were made smaller as well. The engines weren't reduced quite as much, but the rotors were made much smaller. The original V-22 has a large cockpit for two flight crew sitting side by side, but I'm assuming the Joe version will have a single seat in the middle. Suddenly, things overall can be MUCH smaller.


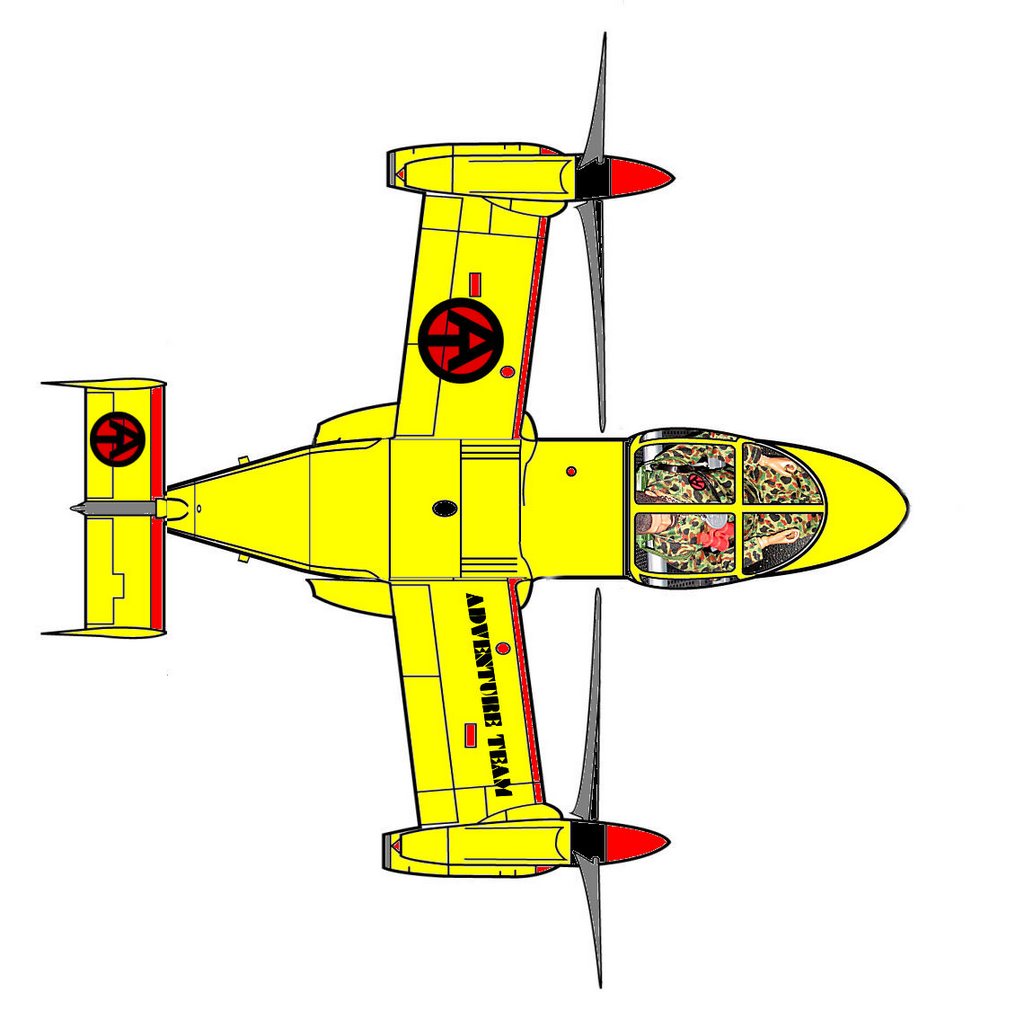
What's left still has the recognizable flavor of the V-22, but it's a fraction of the size, I'm guessing about three-feet long. That's still big by kid-standards, but perhaps not impossibly so. (A Sigma-6 or 3 3/4" version would make a very attractive retail product.) The tail and wings would be removable for storage (or for the retail box).


Of course, by now the question that must be burning in all your brains is, "Steve, what does the Adventure Team version look like? Glad you asked...


What's the point of all this, designing a toy that will never be made for a line that no longer exists? I'm not sure, really, except that it's in the spirit of the toys I loved as a kid. Maybe I can't be ten again, and find this thing under my Christmas tree, but I can at least imagine...

Saturday, March 04, 2006

Moving past Angry Joe Day

Well, Angry Joe Day 2006 was a great success. Thanks to everyone who participated, either by entering the contest, donating prizes, or just in spirit. The plan for now is, if Joe isn't back on retail shelves by March 1, 2007 (and right now, there are no prospects that he will be), then we'll do this again next year.

Remember, this isn't just me, this is all of you. Feel free to take Angry Joe Day and make it your own. Find your own ways to celebrate. Start your own contests, whatever. All I ask is that you keep it in the spirit of fun in which it is intended. We don't want to piss Hasbro off, we just want to remind them that there are people out here who still care, maybe make them smile, and hopefully one day have somebody in charge say, "what the heck, let's give it another try!"

I also wanted to take a moment to talk about "Tanker" Dave and his great 1/6th vehicle contest. If you haven't gone over to his site to check out the winners, you should. Dave asked me to help with the judging, and let me say that it was hard. The quality of all the entries was very good, and the top finishers were just amazing. Congrats to them all, and a big thanks to Dave for sponsoring the contest.

Well, the good thing about the AJD photo contest is that it saved me from a month of posting much of anything of my own. The bad thing is that it's been forever since I posted anything of my own. Time to change that. Several new items have arrived here lately.

Most significantly, I found some thrift-store trains for my friend Eric, who buys, sells, and restores toy and model trains. When I called him, Eric reported that he'd seen some Joes from an estate being unpacked at a place he knew, and that he was going back that day. He was a little vague about what they might be (he really doesn't know GI Joes), only that they were 12," old, and some had fuzz. He set off to the store to see what he could do.


I live 60 miles across a mountain range from Eric, so I couldn't just bop over there to see what he'd found, and in fact, I wasn't able to pick them up for about a week. What I found was a grocery bag with five, nude, fuzzhead Joes in various states of disrepair. Several had pretty good fuzz, one had intact kung-fu grip hands, and among them was a decent looking talking astronaut with a semi-working talk-box. There was also a bag with an assortment of uniform items (some AT, some home-made, some undetermined) a few accessories (the silver astronaut boots, a mystery tape-recorder), and a bag full of incomplete (but mostly dressed) Megos. I don't recall exactly what I ended up getting these all for after we were all done, but I think it was about $25!

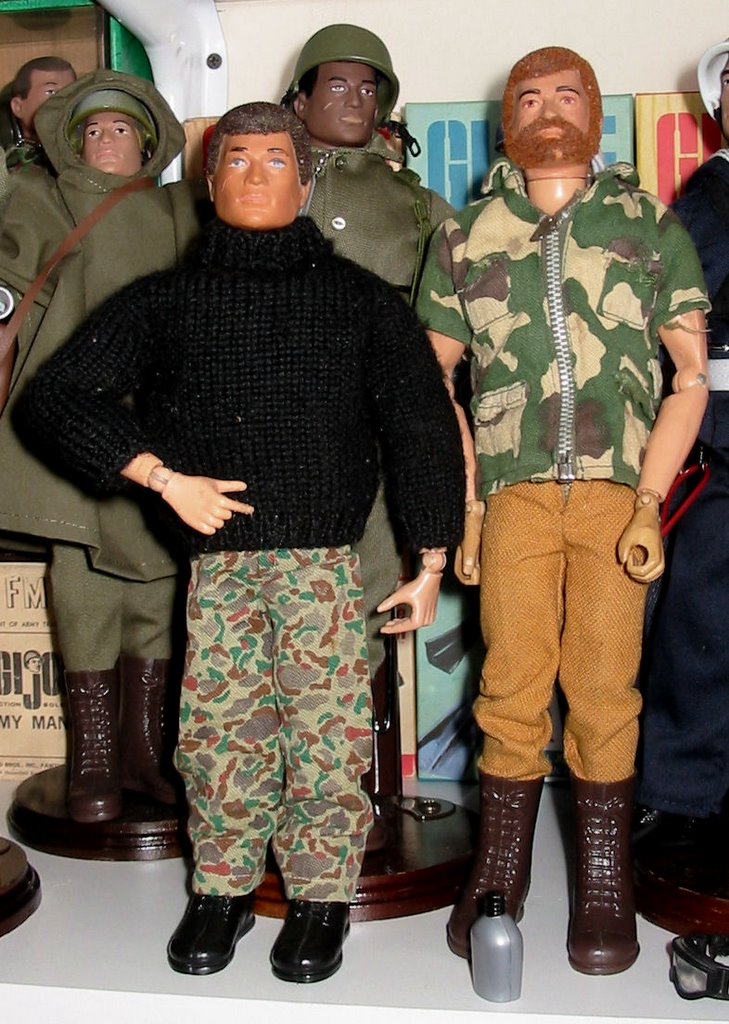
You see two of the guys in the picture. The sweater and shirt are GI Joe from the bag. The pants are from the bag and may be from the same Jungle Survival set as the shirt, but they have a zipper, not a snap. I'm speculating that mom put the zipper in, since some of the other uniform items included were (nicely) home-made. The faded camo pants are childhood vintage from my spares-box. The boots are all modern.


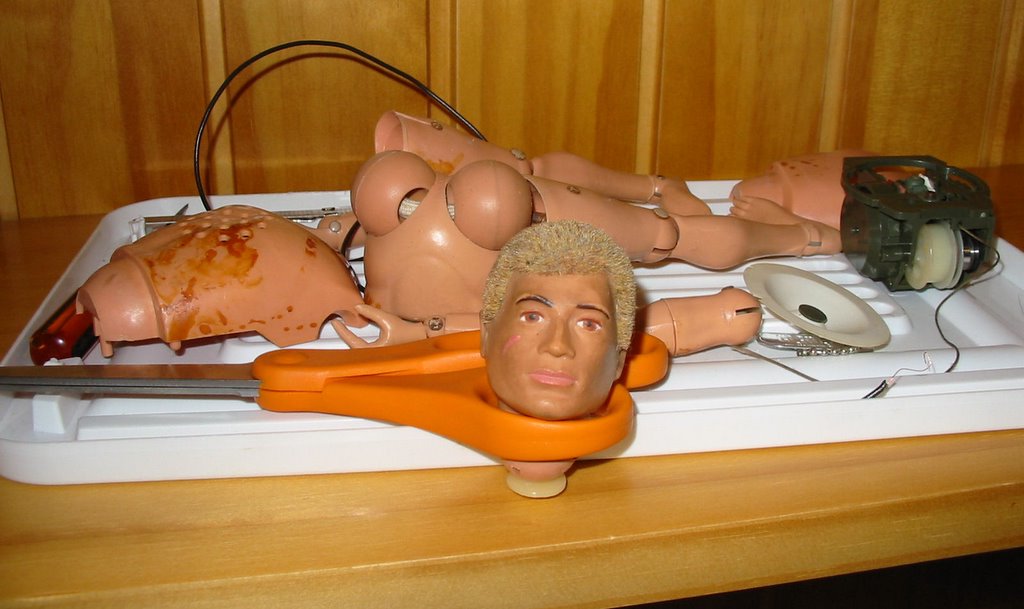
This is may Talking Astronaut, pulled apart for cleaning and repair of the talker. I still haven't figured out how to remove those nasty stains on the body, but they shouldn't show when he's dressed (I need a white jumpsuit though). I seem to be making progress on repairing the talking mechanism using instructions I found here. I'm really looking forward to getting him fixed and back-together.

I am a total novice, by the way, at the business of cleaning and repairing old Joes, so any tips and advice would be appreciated.


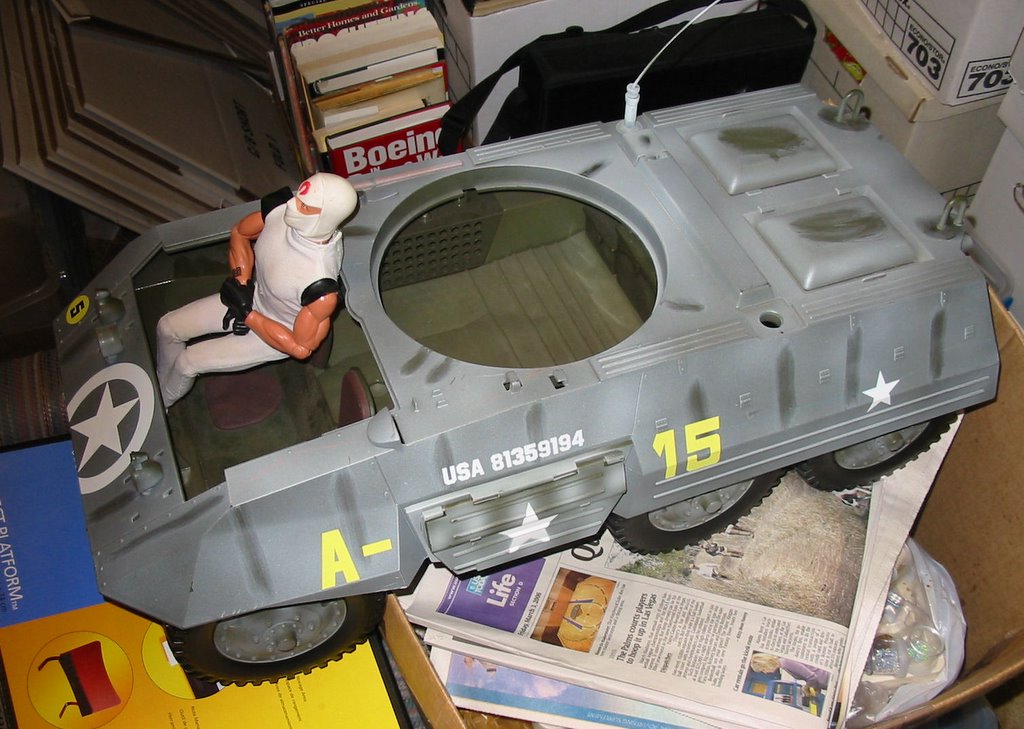
Finally, while I was in "the big city" to pick up my new-old Joes, I hit a few Goodwill stores in search of 1/6th stuff. The first store (one where I almost find something) came up empty. The second turned up only a Storm-Shadow from the two-pack minus missing everything except his uniform. I was standing in line at the checkout when I happened to look up near the front of the store, where some baby strollers and similar items were displayed, and was amazed to see a Hasbro M8 Scout-car!

I jumped out of line and trotted over. It was missing the turret and cover for the crew compartment, but that was okay. It saved me from any temptation to keep it stock, and not convert it into an AT vehicle. Question was, how much? My wife was waiting in the car (working on her ALIAS novel on her laptop like a good writer with a deadline) and I'd already spent Joe money that day, so I didn't want to press my luck.

I rolled it around, looking for a price tag. Finally found it under the nose. $3.99! Score! Well, she might justifiably use the "where will you put it?" complaint, but price would not be an issue.


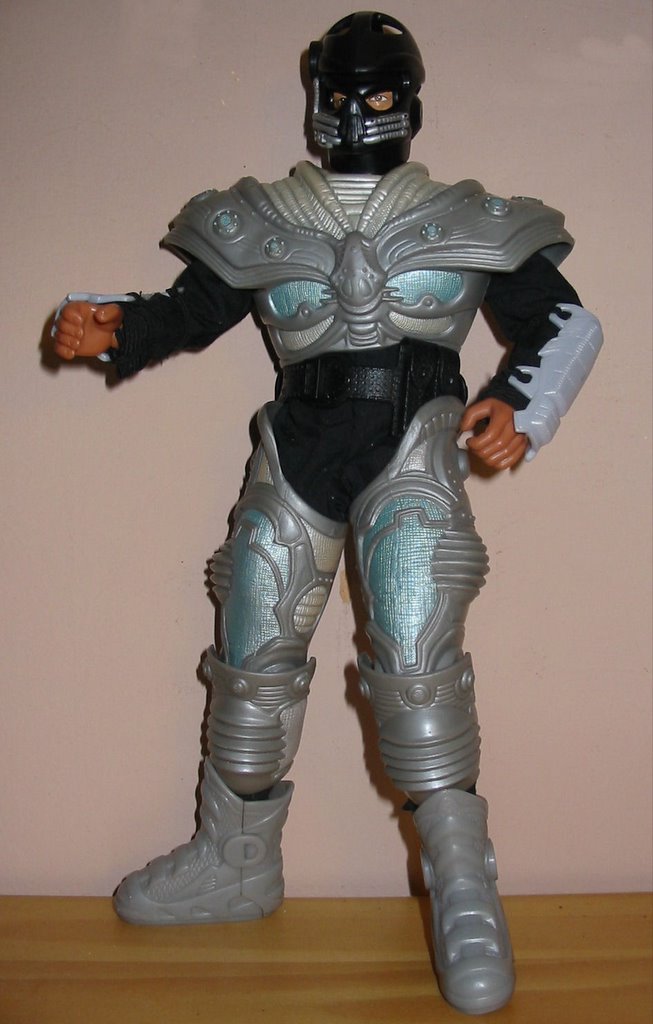
Oh, and let me leave you with one last bit of kitbashing. I was doing some reorganization today, and spotted this guy in a box looking 85% as you see him here. I barely remember throwing him together a few months back. He was just a bunch of stuff thrown together with no real plan. The major armor pieces are from a Hasbro 12" "Batman Forever, Mr Freeze" figure, the same one who provided the head for my infamouse "Der Governator" figure. The base figure is a Max Steel Ultra Action body with a HOF Storm Shadow (I think) head in a black jumpsuit of unknown origin. Tonight, I swapped the black combat boots he'd original been wearing for some sci-fi looking Max Steel boots, added the arm armor, and fiddled with his headgear (he's actually wearing an Action Man helmet over a Spy Troops hard mask over Storm Shadow's molded mask.

No, I can't tell you who or what he's supposed to be, but he looks kind of cool.

Monday, February 06, 2006

Angry Joe Day entries, Tim "Kaber" Hare

A couple of entries from Kaber. Of these, Tim says:
"First Joe is angry about high gas prices.............."


"Then he's angry about the "Fast" food service at Mickey
D's............."


I'm not sure those were exactly the angry-Joe themes I had in mind, but you've got to admire the outstanding night photography and use of read forced-perspective backdrops. Beautiful work!

Angry Joe Day Entry: Mr. Klean

Here's an entry from Mr. Klean. If you're reading out there, Klean, I need a shipping address from you in case you win one of the prizes.

His title is "Joe Cancelled." Gotta love the understatement of those feet at the bottom of the picture.

Friday, January 20, 2006

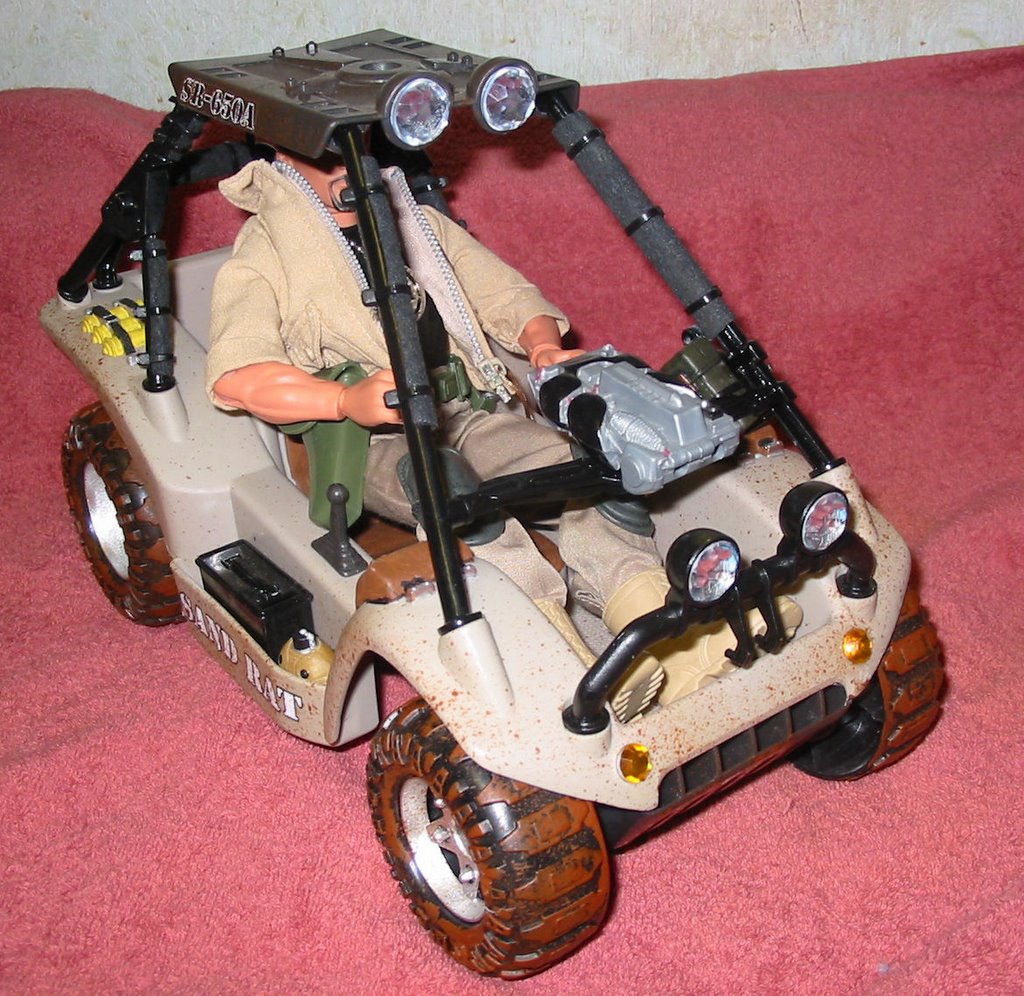
Sand Rat Upgrade, Start to Finish

As I've made pretty clear, my very favorite 1/6th projects are vehicles. Maybe you've seen some of my heavily customized Adventure Team vehicles, like the MLV (Mobile Logistic Vehicle) and LMUTT (Light Mobile Utility Tow and Transport)that started as Barbie camper vehicles and were modified almost beyond recognition.

While I'm quite proud of these and really had fun doing them, I wonder sometimes if they put people off, simply because they're too involved and it just isn't obvious how I got from that pink monster to the nifty yellow vehicle at the end.

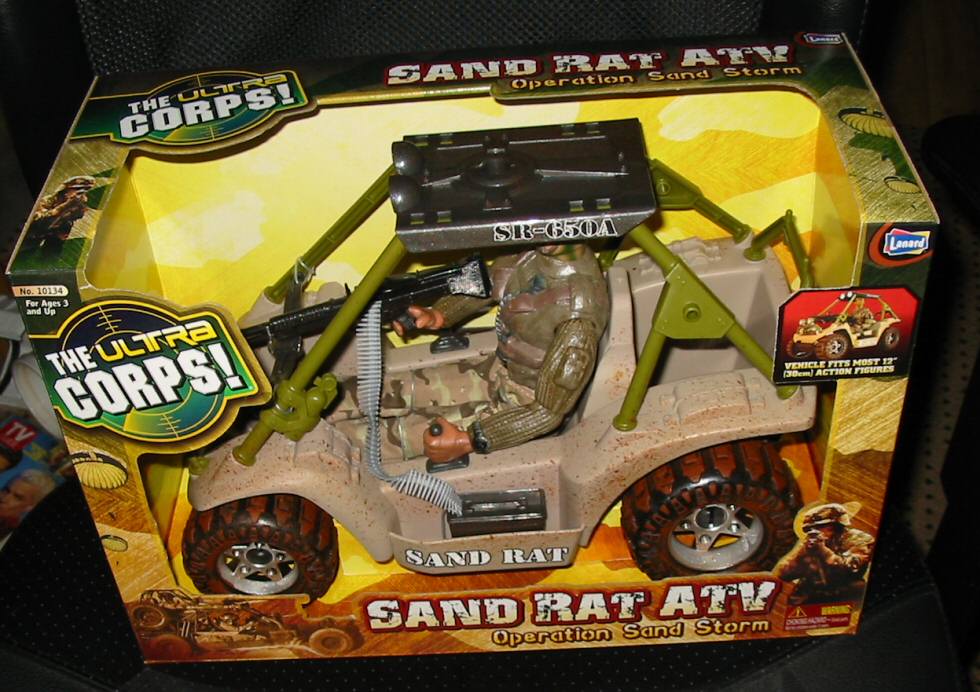
Look, a cool vehicle project doesn't have to be that elaborate. It's a lot of run to take a basic vehicle and, with a little paint, some odds-and-ends, some super-glue, and some imagination, improve it far beyond the basic product, making it your very own. Well, tonight I finished (for now) a long-in-the-works project, and upgrade of the obscure Lanard Ultra-Corps "Sand Rat" vehicle. (Remember, you can click on any of the small pictures to see a large version so you can examine the details.

Most of the materials here are easily found at your local craft or hardware store, or maybe you already have most of what you need in your house.
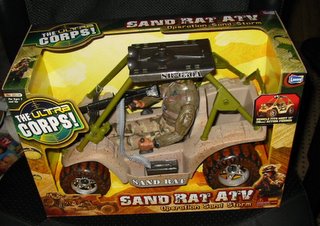


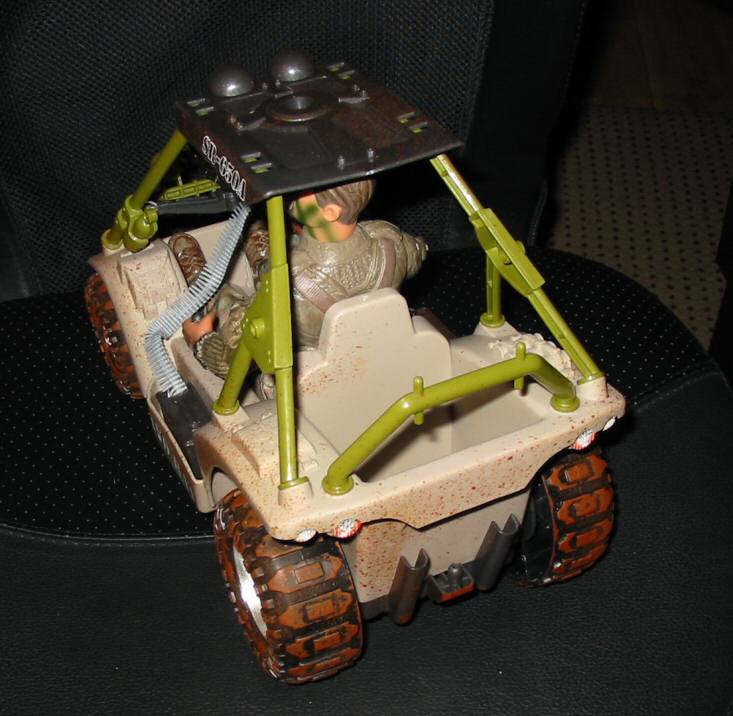
Here's the Sand Rat as I found it in the box last Christmas. I realize that this is a pretty obscure vehicle, and it's unlikely you'll be able to lay your hands on one. But think of it as an example, an "every-vehicle." You can take the lessons here and apply them to a trashed vintage AT vehicle, a 1/6 RC Snowmobile, a Bratz car, or any other not-quite-right vehicle you might lay your hands on.

The Sand Rat is both the best and the worst case in many ways. The best, in that I think it has great lines. It's clearly a knock-off of the Action Man dune-buggy, which was re-released in the US under the Joe vs. Cobra banner a couple years ago (and should be much easier to find). But while it lacks that vehicle's action features, I think it's better from my standpoint. I think it's more attractive, it's a bit larger, a bit more grounded, and it even has room for two figures (a second one can ride in the back, and the roof was clearly designed to mount a weapon of some sort, which wasn't included).


There is, of course, a machine gun in the front, and ammo cans in the cargo side-wells (another nifty feature that the Hasbro version is lacking). But there are many unused mounting points on the vehicle, the hole for the roof-weapon, the holes in the side of the roll bar, and the mysterious pins on the rear "sissy-bar," that make me think this vehicle was designed to have a lot more goodies on it, probably more paint-applications to some of the molded-on-accessories, and to sell at a higher price point than the $10 or so (including figure) that I paid.

My thinking is that when the 12" market imploded, Lanard cut this item to the bare bones, packed it with the ugly molded-shirt (and boots) figure shown, and blew it out cheap. So, while the lines are nice, it really has a unrealistic toy-like appearance right out of the box.
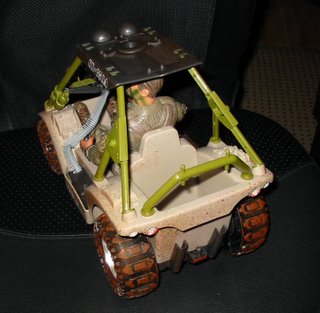


Rather than paint-apps, we got some rather heavy-handed weathering, as through the vehicle had just been driven through mud, rather than sand. I considered trying to remove the weathering, but elected to live with it. I may add some more realistic dry-brush weathering of my own at some point, and I may swap out the stock stickers for Adventure Team markings, but I haven't done that yet, and I'm not sure I'm going to.

From this rear angle, you can see how it really suffers from lack of paint-apps. Those molded on the seat, pedals, packs and grenades really look fake, as does the half-of-a-fire-extinguisher molded to the left side of the roll cage. Speaking of the cage, you can also see how the "tubing" is actually open on the back. The translucent green plastic really shows this flaw up, and hurts the realism.

From this angle you can also see a couple of other drawbacks. There are not lenses on the headlights and tail-lights. They're just stickers over flat plastic. You can also see the rather unconvincing "exhaust pipes" on the back.
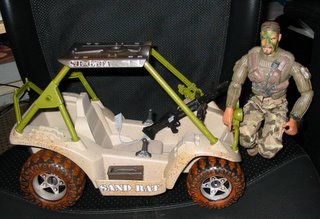


So, what's the plan to upgrade the Sand Rat? Well, here's a shopping list for any vehicle:

1. Decide what your application for the vehicle will be. Change colors, markings, and accessories to match the new mission.

2. Target ugly colors and translucent fake-looking plastic for repainting.

3. Identify unrealistic details. Remove, repaint, or improve.

4. Add small details to increase realism. These don't have to be huge or fancy. Keep in mind that anything that increases the visible number of textures, colors, and surface types will add realism and apparent detail. Think in terms of paint details, things that can be inserted or added in (floor mats, fire-extinguishers, headlight lenses, etc.), or attached (trailer-hitches, gear-shifts, cargo racks, etc.)


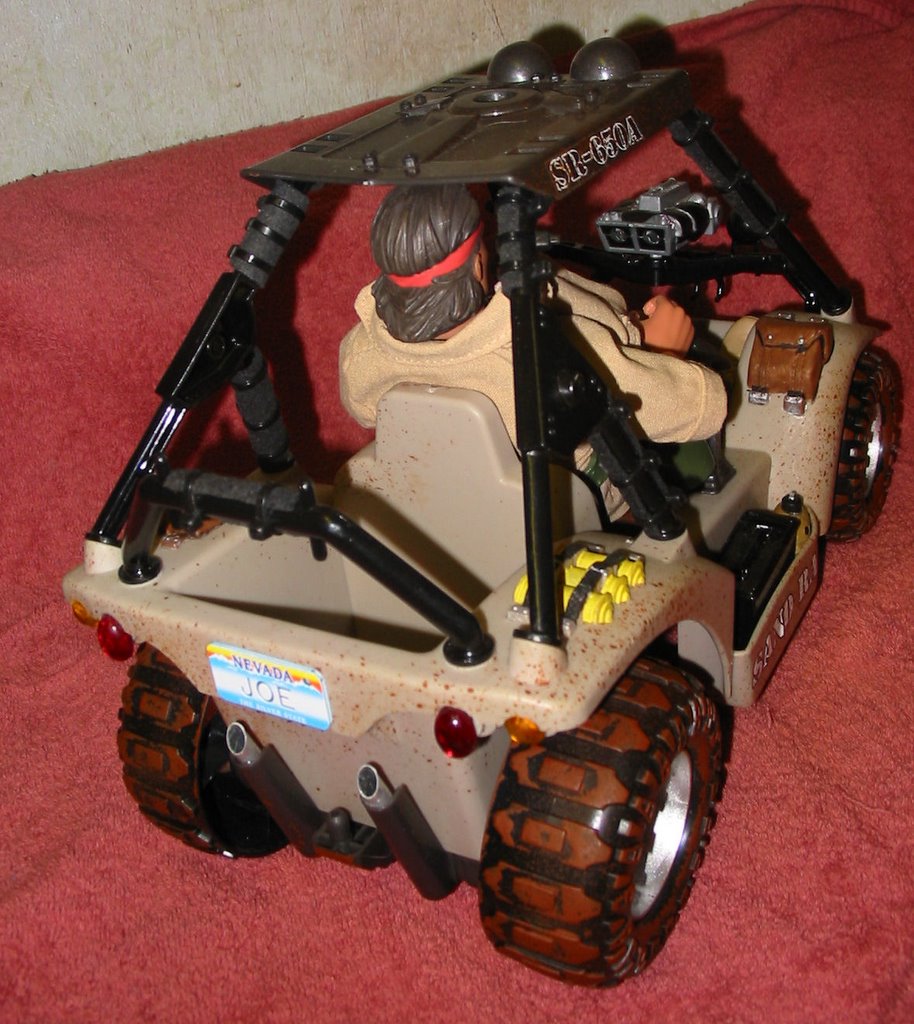
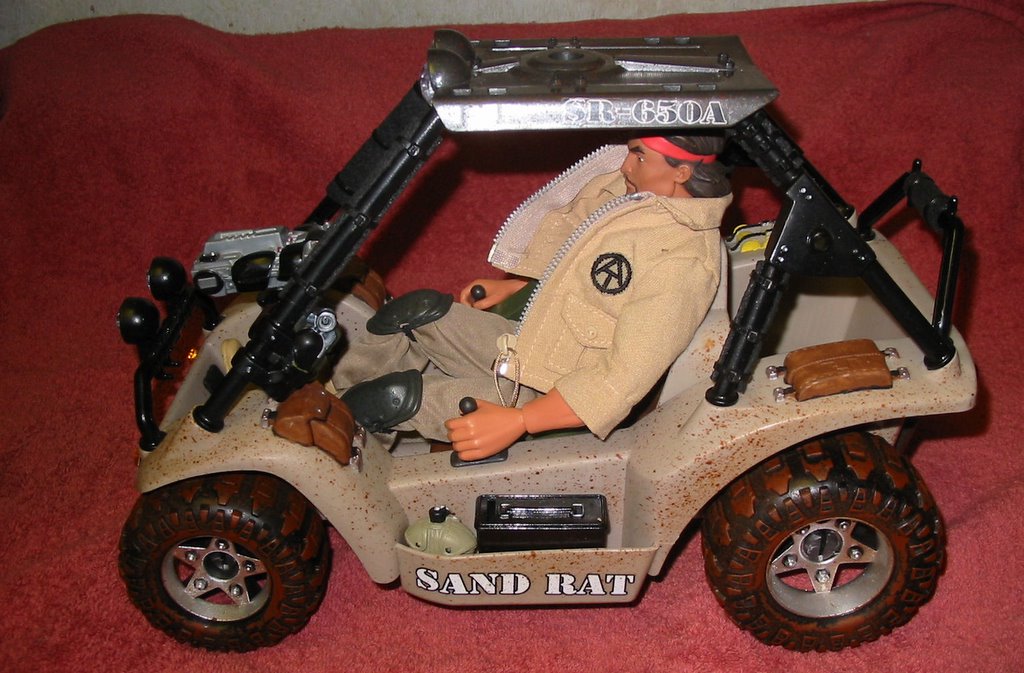
So, here's our improved Sand Rat. The overall appearance hasn't changed that much, but there's a huge increase in realism and visual appeal. Notice that there are lots of small areas of color. There are new and functional-looking details, clearly using different and contrasting materials and colors. Obviously we tossed the ugly figure for a kitbashed AT member (never underestimate the value of a nice-looking driver figure in any vehicle). Given that this is an AT vehicle, the heavy machine gun is gone, replaced by a "sensor cluster" (actually, a weapon pod from some smaller-scale sci-fi toy).

The headlights now have real lenses. These are made from plastic rhinestones picked up at a craft store and stuck on with super-glue. These are clear with a silver backing. On the lower lights, that backing has been sanded off, and the lenses glued directly over the existing headlight stickers. On the upper lights, the sticker was removed and the stone, complete with silvered backing, simply glued in place. A pair of smaller amber stones have been glued on as "parking lights."

The biggest single improvement in appearance and realism came from one, relatively-easy, change. I removed the roll-bars and bumpers, and painted them gloss black using Krylon Fusion paint for plastics. The Fusion sticks just fine to the flexible plastic the bars are made from. It hides the translucent plastic, making it more realistic, and the dark color makes the open back-side of the roll-bars less obvious. (We also disguised this to some extent by adding "padding." More on that in a bit.) Black was also more appropriate to the AT than the semi-military looking green. While I was painting all the bars, I also repainted the ammo-boxes black as well.

Note too that the molded in packs, and grenades have been hand painted using acrylic craft paints. Don't forget to paint the buckles in metallic or contrasting colors to add to the realism. You can't see it, but the seat back and molded in pedals have also been painted dark-brown. This doesn't require a lot of artistic ability, just a fine-brush and a steady hand. Pretty much I followed the molded in lines. It's a coloring-book in three dimensions.
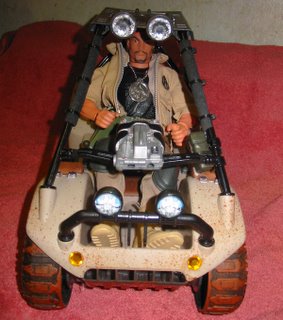


From this front angle, you can see one shortcoming of the Sand Rat that I didn't address, those wheels. They're simply hollow shells, open on the back. Getting some realistic wheels, perhaps salvaged from a smaller scale toy truck or construction vehicle would make a huge difference in appearance. But I haven't done this yet, and I'm not sure I will. I'm going for increased realism here, but not hyper-realism. For instance, where's the engine? There's literally almost no space here for an engine or fuel. A stickler would have fabricated an engine cover to go over that rear compartment, but I wanted to keep it available for cargo, or as a place for a second figure to stand.

In this and the previous picture, you can also see how I addressed the half-a-fire-extinguisher on the left (driver's left) of the roll cage. I simply found an ammo-belt-pack in the junk box that was about the size of the extinguisher, and attached it to the open back side using a small, black, wire-tie (sold in electronics and hardware stores).


From the back, you can see some other details I added. The tail-lights are replaced with glued-on colored stones, again from the craft store. The license plate is a plastic souvenir zipper-pull. These are sold in tourist spots across the country with hundreds of common names printed on them. I look for them when I travel, and always pick up a pare of "JOE" tags whenever I spot them. They look great glued on 1/6th vehicles. They really add some color and interest, with hardly any effort at all.

I also upgraded the exhaust pipes, by adding some bits of Aluminum tube purchased at a hardware store. I find that any place that you have a chance to use real, exposed, metal, it can really enhance a vehicle's realism. Bright, shiny surfaces are also nice interest-points. Look around a hardware store, looking at all the screws, nuts, brackets, screw-eyes, drawer pulls and other items, and you'll find lots of stuff that will work on your vehicles, as bumpers, trailer hitches, light-brackets, etc.

Finally, look around and see what interesting gear you can add to enhance the vehicle's mission. Considering this is a desert vehicle, it seemed natural to put a few canteens in the cargo trays on the side. I carefully chose a pair that had tan covers rather than the more common OD green, and that had the added advantage of some silver and black detail paint. More realism points, effectively for free, that wouldn't be gained by dumping molded mono-color canteens in there.

It's worth noting a few other improvements I've added as well. Though you can't see it in the pictures, the cargo well now has a black "floor mat" made simply out of thin craft foam. Craft form is sold in a variety of colors in any craft store, or in the craft section at Wal-Mart. It's cheap, versatile, and easy to work with (just cut it with scissors or a hobby knife). Often it will just stay where you put it (as in my floor-matt application), or you can glue it, or even buy a self-adhesive version with a peel-off backing. You can use this stuff as seat padding, floor mat's, linings for tool boxes, all kinds of things. I recommend keeping a variety of colors on hand, but especially black.

I had originally intended to do the roll-bar padding using craft-foam as well, but went with an alternate plan at the last minute. The padding is "mini-soaker hose," cheap stuff sold in garden departments for use in drip irrigation systems. I cut it to length with scissors, then cut a slit up one side of the hose. Then I spread it open at the slit, and snapped it over the open side of the roll-bar tubes. Finally, I fixed it in place using small, black, plastic wire-ties (see above). What's really nice about this is that it shows that black is not just black. The black of the painted roll bars, the black of the plastic wire-ties, and the black of the padding are completely different. This kind of contrast among things of similar color really adds to realism for some reason.


So, that's our conversion. Just for comparison, lets look at the finished result side-by-side with the mint-original. Looks better, doesn't it?


Of course, there's plenty more that could be done. Mount some science gear or a cargo rack on the roof. Paint the roof and body. Add some AT markings. Upgrade the wheels. Put in a rifle rack, or mount some kind of small seat to the rear bar for a standing passenger to lean on. Maybe even add working lights. That's the beauty of these projects. Anything you do will likely be an improvement, but there's really not limit to what you can do. All it takes is a little patience and imagination.

Saturday, January 07, 2006

Herbie Rides Again (smaller this time)


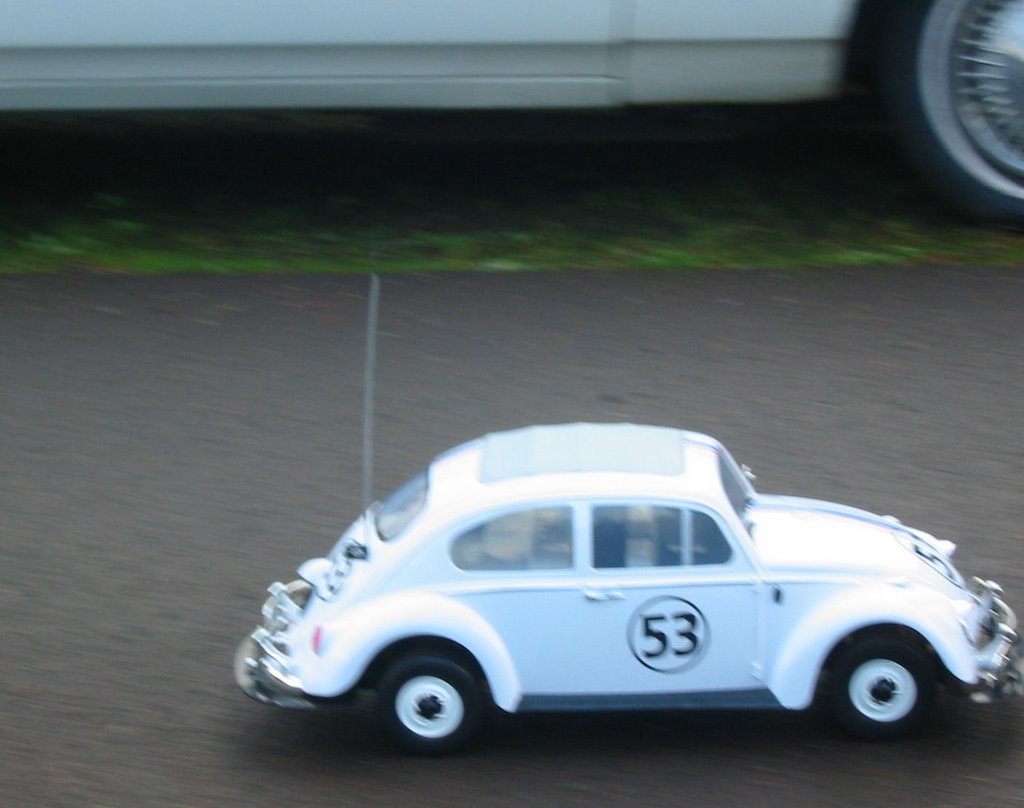
A big thanks out to my good friends Sean and Rose Prescott from Eugene, OR, who tracked down one of the elusive 1/6th scale "Herbie Fully Loaded" 1/6th scale, radio-control beetles. They shower up yesterday with our nifty new toy, and today we had a chance to take it out for a quick test drive. Here's a "road report" with lots of photos.

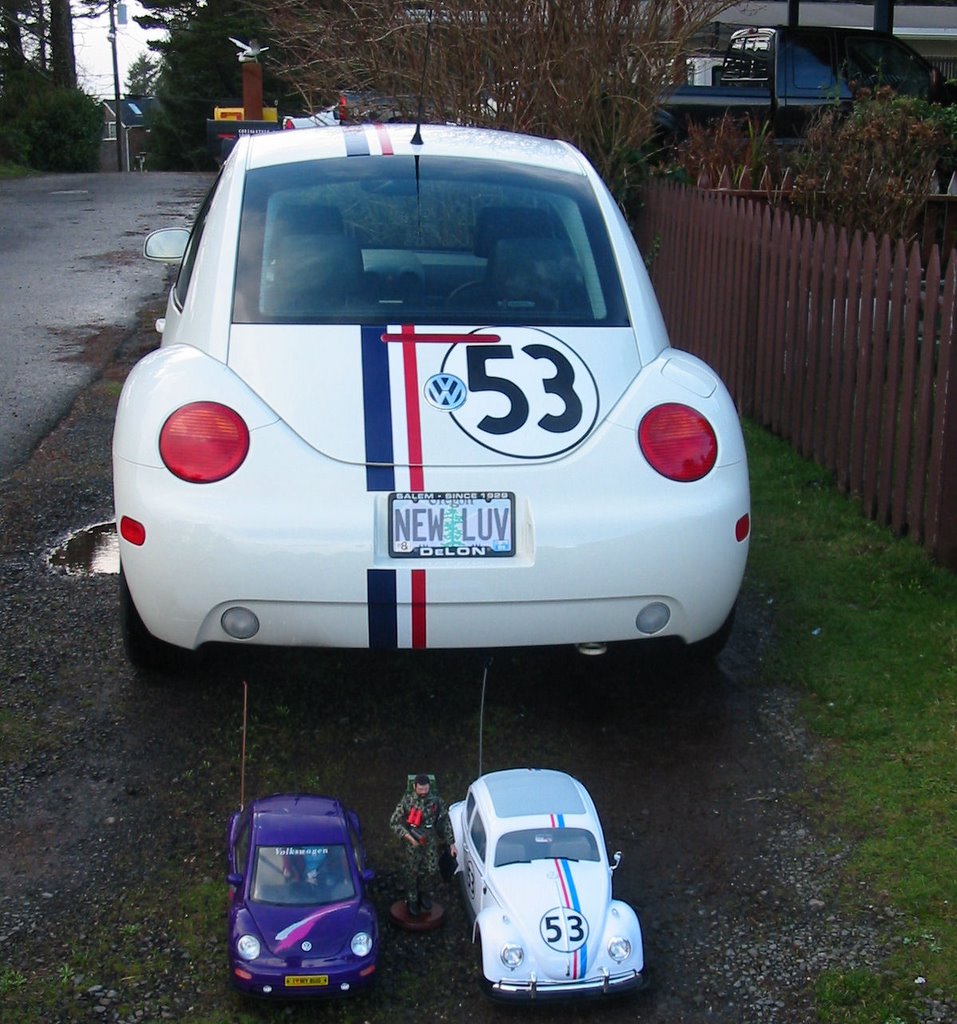
This first shot shows "Lil Herbie" with our 1:1 scale New Beetle Herbie. Also shown for comparison are a New Bright 1/6th scale RC New Beetle, and a Meijer's exclusive Adventure Team GI Joe (Joe sharing 60s icon status with Herbie). As you can see, it's been raining today (hey, it's winter on the Oregon coast) so the pavement in front of the house was wet. Keep that in mind while reading the driving reports.


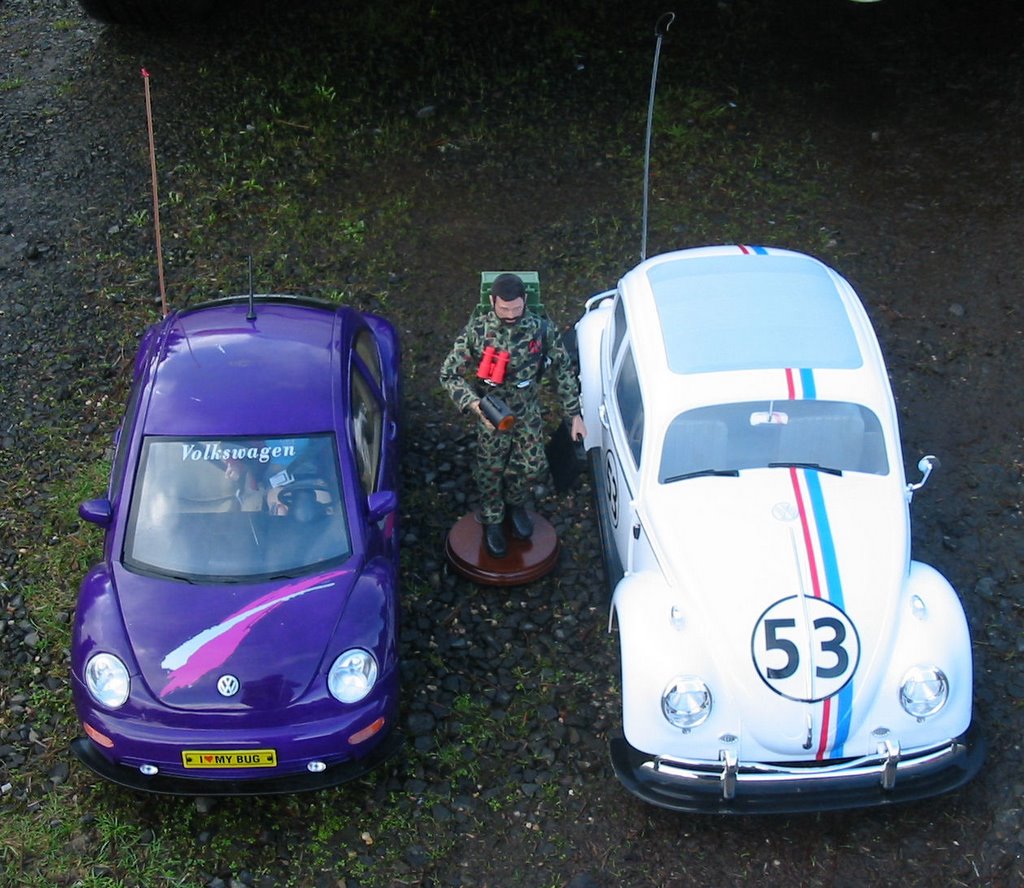
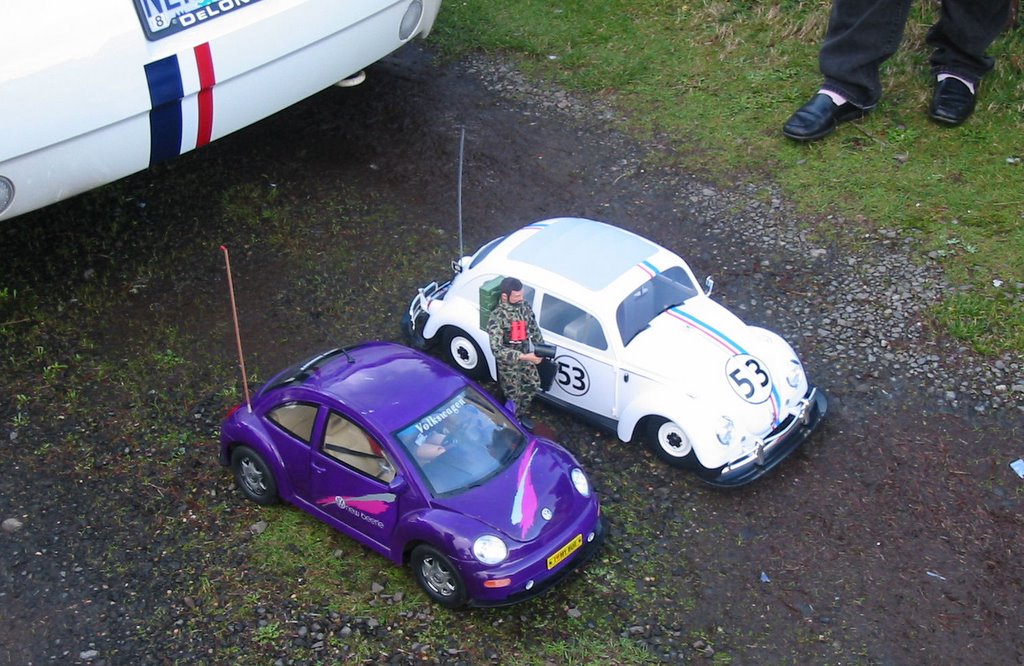
The first thing you'll notice is that although both vehicles are offered as "1/6th scale" the New Beetle is noticeably smaller than Herbie, even though the original Beetle is a smaller car.
The lesson here is that "1/6th" in this context has nothing to do with scale. "1/6th scale" is radio-controlled marking speak for "really big." Most things sold with that designation are under-sized, some vastly so. I suspect that the New Bright New Beetle is closer to proper scale than most so-called 1/6th vehicles.

So, while I haven't taken the measurements or done the math, I suspect that Herbie is actually larger than 1/6th scale. Maybe even 1/5th. You'll also notice that even through the New Bright vehicle is smaller, there's a Cy-Girl 1/6th action figure in the driver's seat. The doors on the New Beetle open (as do the hood and hatch), and there's room for two action figures or fashion dolls inside.

Not so for Herbie. The doors, trunk and engine cover are all molded shut, and as you'll see, there's no room inside for a figure anyway. Still, I do wish those doors opened. Still, if any car looked acceptable driving around with no driver, it's Herbie.

This higher angle gives you another point of comparison. Notice the rather delicate-looking scale bumpers, which are protected by a black "tray" bumper underneath. Given that a vehicle this size can build up a lot of momentum.

The scale side mirror is more of a worry. It looks rather fragile. Hopefully it's stronger than it looks, as the mirrors on these 1/6th vehicles can take quite a beating.

As a trade-off, those opening doors, hood, and hatch on the New Bright New Beetle are more fragile too, and sometimes pop open because of bumps and collisions. Herbie won't have that problem.

Here's a side comparison. It really is great to have any vintage Beetle, much less Herbie, offered in this large scale. The detail and realism of the exterior seem quite good, if not perfect. The white plastic has a slightly translucent look though, which reduces the realism a bit. Overall though, I'd give it a B+. The Herbie markings, by the way, are factory-applied stickers. Not as durable or realistic as if they'd been painted on, but not bad.

Note too that Herbie has stock VW tires and rims. No racing wheels or mods on this version.


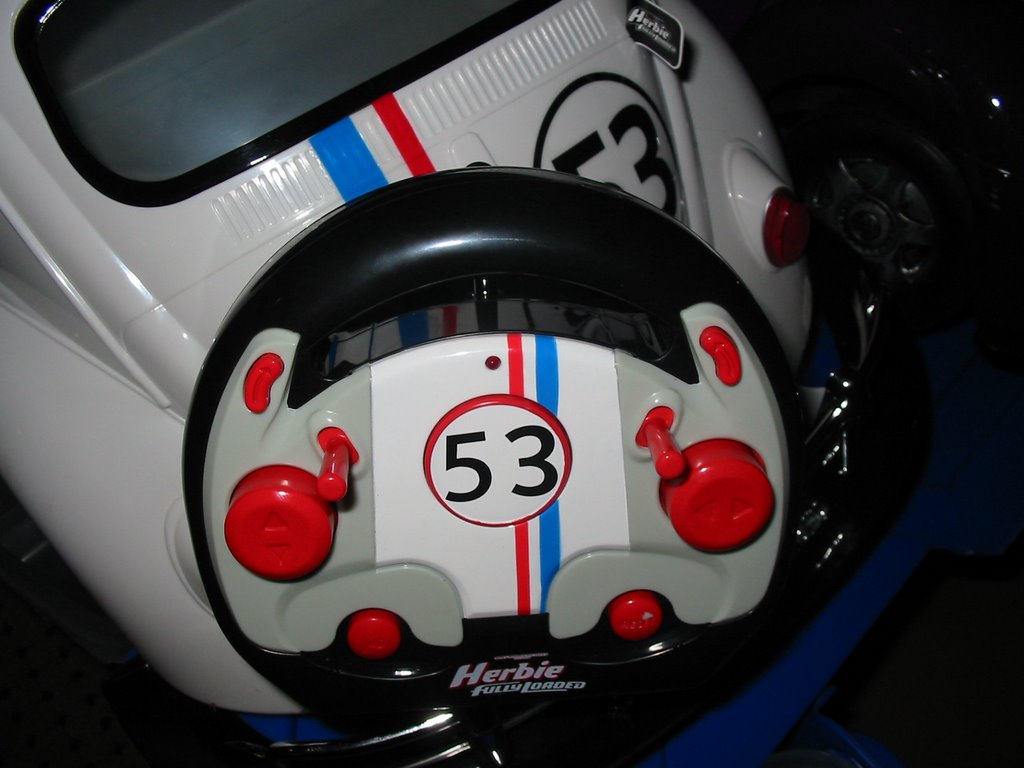
This is Herbie's uniquely-styled controller, which is a nice touch. Note that there are a lot of buttons and levers. Herbie has a lot of different functions, which appropriately give him a lot of personality.

What kind of additional features? Well, Herbie has low-rider style hydraulic shocks! The two buttons at the ten-and-two positions rock the body left and right. The two levers inboard of the buttons raise the front and rear of the body.

The two large "buttons" are actually the driving toggles. The left button rocks front and rear for forward and reverse. The other button rocks left and right for steering.

The lower left button is the engine start (with sound effects) and park (with flashing four-ways, which of course, an early 60s bug didn't have!). The headlights light when moving forward, and tail-lights light when backing up. Turn signals actually flash while you're turning! The New Bright New Beetle has lights too, but none of the flasher or signal functions. This is a neat addition.

The button on the lower right is "reset," and returns Herbie's suspension to the lowered position.

I found the "toggle button" driving controls to be awkward compared to the New Beetle's more conventional joysticks, or the wheel and trigger-throttle used on some other cars.

Herbie lived up to his racing roots, proving to be much faster than the New Beetle, though it lacked the torque to handle the occasional run off-road or into the grass. It really needs pavement, concrete, or hard floors to run on.

A pleasant surprise though, was that (on the damp pavement at least) it was easily capable of slides, skids, and boot-leg turns.

You can't really tell, but this is exactly what is happening in this photo. The back end has broken loose, and is whipping around while the front-end remains relatively fixed. This was a lot of fun, and one of the best aspects of the car. It was controllable enough that with practice, you could turn the car around in little more than it's length. I don't know, however, if this would work on dry pavement.

Power is by an included side-terminal 9.6v NiMH battery (included, with AC charger). While the amp-hour capacity is higher than the New Bright batteries (meaning it will last longer), they're otherwise interchangeable. The New Beetle can also run on a 9.6v NiCad battery with a wire pigtail connection, but Herbie doesn't have that option. Considering the longer running time and faster charging of the NiMH battery, this isn't a disadvantage unless you already have a lot of them hanging around.

One disadvantage of Herbie is that the battery is located under a cover on the bottom, closed with two screws. So a battery change means turning the car over, and having a Phillips screwdriver handy. The battery on the New Beetle is located inside the rear hatch, and is easily accessible.

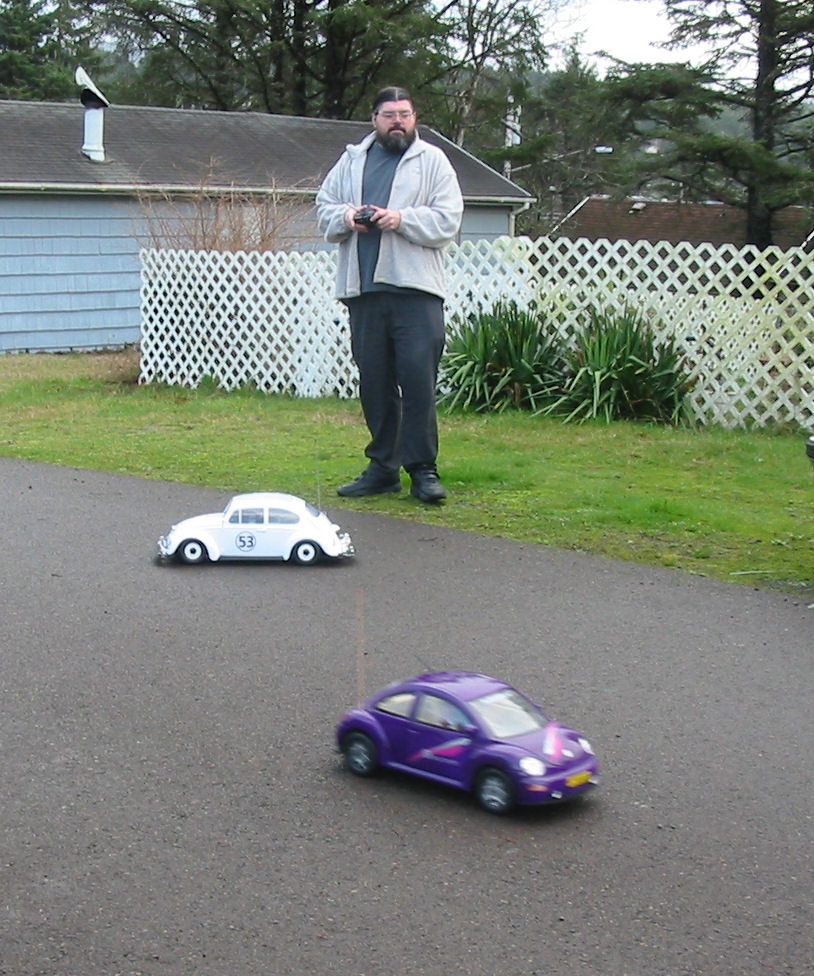
Here's a shot of me and RC Herbie, giving some sense of scale. However, if pays to remember that I'm 6' 6" and 300+ pounds. Herbie is larger than he may appear!

Note that I'm actually driving the New Beetle in this shot, not Herbie, which is why I seem to be paying attention to the wrong car. The purple New Beetle is 49mhz, and Herbie operates on 27mhz. Unfortunately, my other New Beetle and my New Bright H2 Hummer are all also 27mhz vehicles, so Herbie can only play with the purple New Beetle. Well, I suppose I could also use it with my 49mhz 21st Century Stuart tank, but that sounds kind of dangerous.

There is also a split-window VW bus offered as part of the Herbie Fully Loaded line. I'm assuming that vehicle operates on 49mhz for full Herbie compatibility.


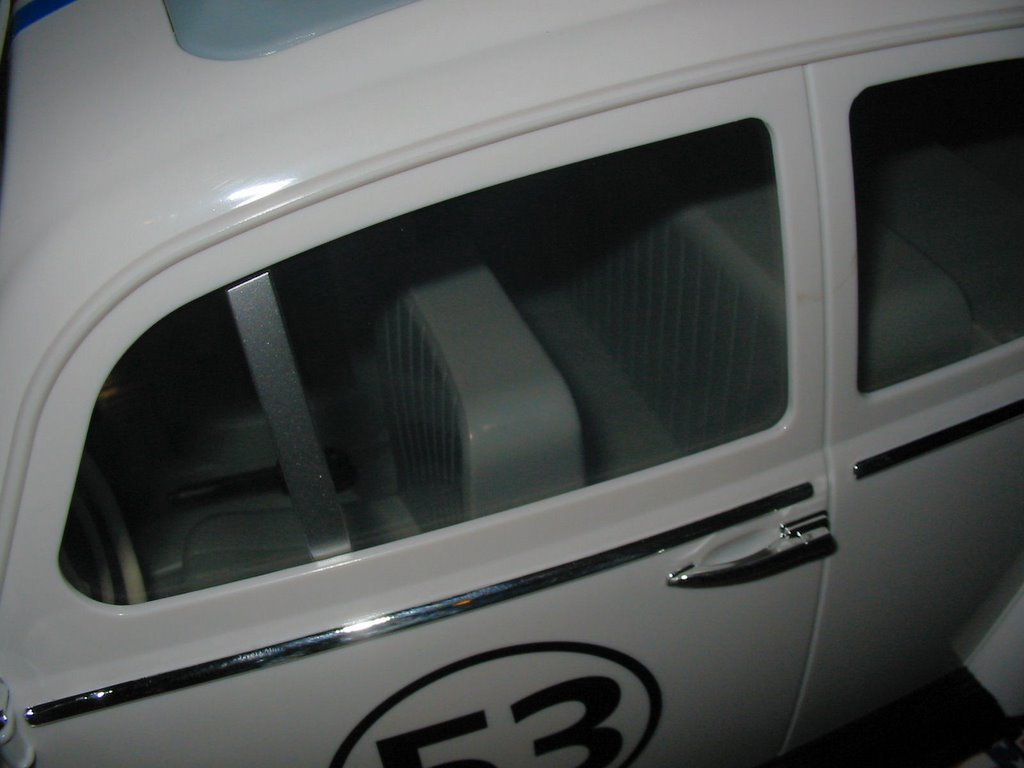
This shot gives you a glimpse into the interior, and you can see part of why a figure would never fit inside. The front seats are shifted far forward, and the back seat is little more than a narrow shelf in front of a mysteriously thick back. Behind the rear seat is a huge shelf, with a rectangular "swimming pool" depression that seems to serve no function at all.

For those still interested in trying to adapt the vehicle for use with figures, the "rag top" is a separate piece of plastic, attached inside with four screws. You could remove the body, remove those screws, and have an open roof beetle. But there's still the problem of the hugely distorted seats, and a firewall that extends almost straight down from the dash, offering no leg room. Since the motors for the front suspension are located right behind the firewall, there's no chance you could cut leg openings. It might be possible to put a legless driver figure into the seat through.
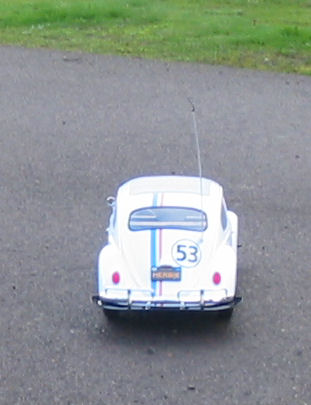
These not-very-good shots show Herbie from the rear. Note that there is no front license plate, and the rear plate reads "Herbie" rather than the proper Herbie license plate number, "OFP 875."

That wraps up this Herbie road-test. Overall, despite some flaws, I was overall very impressed with the vehicle and its driving characteristics. Thanks again to my friends Sean and Rose for delivering Herbie to me, and my wife Chris for asking them track it down (and writing the all-important check).