Friday, July 27, 2007

Comicon 1 Hasbro

(Lots of photos. Click on them for bigger versions.)

I'm currently in California working on a project and taking a few days to go to Comicon. Actually, two well seperated days, Thursday and Sunday. I've never been to a Comicon before, but this year we had other reasons to head south, and my wife Chris is up for the "Scribe" award for best young-adult media tie-in book of the year for her ALIAS novel, "A Touch of Death." So we decided to come down for the award ceremony (which is on Sunday) just in case she won.

I've never been to a Comicon before, so this was a way of putting our toes in the water, and learning enough to plan a full-on assault next year (or some future date, anyway).


Okay, if you've never been to a San Diego Comicon, you just can't comprehend how BIG this place it is, how many people are there, or how intense it is. I've been to five or six World Science Fiction Conventions, but they're a drop in the bucket compared to this. It isn't just the number of people, but the number of exibitors, the amount of stuff going on, the SIZE of the exibits, or the sheer volume of money, and stuff to be swapped for money, going around.

The above shot is looking the length of the exibit hall from pretty near the MIDDLE. There's almost as much stuff behind the camera as in front of it. This is looking south, towards the end of the hall where the major comic, toy, game, and media companies are located. Behind me are book publishers, comic dealers, toy dealers, swag dealers, cartoonists, and a zillion other things.


This is another shot looking across the floor. This place is geek heaven. It just feels like EVERY possible fannish thing you might possibly desire is out there somewhere. There are toys and statues of every description, clothing, jewelery, art, original comic pages, collector comics, magazines, books, hats, candy, you name it. The only problems: A, finding what you want, and B, finding enough money. Okay, there's also C, how the hell to get it out of there and carry it home. Parking is a huge problem (we parked at Qualcomm (sp?) statium and took a trolley the rest of the way to the convention center. Good for parking purposes, bad for hauling stuff. We only picked up three things, a "King Kong" 1/6th scale "V-Rex" skull (a steal at $15), one of the new-issue Perfect Body Females (Minions need women!), and a con-exclusive "vanishing cream" Bugs Bunny action figure. I had a cocktail thing with the Conan Properties folks that afternoon before leaving, so I didn't want to get too loaded down with stuff. I'll probably buy more on Sunday.


I didn't really see half the exibit floor, and of what I did see, we rushed past most of it. I did try to take a LITTLE time in a few key places, mainly the Hasbro and Sideshow booths. Sideshow was huge, with a ton of 1/6th stuff, with other goodies ranging from statues to full-sized prop replicas. I tried to photograph most of the 1/6th stuff, but I'm not going to try and post it yet. Maybe tomorrow. Maybe when I get home. But I am posting all the Hasbro stuff I have so far.


The GI Joe section was a pretty tiny part of a very large display. Transformers (note the large, fiberglass, Optimus Prime out front), Marvel, and other properties (most of which didn't interest me as much, if at all) got a lot more space.

There was at least a little 12" stuff on display. They had the Wal-Mart AT Joes lined up (which makes a pretty cool display), the Club member figure (which I already have, of course), and the box and a sea sled from the next convention set, photos below.


I don't know if the sea sled was vintage, a prototype, or the real production item, but it was sure clean and nice to see there. The box looks great. No giant veggie-clam on display yet. Sigh.


The rest of the Joe display was three double-sided glass cases. Sigma-6 and 12" shared one case. They had the S6 adventure sets on display, but I was disappointed the Joe Colton one with the vintage-style AT head was not on display.


Significantly, 3 3/4" stuff got two full cases. I don't know if they're making announcements about an RAH movie at this Comicon, but I would not be suprised.


If Joe, in all his forms, is in decline, then lets hope there is a movie. If it doesn't suck (and after Transformers, I don't think anybody isn't going to give it their best effort), then it could really give the brand a HUGE shot in the arm. Yeah, I'd rather see an Adventure Team movie, but if RAH will see the brand, GO JOE!


There was quite a bit of 12" Marvel rotocast on display (what Toy Biz called Marvel Icons, but the one box on display was marked Marvel Legends, just like the smaller figures). I've picked up a couple of these (Iron Man and Dr. Doom, plus I have all the 12" FF movie rotocasts) and I like them a lot. Some of these (like Thor) appear to be previously released figures, but there were several that were new to me.

Here you see Thor, Colossus (he IS colossal!) and Dark Phoenix. Good to see more female figures.


Here you have a brown and tan costume Wolverine (his best costume, IMHO short jeans and a brown leather jacket), Magneto (this didn't impress me as much as the others for some reason), and yellow costume "vintage" Daredevil.


Here we have red-costume Daredevil, Cyclops, Nightcrawler (I liked both the X-Men), Silver Surfer (I liked this one a lot, note his big, two-piece board for packaging purposes), regular Phoenix, and "flamed-on" human torch.


Another shot showing the packaging of a "flaming on" human torch variant, Daredevil and the two X-Men again.


Finally a shot of that whole shelf. Note the smaller 6" Legends figures on the shelf above for size comparison.


Finally, along with the Marvel license, Hasbro also has the license for the upcoming "Iron Man" movie, and they had a few actual props on display. Of most interest were a couple of very detailed prop boots. From the looks of them, these either represent part of Tony Stark's first prototype armor, or the under-construction interior of an incomplete suit. Either way, cool.


Sideshow photos (and anything else I take of interest on Sunday) to follow when I get time. Tomorrow busy, Sunday is Comicon again, and then two days to drive home and who knows how many to sleep this all off.

Saturday, June 16, 2007

New Star Trek Cover


Over on my writing blog I just posted the cover for my upcoming Star Trek the Next Generation ebook "Sea of Troubles," and the upcoming paperback reprint of our Star Trek Corps of Engineers ebook "Spin." See them here.

Tuesday, June 05, 2007

A Top for the Schwimmy


Yesterday at the thrift store I spotted one of these Land-Rover-like Bratz "Safari Cruiser" vehicles. It was missing some key parts (most notably the doors and windshield) but I didn't complain because it was only a $1.99! I figured that at this price I could scavenge a few parts and throw the rest away if I wanted. I was especially intrigued by the soft-top, and wondered if possibly I could adapt it to some other vehicle.

Once I got it hope, I carefully separated the top, which somebody at the store had helpfully attached with several complete wraps of clear packing tape. Looking around the room, my eye happened to fall on my AT-converted 21st Century Schwimmenwagen. I plopped the top on there, and to my amazement, it was a near perfect fit!


In these front views, it may look like the top hangs off the side, and in the back it does a bit, since the top is straight-sided and the side rails o the schwimmenwagen curve a bit, but I don't find it objectionable. Though it may appear to hang out a bit in the front too, the bottom rails of the top-frame are almost exactly the width and size of the schwimmy's side-rails at that point.

It sticks out a bit farther in the front than it really needs to (though having a sunshade over the windshield in the tropics is logical) and it looks wide, but that's mainly because the schwimmy windshield is so darned narrow. It isn't the width of the interior cabin space, which in turn is much narrower than the vehicle itself.


The top has a rigid plastic frame over which is stretched a removable fabric top with clear plastic windows. It is quite nicely done. The side and rear flaps are held down with plastic snaps, and can individually be opened and rolled up. Three tie-back straps with their own snaps are provided to hold the retracted flap.


The only real issue is how to attach it to the vehicle. Actually, it sits there pretty well, but it's easy to knock off. At the very least, some kind of positioning pins or tabs would be nice. I'm also planing to paint the frame black (it's currently dark green).

Of course, as you can see, the AT Schwimmy still doesn't have headlights or tail-lights. I plan to add operational ones with a slightly more modern look than the original, but I haven't worked out the best way to do that yet. I plan to use high brightness LEDs, but it's the housings that I can't quite work out. One of these days.


As for the Safari Cruiser, fear not that it will end up on the scrap-heap. Though it would certainly provide a load of cool parts, once I got the top off, I realized that without the doors it reminded me of the Mini Mokes that were used as Village taxis in the classic TV series, The Prisoner. That caused me to take a liking to it, and I decided that it may become yet another Minions at Work vehicle to go with the two golf-cart-style Minionmobiles.

Saturday, April 14, 2007

My solution to the RC Yamaha Rhino head-room problem


A lot of people earlier this year were lucky enough to pick up radio controlled Yamaha Rhino utility ATVs that Wal-Mart had clearanced out at fire-sale prices (I got mine for $25, but I've heard of them going as low as $15).

This is very close to being a 1/6th vehicle, but the head room allowed under the roll bar makes getting a figure in there a tiqht squeeze. To fit, a figure needs to be short and well articulated (like an SA-body GI Joe). Taller figures, or with legs that aren't as flexible, or that had large head-gear just didn't fit.

There have been many solutions to this. Some people have removed the top cross-bar completely, or removed it to the rear, or raised the entire cage. Well, here's my solution, using hardware taken from a "Steel Tec" building set that I got at a thrift store for just a few bucks. Steel Tec sets and collections of parts often go for cheap on EBay (shop wisely, and you'll spend more shipping it than buying it) and all those little brackets and beams are great for work on 1/6th vehicles.


I used a couple of triangular brackets which raise the bar a little in the front, and a lot in the back. I think this configuration blends in well, and allows more head room while still preventing an un-belted figure from flying out of the vehicle during violent maneuvers. I had to drill out the side bars of the roll cage to take the larger Steel Tec screws, and I had to use my drill to slightly elongate the rear hold in the bracket to line up with the spacing of the existing screw locations in the side bar (find some small nuts and bolts, and you might avoid both steps, but I used what I had at hand).

The figure in the vehicle is one of my Minions, which is based on a G3 Power Team figure (tall body with a big head) and has a bulky combat helmet, making him pretty close to a worst-case for me. He fits just fine, so this can double as a Mk 2 Minionmobile.

Oh, and that's our cat Sydney. She seems to think she needs to be in every picture we take around here. Well, here she is in another one.

Saturday, March 10, 2007

What ever happened to Angry Joe Day?


Well, March 1st has come and gone, and no Angry Joe Day this year. It's a little bit of a bummer that there's no photo contest this year, but frankly, I'm just not that angry about Joe at the moment. First, we have some great Adventure Team figures from the GI Joe Collector's club, last year's member "Foreign Adventurer," and this year's new arctic figure. Then there are the exclusive KFG figures from Hot Topic and Urban Outfitters. The new 9" Adventure Team figures from Hasbro look disappointing, but perhaps there will be something to salvage from the line. So that situation isn't wonderful, but it's a lot less dark than two years ago when I started this blog.

I'm not saying Angry Joe Day is gone. It could come back if the situation goes the wrong way. But I really don't feel like doing a "Grumpy Joe Day" just yet, so I'm taking a "wait and see" attitude...

Tuesday, February 06, 2007

Houston, we have winner.


We're going to stray from our 1/6th mantra today.

Besides GI Joe and other 12" action figures like the Marx Mike Hazard and Captain Action, one of my favorite toys as a kid was Major Matt Mason. For those who aren't familiar with Matt's short but glorious run, he was a 6" bendy astronaut with removable helmet. The figure was fine, but what made the line so great were Matt's huge range of accessories, from nifty bubble-carded playsets to huge battery operated Moon vehicles, a working space glider, and the grandaddy of the line, a three level "space station" that stood several feet tall. He also had a number of astronaut friends (including an early black action figure, though GI Joe apparently had the first), and several aliens.

I've got a more-or-less complete space station in my collection, a space crawler, a few replica figures and a few smaller accessories, but this stuff is spendier and harder to come by than GI Joe stuff, so I've never tried to amass a full collection. But I do follow several discussion lists for MMM collectors, and there's always discussion about Mattel reviving the Matt Mason line in some form, either as a replica of the original toy, as a new toy line, or both.

Of course, with old-time collectors the sentiment is on a new bendy toy. And while that's possible for a nostalgia replica, I doubt it would happen with a new toy line. (Given modern safety laws, it might even be impossible for it to happen.) On the other hand, people seem opposed to the idea of a hard-plastic figure. Maybe one feeling is that it won't be realistic enough, or more probably, that it will lack articulation.

Well, in that department, I think the original Matt is somewhat overrated. His waist, wrists, and ankles didn't bend (though the ability to twist the leg somewhat compensated for the last), and his "bellows" knee, elbow, shoulder and hip joints couldn't hold a tight bend very well. He couldn't sit well, or bend well, or do much of anything well but stand there with limited bending of his arms.

The original had other problems as well. Those wires always broke eventually, and they could break sooner if the figure was dropped or flexed too hard. The rubber had a tendency to "melt" in the hard plastic of his accessories (try finding a space station seat without melt marks), and his paint peeled off.

Fortunately, modern toy designers have other options, and I think nothing illustrates this better than the above pictured figure. Surprisingly, it's from the second series of Fantastic Four movie figures. It's the "Astronaut Ben Grimm" figure. (You can click on all these pictures for a closer look).


Like Major Matt Mason, this is a roughly 6" astronaut figure. Like Matt, the design is closely based on real space suit designs (this closely resembles hard suits planned for future Mars and Moon missions) and seems to include the rear-entry hatch design used in current Russian suits). But there, the comparison ends.

This is a hard plastic figure, and unlike MMM, this faithfully represents the bulky look of actual EVA space suits from Apollo forward. As such, you'd think the articulation on this figure would be very limited. You'd be wrong.


This guy is very limber. He has ball and socket joints at hips and shoulders with a large range of movement. The knees are double jointed so the legs can bend almost double. The elbows only bend about 90 degrees, but that's probably as good as Matt could do, and he also has a hinged wrist (no rotation, unfortunately, though there's no reason a similar figure couldn't have this designed in), and hinged fingers for grasping. His waist swivels, and his feet not only bend back and forth, but have hinged toes for kneeling, and swivel from side to side to allow him to stand flat-footed in a variety of poses or on irregular terrain.


In addition, there are also rotary cut joints at the upper arms and legs, giving him even more flexibility. He can be posed walking. He can kneel. He can jump. He can dance. He can float He can sit, though not bolt upright with his knees close together. His poses are very natural and life-like, not stiff and robotic.

He can touch the top of his helmet, and hold things in front of his faceplate.

Heck, he can even scratch his butt (those space diapers they have to wear are itchy!).

With all this, he still has an "action feature" built in. Press the button on his backpack, and his head spins around in his helmet, changing from a human face ("look, it's that guy from 'The Shield!'") to a rocky "Thing" face. Of course the action feature means his helmet and backpack aren't removable, nor can the head turn in the conventional way. But these features could certainly be built into a purpose-built modern astronaut figure.

With all this, Astronaut Grimm seems to be a solid, sturdy, playable toy that I wouldn't hesitate to give to a younger child.

If you like space toys, this little baby belongs in your collection, even if it is (no pun intended) a stand-alone piece. These came out a long while back, but I've seen them in KB Liquidator stores not to long ago, and given the wide distribution of the FF toys, you never know what drug store of Big Lots might have one of these warming the pegs.

But the bigger point is, it is possible to do a good astronaut figure using modern hard-plastic construction, one that would be a worthy heir to our beloved bendy Matt.

Thursday, February 01, 2007

How Big is your Image File?

Okay, not intended to be a personal question. Over on one of the Yahoogroups I frequent, Power Team, there's been a discussion related to the groups filled-up photo albums, and what to do about it. I made the statement that most people don't care to learn the technicalities of managing the size of their image files. Somebody called me on it, so here I am, giving you a chance to learn a little more about this esoteric subject, if you're interested.

Fact is, the issue of image sizes is often counter-intuitive. We're used to "megapixels" as marketing speak, but most of us have very little idea how images are stored in our cameras (and in turn on our computers), or why a picture from one 6-megapixel camera can look much better than another 6-megapixel camera.

Okay, I don't intend to get side-tracked into a camera discussion, but if you follow and understand what I tell you here, it does apply to your camera and may help you better understand how to use its features.

I'll try to keep things simple and non-technical, and that means (for you techheads out there) that I may make some simplifications and generalizations about things. Just relax and cut me some slack. If what I say here isn't always absolutely true, most of the time it's true enough.

As I said, the number of pixels that a camera can detect doesn't always translate into a better image. Likewise, two images on your computer of the same absolute size (say 800 pixels wide, and 600 pixels tall) may have much different file sizes. In both cases, the major issue is something called file compression.

Okay, you've probably noticed in one way or another that image files take up a lot of memory (space on your camera's memory card, space on your hard disk, and so on). What you maybe don't know is that it could be much worse. Almost every image on your computer and in your camera uses some form of compression to make it smaller than it would be otherwise.

What is an image file?
To understand how an image file is compressed, you need to understand first what an image file is.

I used the word "pixel" back there and took it for granted that you'd know what I was talking about, but I'm not sure that's a safe assumption. In general terms, a pixel is a dot. Each dot has characteristics of color and brightness that are recorded in digital form (those ones and zeros you keep hearing about, which can be ignored for our purposes) on your camera or computer. Depending on the type of file and the options chosen, various amounts of information can be stored for each pixel.

The simplest kind of image just has two conditions for the pixel, on (white for instance) and off (which could represent black). But in this day and age, it's rare to see an image that doesn't have color. Some images have just a few colors available. Most photos have a LOT.

Think of it as box of crayons. If you have a box of eight crayons, you're pretty limited in how realistic a picture you can draw. If you have 256 crayons, you'd be able to draw a better picture. Well, many of the images you have on your computer have tens of thousands of crayons to chose from, and most images will use a fair percentage of those. The more crayons you've got, the more information has to be recorded to show which crayon is used to draw any given pixel.

So in basic terms, an image file is something like this.

Pixel 1 (Starting in the upper left hand corner): Pixel 1 is color 11,320 from our box of about 32,000.

Pixel 2 (the next pixel in the top row, but one to the right of pixel 1): Pixel 2 is color 11,321 from our box of about 32,000.

And so on, repeated (in our 800 x 600 example image) 800 times, until we skip down to the left of the second row, and repeat, the whole process repeating 600 times until you reach the bottom right of the picture.

So in a raw, uncompressed file, file size is pretty simple. It's the amount of space each pixel takes up multiplied by the number of pixels. Two pictures of the same size will be the same size, no matter if one is of a blank, white, wall, and the other is of a forest. That's simple, but it's wasteful of storage space, and as I said, image files are inconveniently large. Anything we can do to make them smaller is a good thing. But how do you make the file smaller, without making the image itself smaller?

Squeezing it Down
The funny thing about pictures is that, while a picture may have a lot of pixels, in many images a lot of those pixels are in patches that are exactly the same, and if they aren't the same, they're darned similar. For example, image a picture of your favorite GI Joe sitting on a table outside. Below him is grass and other "ground clutter," but behind him is a clear, blue sky.

Imagine looking at a pixel in the middle of that sky. Let's just call it's color, "blue." Maybe the next pixel to the left is the same blue, and the one beyond that just a TINY bit lighter blue, and the next beyond that back to the original blue again. In fact, you could go a fair distance in any direction from our pixel, and no be able to find a color that was much different than that original pixel.

Sure, some of them are different, but most are so close that they're difficult or impossible to tell apart with the naked eye. If you can't tell them apart, then the computer (or camera) is wasting a lot of space storing information that really doesn't serve much of any purpose. A computer (or the software built into a camera) could look at those similar colors and decide they were too close to tell apart, and set them all to one, average color.

Having turned a bunch of almost identical colors into really identical colors, imagine that, instead of storing "pixel 1, pixel 2, pixel 3" we could instead store "starting 100 pixels from the left and 120 pixels down there's a rectangle. It's 150 pixes tall and 500 pixels wide, and all those pixels are color 11,320 of around 32,000, AKA 'blue.'" We just defined 50,000 color pixels with one sentence. In computer terms, we just saved a butt-load of storage space.

Okay, now imagine the software takes your entire picture and divides it into a whole bunch of rectangles, and defines each one in the same way. Some of those rectangles, say a piece of blue sky, or a white-washed wall, or the big yellow side of the Mobile Support Vehicle may be pretty large, and defining them will save a ton of space.

But other rectangles will be smaller, say the skin on a cheek between the eye and the crease around somebodies mouth, or the middle part of an orange on a table, or the white in a little patch of cloud floating in that blue sky. Defining those areas will still save space, but not nearly so much. It may take just as much storage space to define an area 10 x 50 pixels as it does for one 100 x 500. Some places on the image, in a bed of gravel, or a patch of grass, or in the leaves of a tree, or in uncle jack's herringbone sports-jacket, the rectangles may get so small that it isn't worth making them at all. You'll do just as well to record the individual pixels.
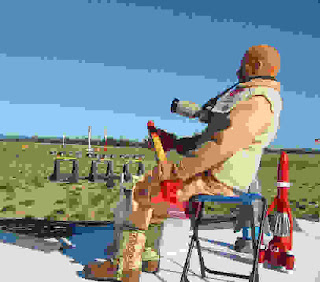


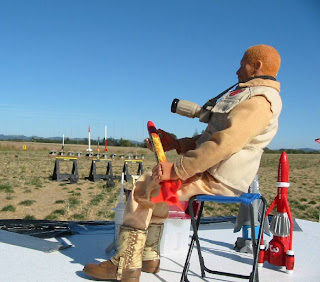
It's easier to see how this works if you look at an image that's been over-compressed to the point of looking "jaggy." Like this one. You might want to click on it for a closer look. Notice that a blue sky isn't just ONE shade of blue. There may be hundreds of shades in the original image. But maybe you can turn it into ten or twenty shades, and your eye usually won't notice. Even in our super-compressed example here, there are still four bands of different blue in the sky, but obviously you do notice.

Notice the smaller blocky areas of the same color, the parts of his uniform, the table he's sitting on. Then look at the really "noisy" parts of the image, the grass, his his detailed boots, the rocket launch pads in the background. Of the total image size here, very little of it is that blue sky, or the white table top. Most of it is in those "dirty" areas. Life is in the details. So is file size.

Most cameras, and most photo editing programs on your computer will somewhere have options on how aggressively to compress images. More compression lowers quality, until you eventually get the "paint-by-numbers" mess you see above, but less compression means bigger file sizes. There's a happy sweet spot somewhere that you can live with. Generally, I go for less compression on the camera, but more compression when I save things for uploading from my photo-editing software (Paint Shop Pro, in my case). As long as you keep the original, high-quality images from your camera, you can then create all the cropped and compressed copies you need. The original is still there if you ever need it.


Dirty Details

So compact image sizes start in what you're taking pictures of. That doesn't mean you should never take a picture with grass or a tree (or your rough concrete driveway, or your hardwood floor). If that's part of what your picture is about, then do it. It's hard for the Adventure Team to have a jungle adventure without the jungle, for example.

But if, on the other hand, you're taking a picture of something to sell on EBay, you may not want to photograph it against you pin-striped sheets or sitting on top of your jelly-bean collection, because that isn't what the picture is about. All that clutter in the background is just wasted file space.

Bringing in the Crops
One easy way to reduce the file size of images before you upload them is to crop unnecessary stuff from the edges. Figure out what the picture is about, and cut off the rest. Yes, a well composed image is going to leave some open space around the subject, but when in doubt, crop.

The point here is not just to make the dimensions of the image smaller, though you'll probably do that. The point is that often the most "noisy" parts of an image (and thus the hardest to compress) are on the edges. For instance, in a picture of an action figures standing in the back yard, do you really need all that grass on the bottom of the picture? It's kind of a law of nature. Gravity pulls clutter down to the bottom of the picture. Nature grows it up on the edges (plants, trees, mountains), and the atmosphere sometimes tosses it in at the top (clouds). The action figure or vehicle in the middle of the picture may be the easiest thing in the frame to compress. Cut off ten percent of the grass at the bottom, and you cut off thirty percent of the file size.

Size Does Still Matter
I said that image size was not the biggest consideration to file size, but it is still a consideration. Just because your camera can record 5 megapixels doesn't mean you necessarily need to share them all with the world. In fact, if the intent is for people to look at it on their screen, the vast majority of that information is just going to be wasted.

If you learn nothing else, learn how to use your photo editing software to resize your images. Remember that you'll probably want to save the reduced-size image as a separate file, and keep your camera original untouched. Once you lose that information by saving a downsized image, you can't get it back. Yes, your paint program can resize the smaller image back to the original size, but it will end up looking like our blocky example about, and not your beautiful original.

How big should your images be? Well, probably no bigger than your average viewer's screen, and probably not even that. Remember that most web browsers clutter up the screen with scroll bars, menu bars, and so on. You just get the smaller space left in the middle. I'd say that 800 x 600 is a good "big" image size, and that many images can be much smaller. Remember that if you've cropped your image as I said, many will be tall and skinny, and some will be short and wide. Just resize it so that the width is no more than about 800, and the height no more than about 600, and you're pretty safe. Much larger than that is wasted on most people's screens, unless you think they'll need to be able to zoom in to view details for some reason (as might be the case in a "how-to" illustration, for example).

Reducing the size of the image, even a little, can be more important than you think. The information that makes up an image grows much faster than the linear dimensions do. For example, a raw 500x400 image doesn't have twice as much information in at as one 250 by 200, it has four times as much. A 1000 x 800 image has 16 times as much information as one 250 x 200, and so on. Compression can offset that to some extent, and usually does, but when you can, smaller is better.

When creating web pages, a common mistake is to confuse options in your web editing software that set display sizes for actually resizing the image. That is to say, somebody will upload a 5 megapixel camera image to their web site, and then tell their web-page editor to display it as a 100 x 200 pixel image on the user's screen. But they're still storing the full 5 megapixel image on their site, and every user who views the site his to download that huge file (with the bandwidth use that goes with it), even though it only displays as a tiny picture on their computer.

Always resize the image using a photo editor program to the final size, then upload that file to your web page.


Goes Down Smooth (for advanced users)

One other trick to reduce image file sizes is to remove some of the random noise that appears in images. Some of this noise can come from "grain" in the image. Noise like that can turn an empty sky or a solid color wall into a compression nightmare, but not add much of anything to the image. Likewise, all those pores and tiny wrinkles in your portrait are not only making you look old before your time, they're also making the image file way bigger.

One way to reduce this noise is simply to soften or blur the images, like when old Hollywood movies used soft-focus lenses to make aging actresses look better in close-ups. You can try this (usually using editing functions in your photo-editing software, not by changing camera focus), and there are sometime reasons to do it, but often this is throwing the baby out with the bath-water. You not only blur the solid areas of the image, but the lines and borders that separate them.

Some photo-editing programs have ways around this. For example, Paint Shop Pro has a function called an "edge preserving smooth." This effectively blurs the solid areas of an image that may contain useless noise, while keeping the lines and edges crisp and solid. It can take out your wrinkles and pores without turning your nose into a blob or your eyes into smudges. It can smooth the sand on a beach but still leave the ocean horizon a razor-sharp line.

The more creative among you may want to consider more labor-intensive methods, manually retouching parts of a picture, or selecting areas to blur or soften, but that's beyond the scope of the casual user making an average picture for upload.

As Big as it Needs to Be
Just remember that your images, and your image files, should be just as large as they need to be to show your subject and deliver your message, and no more. Beyond that, trim the fat. Cut clutter off the edges of the image. Resize the images to be just a big as it needs to be, and no larger. Consider reducing noise and clutter that add nothing to your picture. Set your compression settings enough to reduce the size of your files without detracting from your delivered image.

Doing these things will save disk space, cut upload times, cut download times, reduce bandwidth charges, and make your web pages load faster. They'll make both you, and the people viewing your images, happier, and what's not to like about that?

Saturday, January 20, 2007

A Fossil T-Rex for the Adventure Team


I've been so involved with the Minions lately, that I haven't had much time for my old friends the GI Joe Adventure Team. But today, while picking up a bag of cat food at Petco, I spotted this great T-Rex fossil skull in the aquarium department, and had to have it. I love 1/6th "artifacts" for the Adventure Team to dig up and bring back to the Adventure Team headquarters for display, and this is a doozie.

I always thought that Hasbro missed a bet not making AT "Dinosaur Hunter" figure sets, each of which would include a fossil skull or skeleton accessory for a kid to dig out of the sandbox. This gives you a pretty good idea of what I had in mind, though a toy version would obviously be made of lighter and more durable materials.


The skull is made of hard resin (heavy!) and has an air hose on the back that I'll cut off (even the tag is still attached in this photo). The top of the skull is hinged (so it can open and close as it fills with air). Price was about $10, and money well spent. Actually, big as it is, it STILL isn't full scale for an adult T-Rex skull, but I figure it's close enough.

It looks pretty good in the greenish-gray paint it came with, but I'm at least going to use some acrylic paint to darken the eye sockets, nostrils, and other openings in the skull. I'll post some more photos when I get around to it.

Monday, January 15, 2007

1/6th working engine hoist


I picked up this nifty cast-aluminum engine hoist with working hydralics at a Harbor Freight store. I've never seen it in their catalog or web page(though they have listed the 1/6th jack stands, mini-floor jack and 1/5th tool cart). I think it cost me about $15, which was shockingly cheap (the floor jack is closer to $30). It didn't come with a hook. Instead, there's a metal weight shaped like a tiny engine. I used some hardware store chain and an "S" hook from the same source to hook up my Lincoln Mint 1/6th Ford V-8. Seen here with a GI Joe Collector's Club "Foreign Adventurer" for scale.

Wednesday, January 10, 2007

Amazing 1/5th Scale Ferrari 250GTO


Been a while since I posted here. When I've had a few moments of Joe-time lately, I've been pretty busy with my weekly 1/6th photo-comic Minons at Work. If you haven't visited for a while, check it out. New cartoons every week, and we just opened a Cafe Press shop so you can buy Minions at Work shirts, mugs, and other gear.

But I just had a hole open up in my schedule, allowing me a little time to catch up some things. Last year we made a stop in Las Vegas and I got to do a little sight-seeing. While wandering through the Grand Canal shopping area of the Venetian Casino and Resort, I spotted this incredible near-Joe-sized Ferrari in a shop window and took a couple shots. It was late at night, and the shop was closed (things DO close in Las Vegas, despite what they tell you) so I couldn't see the price tag or description. My best guess based on the level of detail and craftsmanship was "if you have to ask, you can't afford it." From what I've been able to find out, that's close. Here are some more details here. 3,600 Euros folks, shipping NOT included. Still, it was cool to see.

Wednesday, August 23, 2006

Making an easy weapon-rack


Maybe you've seen those cool grid-type weapon racks in 1/1 size. If nothing else, you might have seen them in the ballistics lab set on CSI: Las Vegas. I've always liked those, and I even think that somebody (BBi or Hot Toyz maybe?) made a 1/6th version, but somehow I never ended up with one.

Now maybe you've heard about the concept of a "one-sixth eye." It developing the sense of looking at everything you see as a potential 1/6th prop, and evaluating it accordingly. The other day I was in my local Ace Hardware store looking around (while fending the over-helpful sales people off with a stick, as usual) when I spotted something in the paint department that sent my One-Sixth-O-Meter right to stop.

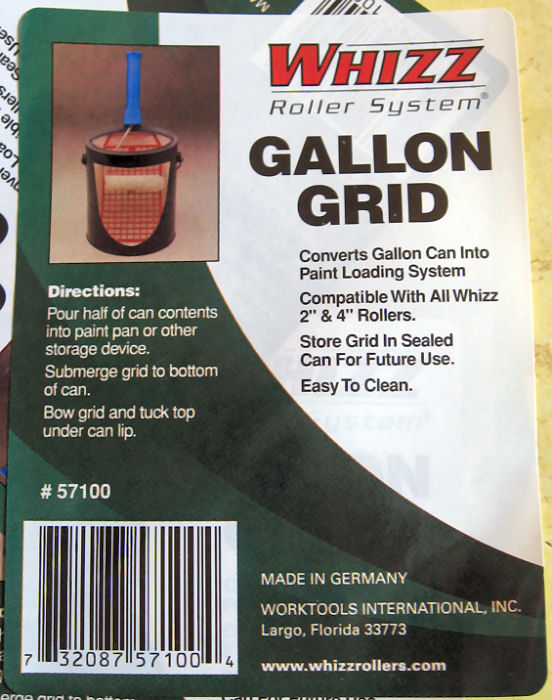
It was a cool little plastic grid molded in off-white speckled plastic, part of some sort of fancy roller system, the Whizz Roller System It wasn't even in a package. It was just a plastic grid with a sticker on it, hanging on a peg. Price: 99 cents. At first I couldn't be sure what it was good for, but I knew there would be something I could do with it. I almost bought just one, but on impulse, I picked up all four that they had in stock.

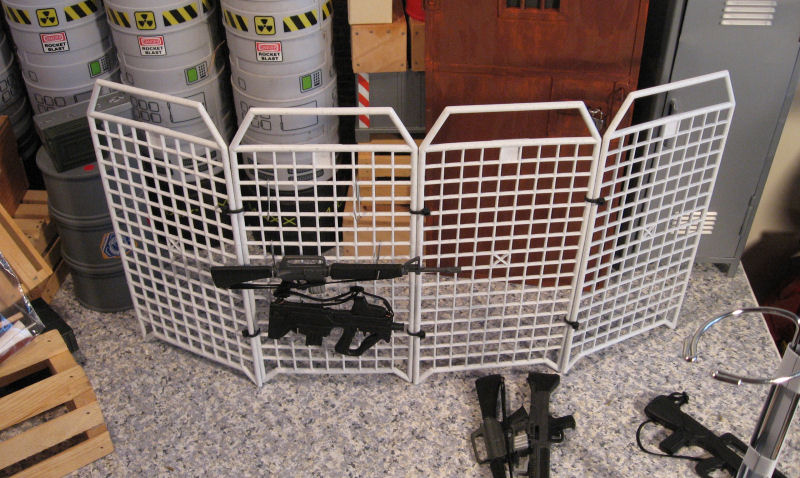
It didn't take me long to realize that they'd be interesting attached together edge-to-edge. I looked around for an easy way to do that, and ended up settling on small, black-plastic wire-ties that I already had on hand. I used two along each edge, pulled tight, and cut the excess off with scissors.

By now, I was starting to think weapon rack. My intent was to make a free-standing, four-sided rack, but for maximum flexibility as a prop, and for easy storage, I didn't tie the final corner together. That way, it could be folded into a square footprint, fanned out as a screen-type rack, or even be used as a safety or crowd-control fence.

The next issue was how to make hooks to hang weapons on the rack. Whatever I did had to be cheap and easy to mass produce. After several dead-end ideas, I settled on using light-duty, wire, paper clips. I used the inner loop of the clip intact, bent the larger loop out about 45-degrees, then cut it off (using wire cutting pliers) leaving about a half-inch stub, I then bent up the last eight of an inch or so using pliers, to make it more of a secure hook.

The small loop from the clip goes over the grid. The weapon itself hangs on the cut-off stub. (It occurs to me that another alternative that might work would be to use wire Christmas ornament hooks, and they'd probably work unmodified)


Here's the final result, with only a few weapons installed on one side. This would look equally at home in the firearms locker for an assault team, in a ballistics lab, a police property room, or an arms-dealer's show-room.

Friday, July 28, 2006

Tree how-to follow-up

I was gratified, and maybe a little surprised at all the positive feedback in email and many forums, you're only seeing a tiny fraction of it here) I've gotten on the "make a tree" post. Given all the quick-and-dirty set and prop building I'm doing for "Minions," you'll probably see more in the future. Please let me know what particular things you'd like to see, and what you like (or don't) about the posts I do make.

As always thanks for reading! (And viewing!)